Difference between revisions of "Documentation/Writer for Students/Unnumbered first pages"
| Line 5: | Line 5: | ||
|PrevPage=Documentation/Writer for Students/MS-Word | |PrevPage=Documentation/Writer for Students/MS-Word | ||
|NextPage=Documentation/Writer for Students/Formatting Title Page | |NextPage=Documentation/Writer for Students/Formatting Title Page | ||
| − | |||
}}__NOTOC__ | }}__NOTOC__ | ||
| − | |||
You will surely want your text pages to be numbered starting with number 1, whereas the title page should be neither numbered nor | You will surely want your text pages to be numbered starting with number 1, whereas the title page should be neither numbered nor | ||
| − | |||
counted. You might even want a second non-numbered and non-counted page for your table of contents.* So you will need ''two'' page styles, one for the '''First Page(s)''' and one for the rest. | counted. You might even want a second non-numbered and non-counted page for your table of contents.* So you will need ''two'' page styles, one for the '''First Page(s)''' and one for the rest. | ||
| + | |||
Step by step: | Step by step: | ||
* go to menu '''Format › Styles and Formatting (F11)''' | * go to menu '''Format › Styles and Formatting (F11)''' | ||
| Line 25: | Line 23: | ||
* having thus ''prepared'' these two page styles now place the cursor in your very first page of your document, i.e. the title page, and double-click the style '''First page''' in your list of '''Page Styles''' in order to actually ''apply'' it to your first page and the following pages (this demonstrates styles that need to be applied with a double-click – ''changing'' a style doesn’t mean you’re necessarily actually going to ''use'' it) | * having thus ''prepared'' these two page styles now place the cursor in your very first page of your document, i.e. the title page, and double-click the style '''First page''' in your list of '''Page Styles''' in order to actually ''apply'' it to your first page and the following pages (this demonstrates styles that need to be applied with a double-click – ''changing'' a style doesn’t mean you’re necessarily actually going to ''use'' it) | ||
* place your cursor at the very bottom of your title page and insert a new page to later fit your table of contents using '''Ctrl + Return'''; this new page will automatically also be in style '''First page''' | * place your cursor at the very bottom of your title page and insert a new page to later fit your table of contents using '''Ctrl + Return'''; this new page will automatically also be in style '''First page''' | ||
| − | * with your cursor placed on this second '''First Page''' insert your table of contents (see section 7) | + | * with your cursor placed on this second '''First Page''' insert your table of contents (see section 7) |
| − | + | ||
| − | + | ||
<div style="overflow: hidden"> | <div style="overflow: hidden"> | ||
<!--makes text to start after the picture--> | <!--makes text to start after the picture--> | ||
| Line 33: | Line 29: | ||
</div> | </div> | ||
'''Illustration 20. Choose page style Default and restart numbering at 1''' | '''Illustration 20. Choose page style Default and restart numbering at 1''' | ||
| + | * place your cursor immediately below your table of contents* go to menu '''Insert › Manual Break › Page break''' and choose '''Default Style'''; choose '''Change page number''' starting from '''1''' as in illustration 20 | ||
| + | * confirm '''OK''' | ||
| + | <div style="overflow: hidden"> | ||
| + | <!--makes text to start after the picture--> | ||
| + | [[File:wfs_may2014_021-pages with_without numbering.png|none]] | ||
| + | </div> | ||
| + | '''Illustration 21. Between the first and second page we have a simple page break (Ctrl + Return); between second and third page we have a manual page break with numbering restarting at 1; thereafter we have automatic page breaks''' | ||
| − | It’s basically the same method we already came across in section 10 on | + | It’s basically the same method we already came across in section 10 on group work in which we described how to use individual page styles for each author in a work group. Similarly you could create a “Roman” page style with Roman numbering instead of Arabic for a preface (see section 20). |
== Separate Document for the First Page? == | == Separate Document for the First Page? == | ||
Revision as of 12:59, 19 May 2014
- Introduction
- Theory
- Document Structure
- Chapter Headings
- Chapter Numbering
- Table of Contents
- Outline
- Navigator
- Text Body
- Paragraph styles overview
- Reusing styles
- Default Page Formatting
- Title Page
- Papers without a Title Page
- Pages with and without numbering
- Roman Page Numbering
- Group Work
- Proofreading
- Numbered lists and bullets
- Line numbering
- Cross-references
- Footnotes
- Bibliography
- Quotes
- Tables
- Charts
- Pictures
- Snapshots
- Presentations & Graphics
- Cross tables (Statistics)
- Extra Long Web Adresses
- Fonts
- Emphasis
- Special Characters
- Non separable combinations
- Shortcut keys
- Mouse clicks
- PDFs
- Saving your files
- Several files open at once
- Search and replace
- Spell Check
- Synonyms
- Document Infos
- Labels and Form letters
- Help
- Installing Program
- Microsoft Word
- Practice I
- Practice II
You will surely want your text pages to be numbered starting with number 1, whereas the title page should be neither numbered nor counted. You might even want a second non-numbered and non-counted page for your table of contents.* So you will need two page styles, one for the First Page(s) and one for the rest.
Step by step:
- go to menu Format › Styles and Formatting (F11)
- press the 4th icon from the left to open the list of Page Styles (illustration 19)
Illustration 19. The fourth button in the menu bar opens up the list of page formats, one of them being "First Page"
- right click First Page and choose Modify
- under the tab Organiser › Next Style change the Default to First Page; this way your document could contain a never ending succession of First Pages until you decide otherwise
- confirm OK* in the list right click on the page style Default and choose Modify
- under the tab Header tick Header on (alternatively choose the tab Footer and tick Footer on) to accommodate your page numbers
- having thus prepared these two page styles now place the cursor in your very first page of your document, i.e. the title page, and double-click the style First page in your list of Page Styles in order to actually apply it to your first page and the following pages (this demonstrates styles that need to be applied with a double-click – changing a style doesn’t mean you’re necessarily actually going to use it)
- place your cursor at the very bottom of your title page and insert a new page to later fit your table of contents using Ctrl + Return; this new page will automatically also be in style First page
- with your cursor placed on this second First Page insert your table of contents (see section 7)
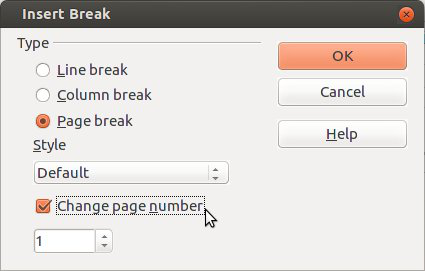
Illustration 20. Choose page style Default and restart numbering at 1
- place your cursor immediately below your table of contents* go to menu Insert › Manual Break › Page break and choose Default Style; choose Change page number starting from 1 as in illustration 20
- confirm OK
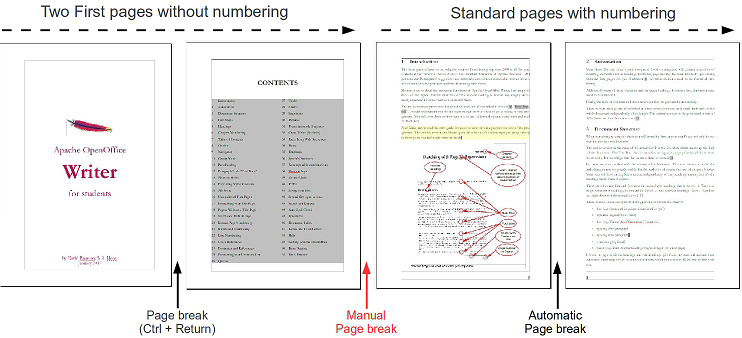
Illustration 21. Between the first and second page we have a simple page break (Ctrl + Return); between second and third page we have a manual page break with numbering restarting at 1; thereafter we have automatic page breaks
It’s basically the same method we already came across in section 10 on group work in which we described how to use individual page styles for each author in a work group. Similarly you could create a “Roman” page style with Roman numbering instead of Arabic for a preface (see section 20).
Separate Document for the First Page?
Now that you’ve seen how easy it is to insert simple page breaks using Ctrl + Return as well as to switch page styles and restart numbering using Manual Page Breaks it is quite obvious you don’t need separate documents for the different parts of your text. In fact, separate documents have a whole number of serious drawbacks:
- you can easily loose track of which documents belong to each other on your hard disk
- it makes it very difficult to create a single final PDF-document for publication or mailing purposes
- most of the automation possibilities cannot be put to use

