Group Work
- Introduction
- Theory
- Document Structure
- Chapter Headings
- Chapter Numbering
- Table of Contents
- Outline
- Navigator
- Text Body
- Paragraph styles overview
- Reusing styles
- Default Page Formatting
- Title Page
- Papers without a Title Page
- Pages with and without numbering
- Roman Page Numbering
- Group Work
- Proofreading
- Numbered lists and bullets
- Line numbering
- Cross-references
- Footnotes
- Bibliography
- Quotes
- Tables
- Charts
- Pictures
- Snapshots
- Presentations & Graphics
- Cross tables (Statistics)
- Extra Long Web Adresses
- Fonts
- Emphasis
- Special Characters
- Non separable combinations
- Shortcut keys
- Mouse clicks
- PDFs
- Saving your files
- Several files open at once
- Search and replace
- Spell Check
- Synonyms
- Document Infos
- Labels and Form letters
- Help
- Installing Program
- Microsoft Word
- Practice I
- Practice II
More and more students have to give in group papers. Up to four or even more authors might be involved.
To facilitate the joining together of the various contributions do the following:
- agree on certain general parameters so as to ensure overall uniformity of document, e.g. limit yourselves to a maximum of two levels of headings
- enable automatic chapter numbering (see section 6)
- make sure all participants use the Text body-style for the Text Body and under no circumstances the Default-style!
- be sure to completely avoid any manual formatting, always apply styles and make sure all members of the group apply the same styles with the same names for the same purposes and with the same formatting
Joining the various contributions in one document is then only a matter of a couple minutes:
- open a new file
- dump all the contributions in any order
- using the Navigator sort chapters as appropriate
• create your title page and generate your table of contents Of course you can always make adjustments at a later stage. See also Section 14 to discover an easy way to export styles for later use by yourself or others.
Individual Headers for Each Contributor?
Who made what contribution has of course to be registered. There are basically three options: 1. Place a list of the authors right under the table of contents with the chapters they authored in brackets. 2. Put the authors’ names in brackets inside the chapter headings. 3. Put the authors’ names in the page header.
If you choose option 3 you will need to create a separate Page Style for each author. These might be named Shila, John and Leila. This is how to go about it:
- open menu Format › Styles and Formatting (F11)
- click on the 4th icon to list all Page styles (see illustration 12)
Illustration 12. 4th icon to the right for page formatting
- right-click on the Default-Style
- select Modify…
- make all the appropriate changes applicable to your standard default pages, e.g. a left margin of 3cm and of course activate the header to accommodate page numbering
- confirm OK
- place the cursor somewhere on your first text page of text and double-click on the page format Default to activate it
- on the top right hand corner of the pop-up menu click on the small black triangle ▼ pointing downwards and chose the first option New Style from Selection
- give your new style the name of one of the group members, say Leila
- repeat these last two steps for each member of the group
- go back to your document and place the cursor at the very end of the text authored by the group
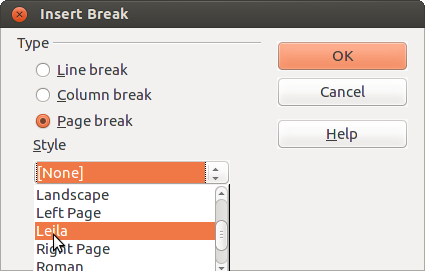
- go to menu Insert › Manual Break › Page break and choose style Leila (see illustration 13)
Illustration 13. Choose your newly created page style Leila
- place cursor in Leila’s Page Header and write her name and university matriculation number left aligned
- remove the tab stop (the symbol ┴) from the ruler above by pulling it down with the mouse pointer
- press the tab key once to move the cursor to the right margin
- choose menu Insert › Fields › Page Number
- in order to jump from Leila’s last page to John’s first page, place cursor at very bottom of former and again open menu Insert › Manual break and under Style select John
- repeat the procedure for all group members – at the very end spring back again from the last group member to Default Page style
