Difference between revisions of "Documentation/Writer for Students/Chapter Numbering"
m |
|||
| (9 intermediate revisions by 2 users not shown) | |||
| Line 6: | Line 6: | ||
|NextPage=Documentation/Writer for Students/Table of Contents | |NextPage=Documentation/Writer for Students/Table of Contents | ||
}}__NOTOC__ | }}__NOTOC__ | ||
| − | + | Let the program do the numbering for you. That way you can add or remove chapters, change their levels or move them around with the help of the Navigator without worrying about correct numbering or having to mark text beforehand. This is especially useful for group work when it comes to combining the various chapters into one document (see sections 8 and 17.) | |
| − | + | ||
| − | change | + | |
| − | + | ||
| − | + | ||
| − | + | ||
| − | + | ||
| − | + | ||
| − | + | ||
| − | ( | + | |
| − | + | You switch on automatic numbering under the menu '''Tools › Outline Numbering''' (see illustration 2). | |
| − | + | You can choose between various numbering styles such as '''A, B, C''' or Roman numbers, but most likely you will stick to Arabic '''1, 2, 3''' style. It’s also possible to mix styles, that is, have Arabic numbers for the first two levels and '''a), b), c)''' for the third – whereby the closing bracket is simply a '''Separator After'''. | |
| − | It’s also possible to mix styles, that is, have Arabic for the first two levels and '''a), b), c)''' for the third | + | |
| − | – whereby the closing bracket is simply a | + | |
<div style="overflow: hidden"> | <div style="overflow: hidden"> | ||
| Line 28: | Line 17: | ||
'''Illustration 2. Activating outline numbering''' | '''Illustration 2. Activating outline numbering''' | ||
| − | When using '''1, 2, 3''' style it is common to '''Show sublevels'''. This means | + | When using '''1, 2, 3''' style it is common to '''Show sublevels'''. This means a full lenght heading ''5.2.7'' instead of simply ''7''. If you mix styles you could '''Show sublevels''' for the first two levels in Arabic style, giving you '''5.2''', but not for the third level, which would then appear as a simple '''c)''' instead of the full length '''5.2.c)'''. |
| − | + | You might want to turn numbering off for particular headings, for example the introduction and the bibliography. You can do so by pressing the ''third'' button on the pop-up menu (see illustration 3). Be careful not to press the ''second'' button, because this would switch numbering off or on for ''all'' headings of that particular level! | |
| − | + | ||
| − | + | ||
| − | You might want to turn numbering off for particular headings, for example | + | |
| − | + | ||
| − | ''third'' button on the pop-up menu (see illustration 3). Be careful not to press the second button, | + | |
| − | because this would switch | + | |
<div style="overflow: hidden"> | <div style="overflow: hidden"> | ||
| Line 43: | Line 26: | ||
'''Illustration 3. Turning off numbering for a particular chapter''' | '''Illustration 3. Turning off numbering for a particular chapter''' | ||
| − | |||
| − | |||
| − | |||
<div style="overflow: hidden"> | <div style="overflow: hidden"> | ||
<!--makes text to start after the picture--> | <!--makes text to start after the picture--> | ||
[[File:Wfs004 activating numbering direct.png|none]] | [[File:Wfs004 activating numbering direct.png|none]] | ||
</div> | </div> | ||
| − | '''Illustration 4. | + | '''Illustration 4. Don't activate numbering directly from the menu! This method is good for numbered lists only.''' |
| − | |||
| − | |||
| − | |||
<div style="overflow: hidden"> | <div style="overflow: hidden"> | ||
<!--makes text to start after the picture--> | <!--makes text to start after the picture--> | ||
[[File:Wfs005 window outline numbering.png|none]] | [[File:Wfs005 window outline numbering.png|none]] | ||
</div> | </div> | ||
| − | '''Illustration 5. | + | '''Illustration 5. This menu determining position of chapter numbering will only pop up in case you open files created with older versions of OpenOffice. The item "Width of numbering" conflates the items "Numbering followed by tab stop at ..." and "Indent at ..." of the more modern menu.''' |
| + | |||
| + | Make sure to leave enough space ('''width''' – see illustration 5) for your numbering. A complete numbering such as 5.2.7 would take up around 1 cm of space. It also depends on the size font you are using. Please take a detailed look at illustration 10 for a better understanding of these settings and those for the corresponding paragraph style. | ||
| + | <br /> | ||
| + | <br /> | ||
| + | ---------- | ||
| + | <p style="text-align:left;">[[Documentation/Writer for Students/Headings|< Previous Page]]</p> | ||
| + | <p style="text-align:right;">[[Documentation/Writer for Students/Table of Contents|Next Page >]]</p> | ||
| + | [[Category:Documentation/Writer]] | ||
Latest revision as of 10:22, 1 March 2016
- Introduction
- Theory
- Document Structure
- Chapter Headings
- Chapter Numbering
- Table of Contents
- Outline
- Navigator
- Text Body
- Paragraph styles overview
- Reusing styles
- Default Page Formatting
- Title Page
- Papers without a Title Page
- Pages with and without numbering
- Roman Page Numbering
- Group Work
- Proofreading
- Numbered lists and bullets
- Line numbering
- Cross-references
- Footnotes
- Bibliography
- Quotes
- Tables
- Charts
- Pictures
- Snapshots
- Presentations & Graphics
- Cross tables (Statistics)
- Extra Long Web Adresses
- Fonts
- Emphasis
- Special Characters
- Non separable combinations
- Shortcut keys
- Mouse clicks
- PDFs
- Saving your files
- Several files open at once
- Search and replace
- Spell Check
- Synonyms
- Document Infos
- Labels and Form letters
- Help
- Installing Program
- Microsoft Word
- Practice I
- Practice II
Let the program do the numbering for you. That way you can add or remove chapters, change their levels or move them around with the help of the Navigator without worrying about correct numbering or having to mark text beforehand. This is especially useful for group work when it comes to combining the various chapters into one document (see sections 8 and 17.)
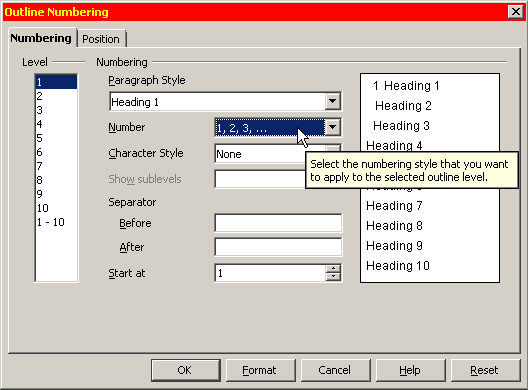
You switch on automatic numbering under the menu Tools › Outline Numbering (see illustration 2). You can choose between various numbering styles such as A, B, C or Roman numbers, but most likely you will stick to Arabic 1, 2, 3 style. It’s also possible to mix styles, that is, have Arabic numbers for the first two levels and a), b), c) for the third – whereby the closing bracket is simply a Separator After.
Illustration 2. Activating outline numbering
When using 1, 2, 3 style it is common to Show sublevels. This means a full lenght heading 5.2.7 instead of simply 7. If you mix styles you could Show sublevels for the first two levels in Arabic style, giving you 5.2, but not for the third level, which would then appear as a simple c) instead of the full length 5.2.c). You might want to turn numbering off for particular headings, for example the introduction and the bibliography. You can do so by pressing the third button on the pop-up menu (see illustration 3). Be careful not to press the second button, because this would switch numbering off or on for all headings of that particular level!
Illustration 3. Turning off numbering for a particular chapter
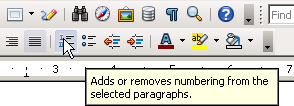
Illustration 4. Don't activate numbering directly from the menu! This method is good for numbered lists only.
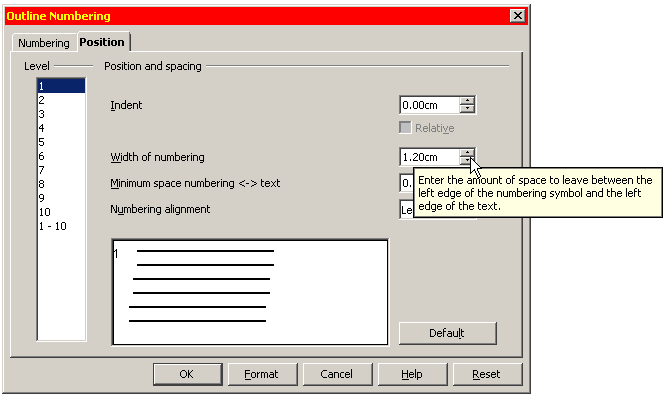
Illustration 5. This menu determining position of chapter numbering will only pop up in case you open files created with older versions of OpenOffice. The item "Width of numbering" conflates the items "Numbering followed by tab stop at ..." and "Indent at ..." of the more modern menu.
Make sure to leave enough space (width – see illustration 5) for your numbering. A complete numbering such as 5.2.7 would take up around 1 cm of space. It also depends on the size font you are using. Please take a detailed look at illustration 10 for a better understanding of these settings and those for the corresponding paragraph style.


