Statusbar
- What is Writer?
- Parts of the Main Writer Window
- Changing Document Views
- Starting a New Document
- Opening an Existing Document
- Saving a Document
- Password Protection
- Closing a Document
- Closing OpenOffice
- Using the Navigator
- Getting Help
- What Are All These Things Called?
- Undoing and Redoing Changes
- Using Writer on a Mac
Status Bar
The Writer status bar is located at the bottom of the workspace. It provides information about the document and convenient ways to quickly change some document features.
Page number
Shows the current page number, the sequence number of the current page (if different from the page number), and the total number of pages in the document. For example, if a document has 14 pages, and you restarted page numbering at 1 on the third page, its page number is 1, its sequence number is 3, and the total number of pages is 14; this field would show 1 3/14.
If any bookmarks have been defined in the document, a right-click on this field pops up a list of bookmarks; click on the required one to go to the bookmark.
To jump to a specific page in the document, double-click on this field. The Navigator opens (see page 19). Click in the Page Number field in the Navigator and type the sequence number of the required page. After a brief delay, the display jumps to the selected page.
Page style
Shows the style of the current page. To change the page style, right-click on this field. A list of page styles pops up; choose a different style by clicking on it.
To edit the current page style, double-click on this field. The Page Style dialog box opens. See Chapter 6 and 7 in this book for more information about styles.
Language
Shows the language for the selected text.
Click to open a menu where you can choose another language for the selected text or for the paragraph where the cursor is located. You can also select None (Do not check spelling) to exclude the text from a spelling check or pick More to open the Character dialog box. See Chapter 3 (Working with Text) for more information.
Insert mode
Click to toggle between Insert and Overwrite modes when typing. In Insert mode, any text after the cursor position moves forward to make room for the text you type; in Overwrite mode, text after the cursor position is replaced by the text you type.
Selection mode
Click to toggle between STD (Standard), EXT (Extend), ADD (Add) and BLK (Block) selection. EXT is an alternative to ⇧ Shift + click when selecting text. See Chapter 3 (Working with Text) for more information about these modes.
Unsaved changes
An asterisk (*) appears here if changes to the document have not been saved.
Digital signature
If the document has been digitally signed, an icon ![]() shows here. To view the certificate, double-click the icon.
shows here. To view the certificate, double-click the icon.
Section or object information
When the cursor is in a section, heading, or list item, or when an object (such as a picture or table) is selected, information about that item appears in this field. Double-clicking in this area opens a relevant dialog box.
| Object | Information shown | Dialog box opened |
|---|---|---|
| Picture | Size and position | Format Picture |
| List item | Level and list style | Bullets and Numbering⧼cite_reference_link⧽ |
| Heading | Outline numbering level | Bullets and Numbering1 |
| Table | Name or number and cell reference of cursor | Table Format |
| Section | Name of section | Edit Sections |
| Other | (Blank) | Fields (Cross-References page) |
View layout
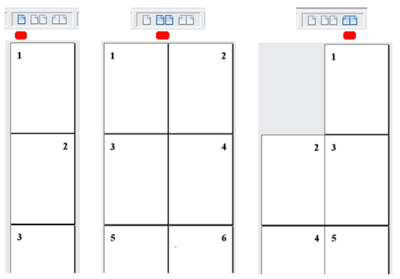
Click an icon to change between single page, side-by-side, and book layout views. (See Figure 11.) You can edit the document in any view. Zoom settings (see below and next page) interact with the selected view layout to determine how many pages are visible in the document window.
Zoom
To change the view magnification, drag the Zoom slider, or click on the + and – signs, or right-click on the zoom level percent to pop up a list of magnification values from which to choose.
Notes
⧼cite_references_prefix⧽ ⧼cite_references_link_one⧽ ⧼cite_references_suffix⧽
| Content on this page is licensed under the Creative Common Attribution 3.0 license (CC-BY). |


