Using the Navigator
- What is Writer?
- Parts of the Main Writer Window
- Changing Document Views
- Starting a New Document
- Opening an Existing Document
- Saving a Document
- Password Protection
- Closing a Document
- Closing OpenOffice
- Using the Navigator
- Getting Help
- What Are All These Things Called?
- Undoing and Redoing Changes
- Using Writer on a Mac
In addition to the Page Number field on the Status bar (described on page 8), Writer provides other ways to move quickly through a document and find specific items by using the many features of the Navigator, the Navigation toolbar, and related icons.
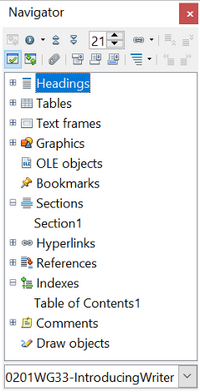
The Navigator lists all the headings, tables, text frames, graphics, bookmarks, and other objects contained in a document.
To open the Navigator, click its icon ![]() from the Sidebar tabs or on the Standard toolbar, or press F5 , or choose View → Navigator on the menu bar, or double-click on the Page number field on the status bar. If the Navigator is displayed separately from the Sidebar, you can dock the Navigator to either side of the main Writer window or leave it floating (see Docking/Floating Windows and Toolbars).
from the Sidebar tabs or on the Standard toolbar, or press F5 , or choose View → Navigator on the menu bar, or double-click on the Page number field on the status bar. If the Navigator is displayed separately from the Sidebar, you can dock the Navigator to either side of the main Writer window or leave it floating (see Docking/Floating Windows and Toolbars).
To hide the list of categories and show only the icons at the top, click the List Box On/Off icon ![]() . This icon is not available in the Sidebar display of the Navigator since it is unnecessary. Click this icon again to show the list. Click the + sign by any of the lists to display the contents of the list.
. This icon is not available in the Sidebar display of the Navigator since it is unnecessary. Click this icon again to show the list. Click the + sign by any of the lists to display the contents of the list.
Table 1 summarizes the functions of the icons at the top of the Navigator.
| The Navigator has different functions in a master document. See Chapter 13 (Working with Master Documents). |
Table 1: Function of icons in the Navigator
| Toggle: Not active in ordinary documents (left image). In a master document (right image), switches between the master document file and its subdocuments. | |
| Navigation: Opens the Navigation toolbar. | |

|
Previous, Next: Jumps to the previous or next item in the selected category (page, graphic, hyperlink, comment, and so on). To select the category of items, see Using the Navigation Toolbar. |

|
Page number: Jumps to the page sequence number showing in the box. Type the required page number or select it using the up and down arrows. |
| Drag Mode: Select Hyperlink, Link, or Copy. See #Choosing Drag Mode for details. | |
| List Box On/Off: Shows or hides the list of categories. | |
| Content View: Switches between showing all categories and showing only the selected category. | |
| Set Reminder: Inserts a reminder. | |
| Header/Footer: Jumps between the text area and the header or footer area (if the page has them). | |
| Anchor <―> Text: Jumps between a footnote anchor and the corresponding footnote text. | |
| Heading Levels Shown: Choose the number of heading levels to be shown. |
Moving Quickly through a Document
The Navigator provides several convenient ways to move around a document and find items in it:
- To jump to a specific page in the document, type its sequence number in the box at the top of the Navigator.
- When a category is showing the list of items in it, double-click on an item to jump directly to that item's location in the document. For example, you can jump directly to a selected heading, graphic, or comment by using this method.
To see the content in only one category, highlight that category and click the Content View icon. Click the icon again to display all the categories. You can also change the number of heading levels shown when viewing Headings.
- Use the Previous and Next icons to jump to other objects of the type selected in the Navigation toolbar. (See below for details.)
| A hidden section (or other hidden object) in a document appears gray in the Navigator, and displays the word "hidden" as a tooltip. For more about hidden sections, see Chapter 4 (Formatting Pages). |
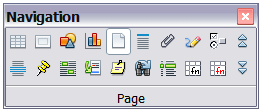
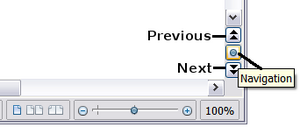
To display the Navigation toolbar (Figure 22), click the Navigation icon ![]() (second icon from the left at the top of the Navigator, Figure 24) or the small Navigation icon near the lower right-hand corner of the window below the vertical scroll bar (Figure 23).
(second icon from the left at the top of the Navigator, Figure 24) or the small Navigation icon near the lower right-hand corner of the window below the vertical scroll bar (Figure 23).
The Navigation toolbar shows icons for all the object types shown in the Navigator, plus some extras (for example, the results of a Find command).
Click an icon to select that object type. Now all the Previous and Next icons (in the Navigator itself, in the Navigation Toolbar, and on the scroll bar) will jump to the previous or next object of the selected type. This is particularly helpful for finding items like index entries, which can be difficult to see in the text. The names of the icons (shown in the tooltips) change to match the selected category; for example, Next Graphic or Next Bookmark.
You can rearrange chapters and move headings in the document by using the Navigator.
- Click the Content View icon to expand the headings, if necessary.
- (Optional) If you have several subheading levels, you can more easily find the headings you want, by changing the Heading Levels Shown selection to show only 1 or 2 levels of headings.
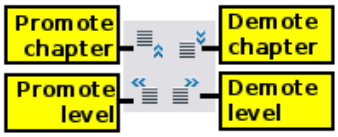
- Click on the heading of the block of text that you want to move and drag the heading to a new location on the Navigator, or click the heading in the Navigator list, and then click either the Promote Chapter or Demote Chapter icon shown in Figure 6. All the text and subsections under the selected heading move with it.
To move only the selected heading and not the text associated with the heading, hold down Control, and then click the Promote or Demote icon.
- To quickly change the outline level of a heading and its associated subheadings, select the heading in the Navigator, and then click either the Promote Level or Demote Level icon. This action does not change the location of the heading, only its level.
To increase the outline level of only the selected heading, but not its associated subheadings, hold down Control, and then click the icon.
Setting Reminders
One of the little-known features of Writer that you may find quite useful is the possibility of jumping between reminders. Reminders let you mark places in your document that you want to return to later on, to add or correct information, make some other change, or simply mark where you finished editing. The possible uses of reminders are limited only by your imagination.
To set a reminder at the cursor's current location, click on the [[Image:]] icon in the Navigator. You can set up to 5 reminders in a document; setting another causes the first to be deleted.
Reminders are not highlighted in any way in the document, so you cannot see where they are, except when you jump from one to the next—the location of the cursor then shows the location of the reminder.
To jump between reminders, first select the Reminder icon on the Navigation toolbar. Then click the Previous and Next icons.
Choosing Drag Mode
To select the drag and drop options for inserting items, such as other documents and images, into a document using the Navigator, choose one of the following from the drop-down menu of the Drag Mode icon ![]() .
.
Insert As Hyperlink
Creates a hyperlink when you drag and drop an item into the current document.
Insert As Link
Inserts the selected item as a link where you drag and drop in the current document. Text is inserted as protected sections. However, you cannot create links for graphics, OLE objects, references, or indexes using this method.
Insert As Copy
Inserts a copy of the selected item where you drag and drop in the current document. You cannot drag and drop copies of graphics, OLE objects, or indexes.
| Content on this page is licensed under the Creative Common Attribution 3.0 license (CC-BY). |


