Selecting the Page Order, Details, and Scale
- What is Calc
- Parts of the main Calc window
- Open and Save CSV files
- Navigating within spreadsheets
- Selecting items in a sheet or a spreadsheet
- Working with Columns and Rows
- Working with Sheets
- Viewing Calc
- Entering data using the keyboard
- Speeding up data entry
- Validating cell contents
- Editing data
- Formatting data
- Auto-formatting cells and sheets
- Formatting spreadsheets using themes
- Using conditional formatting
- Hiding and showing data
- Sorting records
- Using formulas and functions
- Analyzing data
- Printing from Calc
- Using Print Ranges
- Selecting the Page Order, Details, and Scale
- Page Breaks
- Headers and Footers
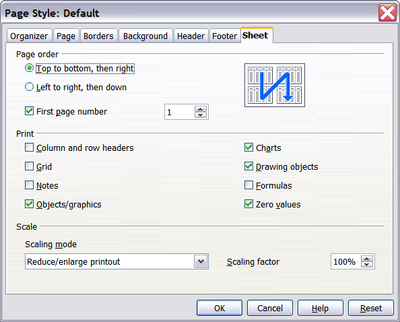
Selecting the Page Order, Details, and Scale
To select the page order, details, and scale to be printed:
- Choose Format → Page from the main menu.
- Select the Sheet tab.
- Make your selections, and then click OK .
Page Order
When a sheet will print on more than one page (of paper) you can set the order in which pages print. This is especially useful in a large document; for example, controlling the print order can save time if you have to collate the document a certain way. The two available options are shown below.
| Top to bottom, then right | 
|
Left to right, then down | 
|
Details
You can specify which details to print. These details include:
- Row and column headers
- Sheet grid—prints the borders of the cells as a grid
- Comments—prints the comments defined in your spreadsheet on a separate page, along with the corresponding cell reference
- Objects and graphics
- Charts
- Drawing objects
- Formulas—prints the formulas contained in the cells, instead of the results
- Zero Values—prints cells with a zero value
Scale
Use the scale features to control the number of pages the data will print on. This can be useful if a large amount of data needs to be printed compactly or if you want the text enlarged to make it easier to read.
- Reduce/Enlarge printout—scales the data in the printout either larger or smaller. For example if a sheet would normally print out as four pages (two high and two wide), a scaling of 50% would print as one page (both width and height are halved).
- Fit print range(s) on number of pages—defines exactly how many pages the printout will take up. This option will only reduce a printout, it will not enlarge it. To enlarge a printout, the reduce/enlarge option must be used.
- Fit print range(s) to width/height—defines how high and wide the printout will be, in pages.
Printing Rows or Columns on Every Page
If a sheet is printed on multiple pages, you can set up certain rows or columns to repeat on each printed page.
For example, if the top two rows of the sheet as well as column A need to be printed on all pages, do the following:
- Choose Format → Print Ranges → Edit. On the Edit Print Ranges dialog, type the rows in the text entry box under Rows to repeat. For example, to repeat rows 1 and 2, type $1:$2. This automatically changes Rows to repeat from, – none – to – user-defined –.
- To repeat columns, type the columns in the text entry box under Columns to repeat. For example, to repeat column A, type $A. In the Columns to repeat list, – none – changes to – user-defined –.
- Click OK .
| You do not need to select the entire range of the rows to be repeated; selecting one cell in each row works. |
| Content on this page is licensed under the Creative Common Attribution 3.0 license (CC-BY). |

