Parts of the Main Draw Window
- What is Draw?
- Parts of the main Draw window
- Choosing and defining colors
- Positioning objects with Snap functions
- Positioning objects with guiding lines
- The basic drawing shapes
- Drawing geometric shapes
- Selecting objects
- Moving and dynamically adjusting an object’s size
- Editing objects
- Using styles
- Special effects
- Combining multiple objects
- Aids for positioning objects
- Inserting and editing pictures
- Working with 3D objects
- Exporting graphics
- Adding comments to a drawing
Parts of the Main Draw Window
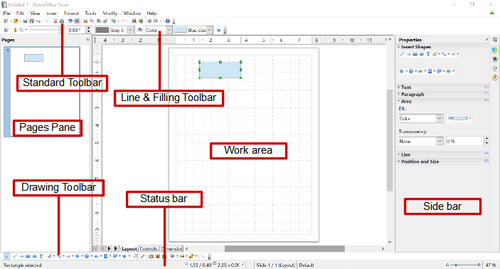
The components of the main Draw window are shown in Figure 134.
You can surround the drawing area with toolbars and information areas. The number and position of the visible tools vary with the task in hand and user preferences. Therefore, your setup may look different. For example, many users put the main Drawing toolbar on the left-hand side of the workspace, not at the bottom as shown here. The figure shows the Sidebar with the Properties deck as it appears when a shape is selected. Many functions from various toolbars and menus are available in the Sidebar and displaying it with View → Sidebar may allow you to work with fewer toolbars visible. The Sidebar is introduced in Chapter 1.
You can split drawings in Draw over several pages. Multipage drawings are used mainly for presentations. The Pages pane, on the left side of the Draw window in Figure 134 gives an overview of the pages that you create. If the Pages pane is not visible on your setup, you can enable it from the View menu (View → Page Pane).
Rulers
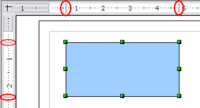
You should see rulers (bars with numbers) on the upper and left-hand side of the workspace. The rulers show the size of a selected object on the page (see the gray double lines, highlighted in Figure 135). When no object is selected, they show the location of the mouse pointer, which helps to accurately position drawing objects.
You can also use the rulers to manage object handles and guidelines, making it easier to position objects. The page margins in the drawing area are also represented on the rulers. You can change the margins directly on the rulers by dragging them with the mouse.
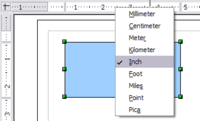
To modify the unit of measurement of a ruler, right-click on the ruler and select one of the measurement units. The two rulers can have different units.
Status Bar
The Status bar is located at the bottom of the screen (in all Apache OpenOffice components); it includes several Draw-specific fields.
For details on the contents and use of these fields, see Chapter 1 (Introducing Apache OpenOffice).
Toolbars
To display or hide the various Draw toolbars, choose View → Toolbars. On the menu that appears, select which toolbars you want to display. For more about working with toolbars, see Chapter 1 (Introducing Apache OpenOffice).
The tools available in the Draw toolbars are explained in the following sections. The appearance of the toolbar icons may vary depending on your operating system and the selection of icon size and style in Tools → Options → OpenOffice → View.
Standard toolbar
The Standard toolbar is the same for all Apache OpenOffice components and is not described in detail in this chapter.
Line and Filling toolbar
The Line and Filling toolbar lets you modify the main properties of a drawing object. See Editing objects for details.
Text Formatting toolbar
If the selected object is text, the Line and Filling toolbar changes to the Text Formatting toolbar, which is similar to the Formatting toolbar in Writer. For more information, see Chapter 3 (Getting Started with Writer) in this book.
Drawing toolbar
The Drawing toolbar is the most important toolbar in Draw. It contains all the necessary functions for drawing various geometric and freehand shapes and for organizing them on the page.
Many of the functions of the Line and Filling, the Text Formatting, and the Drawing toolbars are available in the Properties deck of the Sidebar once an object is selected
Options toolbar
Use the Options toolbar to activate or deactivate various drawing aids. To display the Options toolbar, select View → Toolbars → Options.
| Content on this page is licensed under the Creative Common Attribution 3.0 license (CC-BY). |


