Gluepoints and Connectors
- What is Draw?
- Parts of the main Draw window
- Choosing and defining colors
- Positioning objects with Snap functions
- Positioning objects with guiding lines
- The basic drawing shapes
- Drawing geometric shapes
- Selecting objects
- Moving and dynamically adjusting an object’s size
- Editing objects
- Using styles
- Special effects
- Combining multiple objects
- Aids for positioning objects
- Inserting and editing pictures
- Working with 3D objects
- Exporting graphics
- Adding comments to a drawing
Gluepoints and Connectors
All Draw objects have associated invisible gluepoints, which become visible when you choose any of the connectors under the Connector icon ![]() on the Sidebar or Drawing toolbar and then move the mouse pointer over the object.
on the Sidebar or Drawing toolbar and then move the mouse pointer over the object.
Most objects have four gluepoints, as shown in Figure 150. You can add more gluepoints, and customize gluepoints, using the toolbar under the Gluepoint icon ![]() on the Drawing toolbar. This icon is not available on the Sidebar but can be accessed with View → Toolbars → Gluepoints.
on the Drawing toolbar. This icon is not available on the Sidebar but can be accessed with View → Toolbars → Gluepoints.
Gluepoints are different from handles (the small blue or green squares around an object). The handles are for moving or resizing an object. The gluepoints attach connectors to an object.
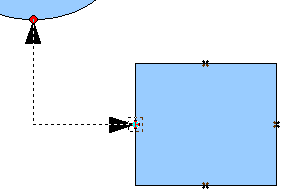
Connectors are lines or arrows whose ends automatically dock to gluepoints on an object. When you move the other object, the connector moves with it. Connectors are particularly useful for making organizational charts. You can reorganize the blocks of your chart and all the connected objects stay connected.
Figure 151 shows two Draw objects and a connector.
Draw offers a range of different connectors and connector functions. Open the floating Connector toolbar by clicking on the arrow next to the Connector icon ![]() . For more about connectors and gluepoints, see Chapter 9 (Organization Charts, Flow Diagrams, and More) in the Draw Guide.
. For more about connectors and gluepoints, see Chapter 9 (Organization Charts, Flow Diagrams, and More) in the Draw Guide.
| Content on this page is licensed under the Creative Common Attribution 3.0 license (CC-BY). |

