Using Data Sources in Apache OpenOffice
- What is Base?
- Planning a database
- Creating a new database
- Creating database tables
- Defining relationships
- Creating a database form
- Accessing other data sources
- Using data sources in Apache OpenOffice
- Creating queries
- Creating reports
Using Data Sources in Apache OpenOffice
Having registered the data source, whether a spreadsheet, text document, external database or other accepted data source, you can use it in other AOO components including Writer and Calc.
Viewing Data Sources
Open a document in Writer or Calc. To view the data sources available, press F4 or select View → Data Sources from the pull-down menu. This brings up a list of registered databases, which will include Bibliography and any other database registered, such as the database created earlier in this chapter.
To view each database, click on the + to the left of the database's name (see Figure 183). This brings up Tables and Queries. Click on the + next to Tables to view the individual tables created. Now click on a table to see all the records held in it.
Editing Data Sources
Some data sources can be edited in the View Data Sources dialog. A spreadsheet can not. In other cases, a record can be edited, added, or deleted.
The data is displayed on the right side of the screen. Click in a field to edit the value.
Beneath the records are five tiny buttons. The first four move backwards or forwards through the records, or to the beginning or end. The fifth button, with a small star, inserts a new record.
To delete a record, right-click on the gray box to the left of a row to highlight the entire row, and select Delete Rows to remove the selected row.
Launching Base to Work on Data Sources
You can launch Base at any time from the View Data Source pane. Just right-click on a database or the Tables or Queries icons and select Edit Database File. Once in Base, you can edit, add, and delete tables, queries, forms, and reports.
Using Data Sources in Writer and Calc
Data can be placed into Writer and Calc documents from the tables in the data source window. In Writer, values from individual fields can be inserted. Or, a complete table can be created in the Writer document. One common way to use a data source is to perform a mail merge.
Writer Documents
To insert a field from a table opened in the data source window into a Writer document, click on the field name (the gray square at the top of the field list) and, with the left mouse button held down, drag the field onto the document. In a Writer document, it will appear as <FIELD> (where FIELD is the name of the field you dragged).
For example, to enter the information about an expense you can follow these steps.
- Open the list of data sources by pressing F4 and select the Finance database and its Expenses table.
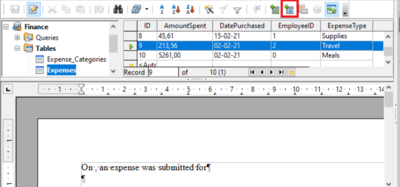
- Type the sentence in the Writer document to contain the information from the table, but do not write anything in the locations where database information will go. See Figure 186.
- Click and hold on the column header of one of the desired fields, for example DatePurchased, and drag it to the desired location. Do this for each field. The text in the document will now look like On <DatePurchased>, an expense of <AmountSpent> was submitted for <ExpenseType>.
- Click on the gray box at the left end of the row holding the desired information.
- Click on the Data to Fields icon, which is highlighted in red in Figure 186.
The values from the selected row will appear in the document. If View → Field Shadings is selected, the values will appear with gray shading. This shading does not print. If the record with ID = 9 was selected, the text in the Writer document will say: On 02/02/21, an expense of 213.56 was submitted for Travel.
Adding data in table format is a little easier and takes perhaps fewer steps. Some steps will be quite similar.
- Navigate to the place you want to place the table and click the location.
- Ctrl + Click the gray box to the left of each row of the data source that you want to be a row in your table when the rows are not consecutive. To select consecutive rows, click the gray box to the left of the top desired row and ⇧ Shift + Click the bottom desired row.
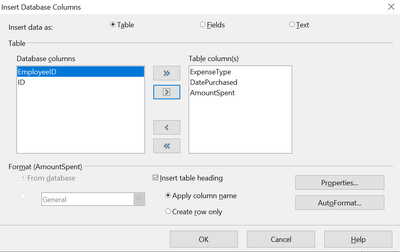
- Click the Data to Text icon to open the Insert Database Columns dialog. (The Data to text icon is to the left of the Data to Fields icon in Figure 186.
- Move the fields you want in your table from the Database columns list to the Table column(s) list.
- To place the fields in the order you select, click the field and use the single arrow to move the fields in the order you desire. You can also limit the fields you use to less than all the fields available.
- If you want to use all the fields, use the double arrow pointing to the right to move all of them at one time. The order of the fields in the table you create will be the same as in the data source table.
- To remove a single field from the Table Column(s) list, click the field and use the single arrow pointing to the left.
- To start over, click the double arrow pointing to the left.
- Select the settings for your table. Use the default settings as in Figure 187.
- Click OK . Save the document.
Calc Spreadsheets
There are two ways to enter data in a Calc spreadsheet. One enters the data into the spreadsheet cells. The other creates controls to display the data in the spreadsheet just as is done in creating a form document in a Base file. While you can directly access the data in the spreadsheet cells, you can only see the data in the controls created in the spreadsheet.
Entering data directly to the spreadsheet cells uses the Data to Text icon as we did to make a table in a Writer document. But differences exist in these two situations.
The steps are straightforward:
- Click the cell of the spreadsheet which you want to be the top left of your data including the column names.
- Use F4 to open the database source window and select the table whose data you want to use.
- Select the rows of data you want to add to the spreadsheet:
- Click the gray box to the left of the row you want to select if only selecting one row. That row is highlighted.
- To select multiple rows, hold down the Ctrl key while clicking the gray box of the rows you need. Those rows are highlighted.
- To select all the rows, click the gray box in the upper left corner. All rows are highlighted.
- Click the Data to Text icon to insert the data into the spreadsheet cells.
- Save the spreadsheet.
Adding records displayed in form controls to a spreadsheet is fairly easy. You need to have the Data Source window open, your spreadsheet open, and the table you want to use selected.
- Click the gray box above a field name.
- Drag and drop the gray box for the field to where you want the record to appear in the spreadsheet.
- Repeat until you have moved all the fields you need to where you want them.
- Name and save the spreadsheet.
- Click a row of the table in the Data Source window.
- Drag the data, not the header, in the first field in the selected row onto its corresponding control in the spreadsheet. The Save icon should activate.
- Click the Edit File button to make the spreadsheet read only. Click Save when asked if you want to save the file.
- The Data Source window goes blank, the fields in the spreadsheet are populated with data from the row you selected, and the Form Navigation toolbar appears at the bottom of the spreadsheet.
Click the arrows on the Form Navigation toolbar to view the different records of the table. (The arrows are circled in red.) The number in the box changes when you change the record number by clicking an arrow. The data in the fields changes correspondingly to the data for that particular record number.
| Content on this page is licensed under the Creative Common Attribution 3.0 license (CC-BY). |


