Creating Tables in Design View
- What is Base?
- Planning a database
- Creating a new database
- Creating database tables
- Using the wizard to create a table
- Creating a table by copying an existing table
- Creating tables in design view
- Creating auxiliary tables for data entry
- Defining relationships
- Creating a database form
- Accessing other data sources
- Using data sources in Apache OpenOffice
- Creating queries
- Creating reports
Creating Tables in Design View
Design View is a more flexible method for creating a new table, in which you directly enter information about each field in the table. We will use this method for the rest of the tables of our database.
| While the Field type and formatting are different in Design View, the concepts are the same as in the Wizard. |
The first table to be created is People. Its fields are PeopleID, FirstName, and LastName.
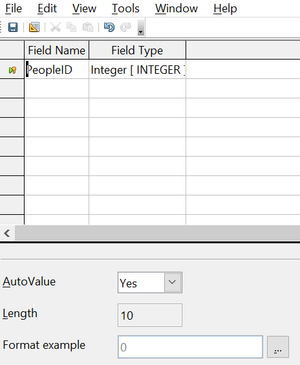
- Click Create Table in Design View. A table similar to Figure 163 will appear but with no entries.
- PeopleID field:
- Type PeopleID as the first Field Name. Press the Tab ⇆ key to move to the Field Type column.
- Select Integer [INTEGER] as the Field Type from the dropdown list. (The default setting is Text [VARCHAR].)
| A shortcut for selecting from the Field Type dropdown list: press the key for the first letter of the choice. You can cycle through the choices for a given letter by repeatedly pressing that key. |
- Change the Field Properties in the bottom section
Change AutoValue from No to Yes. - As a result of choosing AutoValue, when you move the cursor to the next row, PeopleID will be set as the Primary key and a small key icon will appear next to the field name. To set the primary key manually, right-click on the green triangle to the left of the field name (Figure 163) and select Primary Key from the menu. This places a key icon in front of the field name. However, if AutoValue has not been set, you will need a method to track what values have been used and to create values for new entries.
- Change the Field Properties in the bottom section
- FirstName and LastName fields:
- Type the next field name in the Field Name column.
- Select the Field Type TEXT [VARCHAR] for each field.
- To save and close the table, choose File → Save. Name the table People. Close the table.
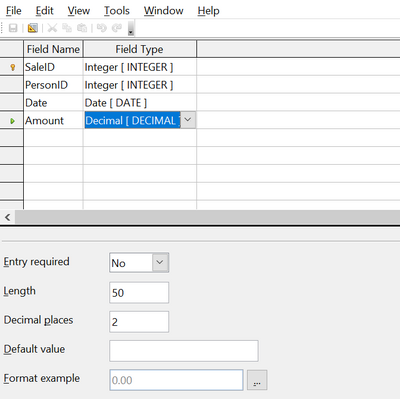
Follow the same steps to create a table named Sales. The fields and their field types are listed in Figure 164. Make sure you make the SaleID field the primary key before closing. This should be true if you define the field with AutoValue = Yes. Be sure to set the Decimal places of the Amount field to 2 as shown in the figure.
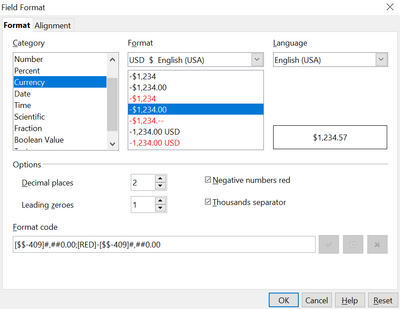
You can set the display format of either the Date field or the Amount field. To do this, click the button at the right end of the Format example box to bring up the Field Format dialog. This dialog is shown in Figure 165 with a currency format chosen, which might be appropriate for the Amount field.
Once all the fields are defined, save the table and name it Sales. Close the Sales table and save the Base document.
| Content on this page is licensed under the Creative Common Attribution 3.0 license (CC-BY). |


