Laying Out a Form With Multiple Controls
- What is Base?
- Planning a database
- Creating a new database
- Creating database tables
- Defining relationships
- Creating a database form
- Using the wizard to create a simple form
- Using the wizard to make a form with a subform
- Laying out a form with multiple controls
- Creating forms and subforms in design view
- Accessing other data sources
- Using data sources in Apache OpenOffice
- Creating queries
- Creating reports
Laying Out a Form With Multiple Controls
A form with multiple controls will likely need some adjustments to their layout and appearance. We will make a form for the Sales table as a tool to demonstrate how to do this. The form could be made with a Form – Subform arrangement as was done for the Expenses form document.
Making the Form
In the main database window (Figure 160), click the Forms icon in the left column. In the Tasks list, click Use Wizard to Create Form to open the Form Wizard (Figure 168).
Step 1: Select fields
- Under Tables or queries, select Table: Sales.
- Move all the fields to the list on the right using the >> button then click Next . Since SaleID is an AutoValue field, you might normally choose to not display it in the form.
Step 2: Set up a subform
This form will not have a subform. Click Next and the dialog will jump to Step 5.
Step 5: Arrange controls
In the Arrangement of the main form section, choose the second icon from the left which sets the layout to Columnar – Labels on top. Click Next .
Step 6: Set data entry
Accept the defaults by clicking Next .
Step 7: Apply styles
Accept the defaults by clicking Next .
Step 8: Set name
Choose the name Sales and the option Modify the form and then click Finish .
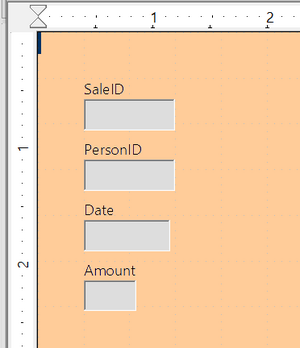
You will now have a data form with four controls in a single column as shown in Figure 174. This is a perfectly serviceable arrangement, but we will change it to have the controls horizontally arranged towards the middle of the form. If the Form Controls toolbar is not visible, open it with the menu View → Toolbars → Form Controls. Use the Design Mode button, which is highlighted in red, to toggle Design Mode to On as shown in Figure 170.
The entire group of controls can be moved by selecting them with click and drag. Make sure the cursor is in select mode by clicking the Select icon on the Form Controls toolbar. It is the first icon on the toolbar. Click and hold above and to the left of the SaleID label and drag down and to the right to form a rectangle around all the controls. When you release the mouse button, green handles will define a rectangle encompassing all the controls. Click and hold within this rectangle and drag the group to the right. Click anywhere outside the rectangle to release the grouping of the controls. To arrange the controls horizontally, we will first drag them into their approximate positions and then fine tune them with Position and Size dialogs. Each control consists of a label and a field and if you click on one of the controls, both the label and the field are selected. After placing the label/field pairs close to their desired final positions, we can examine and adjust their precise positions. Figure 175 shows the controls after clicking and dragging.
Since we are dealing with an artificial set of data, we do not have strong reasons to arrange the controls in any particular way. We will make the rather arbitrary decision to make each field box one inch long and put a half inch between them. We also want them all at the same vertical position.
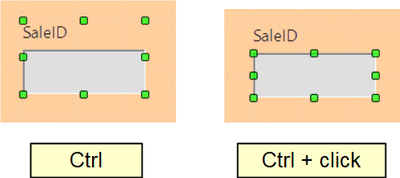
The label and the field are actually two objects that can be edited independently. To access one of them, use Ctrl + Click . Figure 176 shows the difference between clicking on the field of the SaleID control using just the left mouse button or using Ctrl + Click .
After using Ctrl + Click , you can move from the field to the label and vice versa with the Tab ⇆ key. If you want to move both the label and the field, you should be careful that you have selected both with a plain click, so you do not undo their alignment accidentally.
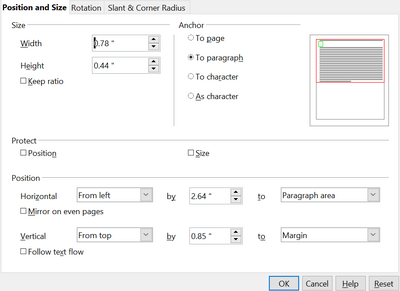
To examine and adjust a control's position, click on it, then right click and select Position and Size. The resulting dialog is shown in Figure 177.
The width and size of the label/field pair is shown at the top left while the position on the page is shown at the bottom. We will set the horizontal position to 2.50 and note that the vertical position is 0.85. We will leave the width unchanged because we want to change the width of only the field and not the label. Likewise, we then exit the dialog and use Ctrl + Click to select only the data field of the SaleID control. Furthermore, we can as well right-click on the field, choose Position and Size and adjust its width to one inch. We can also use Ctrl + Click to select the label, right click on it, select Control, and change the label text, font color, or any other property. We can then proceed to the other controls, setting them to be on a 1.5 inch (3.81 cm) pitch with each data field having a width of one inch and placing them all at the 0.85 inch (2.16 cm) vertical position. Furthermore, we should also set the Date field to have a dropdown list by using Ctrl + Click to select only the date field, then right-clicking and selecting Control.
The controls are now evenly positioned, but there are three remaining adjustments to make the form easily usable.
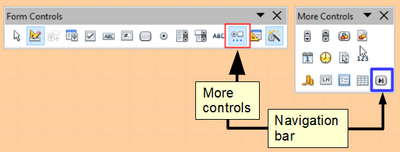
The first adjustment is to add a Navigator Bar to move from record to record and add new records. There is a Navigation Bar icon available in the More Controls auxiliary toolbar of the Form Controls toolbar. Figure 178 shows the location of the More Controls icon and the Navigation Bar icon.
Click the Navigation Bar icon and use click and drag to place the bar. You can select it and lengthen it manually until all of its buttons are visible and use the methods just discussed for positioning it precisely. It has buttons which move the selection to the first record, the previous record, the next record, the last record, and a new record.
Adding a List Box
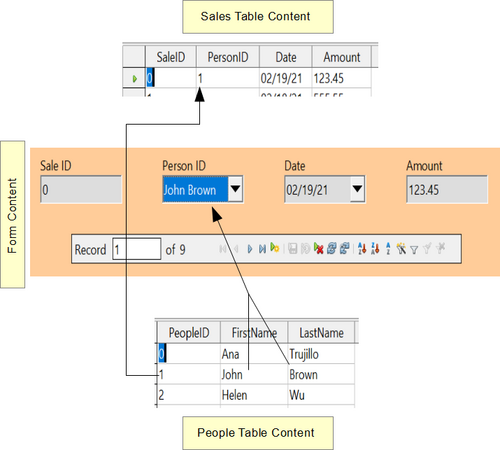
Another change needed to improve the usability of the form is to change the PersonID field into a List Box. The Form Wizard chose a Formatted Field for this control, which is basically a numeric field. You can see this by selecting only the PersonID data field, right-clicking and selecting Control. The title bar shows that the control is a Formatted Field. The PersonID field is indeed numeric, it stores the PeopleID value from the People table as shown in Figure 166. To input data easily, we would want to know which FirstName and LastName correspond to a PeopleID value. A List Box is like a Combo Box in that it displays values, but it displays one value and stores another. We will use a List Box to display the combined FirstName and LastName values of a row from the People table and store the corresponding PeopleID value in the Sales table PersonID field.
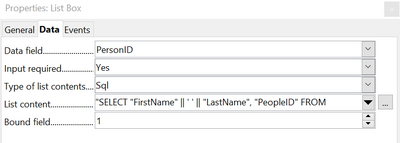
Use Ctrl + Click to select the field of the PersonID field then right click and choose Replace with → List Box. Right click again on the field and select Control. On the Data tab set Type of list contents to Sql and set List content to SELECT "FirstName" || ' ' || "LastName", "PeopleID" FROM "People". The Bound field should be set to 1 and on the General tab, the Drop-down list should be set to Yes.
The meaning of a very similar SQL statement was explained in the section Modifying the Subform. The fields named after the SELECT keyword are a little more complicated here. The || symbol acts to concatenate or glue together the text on each side of it. "FirstName" || ' ' || "LastName" means "The value of the FirstName field followed by a space followed by the value of the LastName field". We will call this the Full Name of the record. The full SELECT clause returns the Full Name followed by the PeopleID of the record in the People table. The Bound Field value tells the control to store the second returned item (the control counts from zero) in the target table. This means PeopleID will be sent to the PersonID field of the Sales table. Figure 180 shows the result of setting up the List Box. The Person ID dropdown list shows the full name of the person, but the value stored in the Sales table is the integer PeopleID. This can be confirmed after some data are entered by going to the main window of the Base file, selecting the Tables icon and double-clicking on the Sales table.
The advantage of this arrangement is that if a person's name should change, the information only needs to be updated in one table. A database might have many tables that need to tie records with a particular person. If the name were input into each of these, a name change would require updating many tables, which is likely to lead to errors. It is a common practice to give people employee or customer identification numbers which look more elaborate than our simple integers but serve the same purpose in the database.
Changing the Tab Order
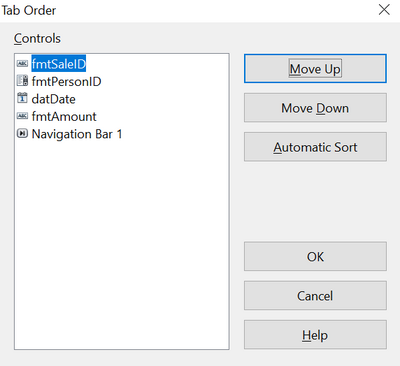
The last change for usability is to adjust the tab order of the controls. In the very simple form we have made, this is not needed but in forms with many controls, it is much more convenient to jump from one control to the next with the tab key than to repeatedly click on the form. To adjust the tab order, open the Form Design toolbar with View → Toolbars → Form Design. The toolbar is shown in Figure 181 with the Activation Order icon highlighted in red. Click that icon to open a dialog showing all the controls in the order in which they will be chosen by the Tab ⇆ key.
The dialog, shown in Figure 182, has buttons to move controls up and down the list. The control names are the automatically assigned ones unless you have changed them while editing other control properties. The easiest way to make these names meaningful is to give the database table fields meaningful names, which is good practice in any case. The list has the controls in a reasonable order but in a form with more fields, it is likely that the order of the fields in the database will not be convenient for data entry.
| Content on this page is licensed under the Creative Common Attribution 3.0 license (CC-BY). |
