Using the Wizard to Create a Table
- What is Base?
- Planning a database
- Creating a new database
- Creating database tables
- Using the wizard to create a table
- Creating a table by copying an existing table
- Creating tables in design view
- Creating auxiliary tables for data entry
- Defining relationships
- Creating a database form
- Accessing other data sources
- Using data sources in Apache OpenOffice
- Creating queries
- Creating reports
Using the Wizard to Create a Table
Wizards are designed to do the basic work. Sometimes this is not sufficient for what we want; in those cases we can use a wizard as a starting point and then build upon what it produces.
The Table Wizard in Base contains two categories of suggested tables: business and personal. Each category contains sample tables from which to choose. Each table has a list of available fields. We can delete some of these fields and add other fields.
A field in a table is one piece of information. For example, a price list table might have one field for the item name, one for the description, and a third for the price.
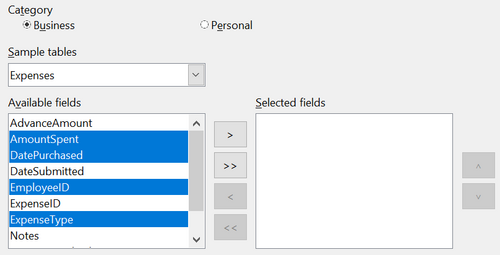
Click Use Wizard to Create Table. This opens the Table Wizard (Figure 161).
Step 1: Select fields
We will use the Expenses sample table in the Business category to select the fields we need for our first table.
- Category: Select Business. The Sample tables drop down list changes to a list of tables appropriate for a business.
- Sample tables : Select Expenses. The Available fields box changes to a list of available fields for this table.
- Selected fields : Using the > button, move the following fields from the Available fields window to the Selected fields window in this order: AmountSpent, DatePurchased, EmployeeID, ExpenseType. You can select multiple fields by pressing the Ctrl key while clicking and then move all the chosen fields at once.At this point, you could select another sample table and move fields from it to the Selected fields list, but that is not necessary in this case.
- If you make a mistake in selecting fields, click on the field name in the Selected fields list and use the < button to move it from the Selected fields list back to the Available fields list.
- If you make a mistake in the order of the selected fields, click on the field name that is in the wrong order and use the Up or Down arrow on the right side of the Selected fields list to move the field name to the correct position.
- Click Next .
Notice that none of the field names include spaces. It is possible to have spaces in field names, but it is best to avoid them.
Step 2: Set field types and formats
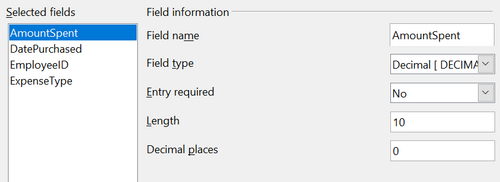
In this step you give the fields their properties. When you click a field, the information on the right changes. (See Figure 162) You can then make changes to meet your needs. Click each field, one at a time, and make the changes listed below. Some questions you might consider in a real application are included in the changes.
- AmountSpent: Change Decimal places to 2. You should consider whether you want to allow an expense with no amount recorded. If not, change Entry required to Yes.
- DatePurchased: Notice the Field type is Date, which is correct. If you want to require a date, change Entry required to Yes.
- EmployeeID: If you want to require that every expense be assigned to an employee, change Entry required to Yes.
- ExpenseType: The Field type is Text [VARCHAR]. With Length set to 50, this field must be no more than 50 characters long. Is that enough?
- When you have finished, click Next .
Step 3: Set primary key
- Create a primary key should be checked.
- Select the option Automatically add a primary key and check Auto value.
- Click Next .
Step 4: Create the table
- If desired, rename the table at this point. If you rename it, make the name meaningful to you. For this example, make no changes.
- Leave the option Insert data immediately checked. We will view the table but not actually enter data.
- Click Finish to complete the table wizard.
A window will appear titled Expenses – Finance – OpenOffice Base: Table Data View. This displays the empty table with the fields (columns) you selected plus a column named ID that is labeled <AutoField> and it was created in Step 3 above. The ID column will be filled with integers automatically when data is added and those numbers will never repeat even if data is deleted. The ID column is the Primary Key of the table.
Close the window displaying the table, and you will be back to the main window of the database with the listing of the tables, queries, forms, and reports. Notice that a table named Expenses is now listed in the Tables portion of the window. Now is a good time to save the Base file.
| Content on this page is licensed under the Creative Common Attribution 3.0 license (CC-BY). |

