Using the Wizard to Make a Form With a Subform
- What is Base?
- Planning a database
- Creating a new database
- Creating database tables
- Defining relationships
- Creating a database form
- Using the wizard to create a simple form
- Using the wizard to make a form with a subform
- Laying out a form with multiple controls
- Creating forms and subforms in design view
- Accessing other data sources
- Using data sources in Apache OpenOffice
- Creating queries
- Creating reports
Using the Wizard to Make a Form With a Subform
Making the Form
Forms can be arranged in a hierarchy so that the data selected in one form influences the data shown on the second form. The objects referred to as forms here are different from what we have previously called a form. If you click on the Forms icon on the main Base page, you will see a pane labeled Forms that displays forms previously saved in the Base file. In the file we have been working with there is now one form called People. A more precise descriptor for People would be Form Document. A Form Document contains one or more groups of Form Controls that interact with a database table or query. In the People Form Document, there is only one control, a data sheet, and it reads data from and writes to the People table. We could have had multiple controls, one dealing with each field in the table, but they all would have interacted with one table. Such a group of controls is also called a form, though a more precise name would be a Data Form. It is possible, even common, to have a Form Document that contains two or more Data Forms, each Data Form interacting with a different table but also some Data Forms influencing other Data Forms. We will now use the Form Wizard to make a Form Document that contains two Data Forms arranged as Form – Subform. The main Form will use the People table and the Subform will use the Expenses table. The two Data Forms will allow us to view and record the expenses of a chosen person.
In the main database window (Figure 160), click the Forms icon in the left column. In the Tasks list, click Use Wizard to Create Form to open the Form Wizard (Figure 168).
Step 1: Select fields
- Under Tables or queries, select Table: People. The box Available fields lists the fields for the People table.
- Click the field FirstName and then on the right single arrow to move it to the Fields in the form list. Do the same with LastName. Click Next .
Step 2: Set up a subform
Since we have already created a relationship between the People and Expenses tables, we will use that relationship. If no relationship had been defined, this would be done in step 4.
- Click the box labeled Add Subform.
- Click Subform based upon existing relation.
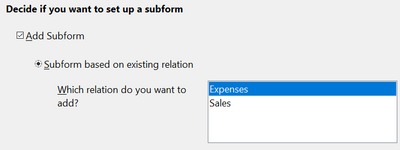
- Both the Expenses and Sales tables have a relation with People, so both are listed as possible choices. Click Expenses to highlight it, as in Figure 171. Click Next . Even if only one table were listed, it would still be necessary to click on it to select it for the subform.
Step 3: Add subform fields
This step is much like step 1.
- Expenses is preselected under Tables or queries.
- Use the >> button to move all the fields to the right.
- Click the ID field to highlight it.
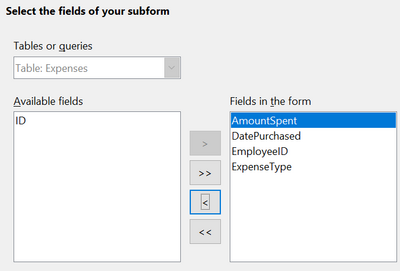
- Use the < button to move the ID to the left (Figure 172). We are excluding the ID field because its value is set automatically. There can be circumstances where you would want to be able to view the ID and displaying it in the form is a valid choice. Click Next .
Step 4: Get Joined Fields
This step is for tables or queries for which no relationship has been defined. Because we have already defined the relationship, the wizard skips this step.
| It is possible to create a relationship between two tables that is based upon more than one pair of fields. |
Step 5: Arrange controls
Set the arrangement of both the main form and the subform to be As Data Sheet, which is the third icon from the left. Click Next .
Step 6: Set data entry
Accept the default settings. Click Next .
Step 7: Apply styles
- Select the color you want in the Apply Styles list.
- Select the Field border you want.
- Click Next .
Step 8 : Set name
- Enter the name for the form. In this case, it is Expenses.
- Click Work with the form.
- Click Finish . The form opens ready for use. Though you can use the form immediately, it is a good time to close the form and save the main Base document.
Entering Data in the Subform
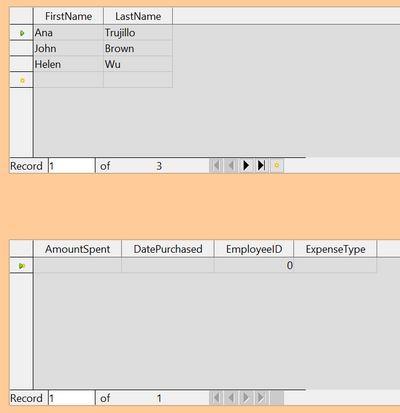
Reopen the Expenses form document if you closed it. If you have already entered data in the People table as described in Entering Data With the New Form, you will see that data in the main form. Figure 173 shows three people entered into the People table and the subform ready for data.
Notice that the EmployeeID of the subform is already populated. The 0 is the PeopleID of Ana Trujillo in the People table, which is the record that is currently selected as can be seen by the green triangle at the left edge of the row. Remember that PeopleID and EmployeeID have a foreign key relationship as seen in Figure 166. If you select another person by clicking on the record or using the navigation bar, the EmployeeID in the subform will automatically change.
We could enter data for each employee now. The AmountSpent can be any number, the DatePurchased should be in the format appropriate for your locale, though YYYY–MM–DD should work anywhere, and the ExpenseType must be one of the values in the Expense_Categories table. If you try to enter some other value, say, Fish, the database will refuse to accept it. No error message appears, but you cannot move down to the next row with an invalid value in ExpenseType. Similarly, you can enter a number in EmployeeID, but if it is not a value that exists in the People table, it will not be accepted. This is a result of the foreign key relationships set up earlier and is an important tool for maintaining data integrity. Rather than struggling to remember valid ExpenseTypes, we can modify the form to improve the ease of data entry.
Modifying the Subform
In addition to making it easier to enter the ExpenseType, there are a few other changes that would improve the usability or appearance of the form. The column headers currently show the field names and could be replaced with labels closer to nontechnical language. Also, the DatePurchased column would benefit from a calendar widget to decrease the amount of typing.
Open the form document by right-clicking on its icon and selecting Edit. The first step is to put the two Data Sheets into Design Mode. If the Form Controls toolbar is not visible, open it with the menu View → Toolbars → Form Controls. As shown in Figure 170, use the Design Mode button, which is highlighted in red, to toggle Design Mode to On.
Right-click the ExpenseType header and select Replace with → Combo Box. The column had been a set of Text Boxes. These are controls which accept text entries. A Combo Box is very similar except that it provides a drop-down list of entries. To set the properties of the Combo Box, right click again on the ExpenseType header and select Column. A dialog titled Properties: Combo Box will appear.
- On the General tab, change the Label to Expense Type, with a space between the words.
- On the Data tab, make sure Type of list contents is Sql and List content is .
SELECT "ExpType" FROM "Expense_Categories"
SELECT "ExpType" FROM "Expense_Categories"
To make the other changes in the Data Sheet, click on each column header and select Column.
- For the AmountSpent field, change the Label to Amount Spent. You may also adjust the Formatting property by clicking the small button with three dots at its right edge and using the dialog to set the Category to Currency and the Format to whichever setting you prefer.
- For the DatePurchased field, select the General tab and set the Label to Date Purchased then scroll down to find the Drop-down listing and change it to Yes.
It would also make sense to delete the EmployeeID column. Its value is set through the foreign key relation. It was displayed only to show the effect of the relation. We will not do that, but a column is deleted by clicking on the header and selecting Delete Column.
Take the forms out of Design Mode and try entering some data. You should be able to use dropdown lists in the Date Purchased and Expense Type columns and the Amount Spent column will be displayed with a currency format if you chose to set that up.
| Content on this page is licensed under the Creative Common Attribution 3.0 license (CC-BY). |


