Dialog Editor
This section provides an overview of the Dialog editor functionality. The controls that are used to design a dialog are not explained. See Programming Dialogs and Dialog Controls for details on programming these controls. The dialog editor is activated by creating a new dialog, clicking a dialog tab at the bottom of the IDE window, or selecting a dialog in the OpenOffice Basic Macro Organizer dialog and clicking the Edit button.
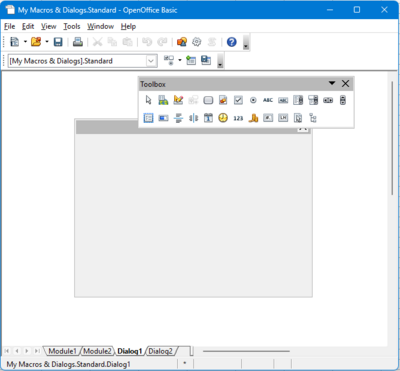
Initially, a new dialog consists of an empty dialog frame. The next illustration shows Dialog2 of the application Standard library in this state.
In the dialog editor mode, the Controls button is enabled and the illustration shows the result by clicking this button. A small toolbar with dialog specific tools is displayed. The buttons in this toolbar represent the types of controls that can be inserted into the dialog. The user clicks the desired button, then draws a frame with the mouse at the position to insert the corresponding control type.
The following three buttons in the dialog tools window do not represent controls:
| The Select button at the lower right of the dialog tools window switches the mouse cursor to selection mode. In this mode, controls are selected by clicking the control with the cursor. If the Shift key is held down simultaneously, the selection is extended by each control the user clicks. Controls can also be selected by drawing a rubber band frame with the mouse. All controls that are completely inside the frame will be selected. To select the dialog frame the user clicks its border or includes it in a selection frame completely. | |
| The Activate Test Mode button switches on the test mode for dialogs. In this mode, the dialog is displayed as if it was a Basic script (see Programming Dialogs and Dialog Controls). However, the macros assigned to the controls do not work in this mode. They are there to help the user design the look and feel of the dialog. | |
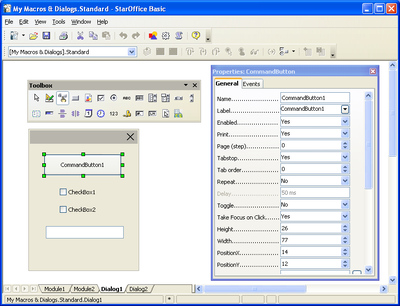
| The Properties button at the lower left of the dialog tools window opens and closes the Properties dialog. This dialog is used to edit all properties of the selected control(s). The next illustration shows the Properties dialog for a selected button control. | |
| The Manage Language button (available since OpenOffice.org 2.2.0 opens the Manage User Interface Languages dialog allowing to manage the localization of dialogs. All details concerning Dialog localization are described in Dialog Localization. |
The illustration above shows that the dialog tool window can be pulled from the main toolbar by dragging the window at its caption bar after opening it.
The Properties dialog has two tabs. The General tab, visible in Illustration 12.26, contains a list of properties. Their values are represented by a control. For most properties this is a list box, such as color and enum types, or an edit field, such as numeric or text properties. For more complex properties, such as fonts or colors, an additional ellipsis button opens another type of dialog, for example, to select a font. When the user changes a property value in an edit field this value is not applied to the control until the edit field has lost the focus. This is forced with the tab key. Alternatively, the user can commit a change by pressing the Enter key.
The Events tab page displays the macros assigned to the events supported by the selected control:
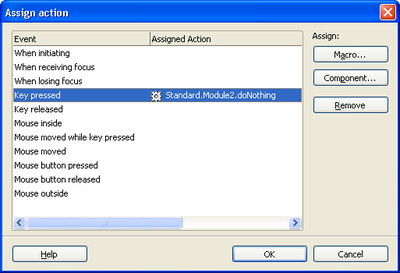
In the example above, a macro is assigned to the Key pressed event: When this event occurs, the displayed Sub doNothing in Module2 of the application Basic library Standard is called. The events that are available depend on the type of control selected.
To change the event assignment the user has to click one of the ellipsis buttons to open the Assign Action dialog displayed in the illustration below.
The list box titled Event displays the same information as the Events tab of the Properties dialog. The Assign Action dialog is always the same, that is only the selected event in its Event list changes according to the ellipsis button the user selected on the Events tab of the Properties dialog.
To assign a macro to an event, the user needs to click on the Macro ... button. This opens the Macro Selector dialog which allows the user to select a macro from the library hierarchy. Clicking OK in the Macro Selector assigns the selected macro to the event. If another macro is already assigned to an event, this macro is replaced. If no Sub is selected, the OK button is disabled.
If the dialog is stored in a document, the library hierarchy displayed in the Macro Selector dialog contains the application library containers and the library container of the document. If the dialog belongs to an application dialog library, document macros are not displayed since they cannot be assigned to the controls of application dialogs. This is because it cannot be guaranteed that the document will be loaded when the application dialog event is fired.
The Remove button is enabled if an event with an assigned macro is selected. Clicking this button removes the macro from the event, therefore the event will have no macro binding.
The list box below the Remove button is used to select different macro languages. Currently, only Apache OpenOffice Basic is available.
The OK button closes the Assign Action dialog, and applies all event assignments and removals to the control. The changes are reflected on the Events tab of the Properties dialog.
The Cancel button also closes the Assign Action dialog, but all assignment and removal operations are discarded.
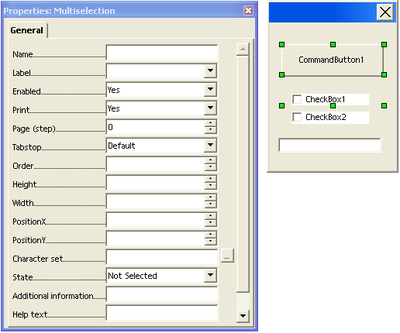
As previously explained, it is also possible to select several controls simultaneously. The next picture shows the situation if the user selects both CommandButton1 and CheckBox1. For the Properties dialog such a multi selection has some important effects.
Here the caption of the Properties contains the string Multiselection to point out the special situation. The two important differences compared to the single selection situation are:
- The displayed properties are an intersection of the properties of all the selected controls, that is, the property is only displayed if all the selected controls support that property. A property value is only displayed if the value is the same for all selected controls. All selected controls are effected when a value is changed by the user. Values that are not the same for all controls can be set with the effect that the specified value applies to all controls in the selection.
- A multi-selection Properties dialog does not have an Events tab. Events can only be specified for single controls.
| Content on this page is licensed under the Public Documentation License (PDL). |


