Difference between revisions of "Documentation/DevGuide/Basic/Calling a Sub from the User Interface"
OOoWikiBot (Talk | contribs) m (Robot: Changing Category:Documentation/Developers Guide/Basic and Dialogs) |
|||
| Line 6: | Line 6: | ||
}} | }} | ||
{{DISPLAYTITLE:Calling a Sub from the User Interface}} | {{DISPLAYTITLE:Calling a Sub from the User Interface}} | ||
| − | A Sub can be called from customized icons, menu entries, upon keyboard shortcuts and on certain application or document events. The entry point for all these settings is the '''Customize''' dialog accessible through the '''Assign''' button in the Macro dialog or the '''Tools | + | A Sub can be called from customized icons, menu entries, upon keyboard shortcuts and on certain application or document events. The entry point for all these settings is the '''Customize''' dialog accessible through the '''Assign''' button in the Macro dialog or the '''Tools > Customize''' command. |
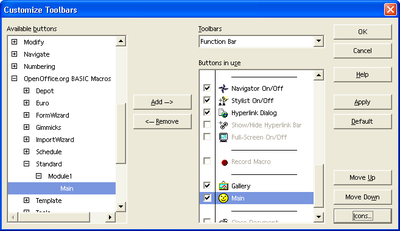
| − | To assign the Sub Main to a toolbar icon, select '''Tools | + | To assign the Sub Main to a toolbar icon, select '''Tools > Customize''' and click the '''Toolbars''' tab The '''Toolbars''' tab looks like this: |
[[Image:CustomizeToolbars.png|none|thumb|400px|Customize Toolbars]] | [[Image:CustomizeToolbars.png|none|thumb|400px|Customize Toolbars]] | ||
| − | Click the '''Add''' button in the '''Toolbars''' tab. In the Add Commands dialog that pops up, scroll down the '''Category''' list until you see the {{PRODUCTNAME}} Macros node. Expand it and the '''FirstStepsBasic.odt''' node. Navigate to the Module < | + | Click the '''Add''' button in the '''Toolbars''' tab. In the Add Commands dialog that pops up, scroll down the '''Category''' list until you see the {{PRODUCTNAME}} Macros node. Expand it and the '''FirstStepsBasic.odt''' node. Navigate to the Module <tt>FirstStepsBasic.Standard.Module1</tt> and select it. When <tt>Module1</tt> is selected, the Commands list shows an entry "Main" for the Sub Main in <tt>Module1</tt>. Clicking '''Add''' will add it to a toolbar. |
You can now click the new toolbar item to launch the example macros. | You can now click the new toolbar item to launch the example macros. | ||
Revision as of 23:38, 15 February 2009
- Creating a Module in a Standard Library
- Writing and Debugging a Basic UNO program
- Calling a Sub from the User Interface
- Creating Dialogs
- Adding Event Handlers
- AutoPilot Dialogs
A Sub can be called from customized icons, menu entries, upon keyboard shortcuts and on certain application or document events. The entry point for all these settings is the Customize dialog accessible through the Assign button in the Macro dialog or the Tools > Customize command.
To assign the Sub Main to a toolbar icon, select Tools > Customize and click the Toolbars tab The Toolbars tab looks like this:
Click the Add button in the Toolbars tab. In the Add Commands dialog that pops up, scroll down the Category list until you see the OpenOffice.org Macros node. Expand it and the FirstStepsBasic.odt node. Navigate to the Module FirstStepsBasic.Standard.Module1 and select it. When Module1 is selected, the Commands list shows an entry "Main" for the Sub Main in Module1. Clicking Add will add it to a toolbar.
You can now click the new toolbar item to launch the example macros.
The section Assigning Macros to GUI Events describes other options to make your Sub accessible from the user interface.
| Content on this page is licensed under the Public Documentation License (PDL). |
