Workspace Views
- What is Impress?
- Starting Impress
- The main Impress window
- Workspace views
- Creating a new presentation
- Formatting a presentation
- Adding and formatting text
- Adding pictures, tables, charts, media files, and other objects
- Working with master pages and styles
- Adding comments to a presentation
- Setting up the slide show
- Running a slide show
Workspace Views
Each of the workspace views is designed to ease the completion of certain tasks; it is therefore useful to familiarize yourself with them in order to quickly accomplish those tasks.
| Each Workspace view displays a different set of toolbars when selected. These toolbar sets can be customized by going to View → Toolbars, then check or uncheck the toolbar you want to add or remove. |
Normal View
Normal view is the main view for working with individual slides. Use this view to format and design and to add text, graphics, and animation effects.
To place a slide in the slide design area (Normal view), click the slide thumbnail in the Slides pane or double-click it in the Navigator.
Outline View
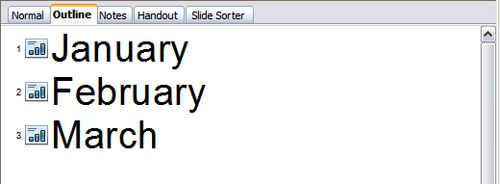
Outline view contains all the slides of the presentation in their numbered sequence. It shows topic titles, bulleted lists, and numbered lists for each slide in outline format. Only the text contained in the default text boxes in each slide is shown, so if your slide includes other text boxes or drawing objects, the text in these objects is not displayed. Slide names are also not included.
Use Outline view for the following purposes.
- Making changes in the text of a slide:
- Add and delete the text in a slide just as in the Normal view.
- Move the paragraphs of text in the selected slide up or down by using the up and down arrow buttons (Move Up or Move Down) on the Text Formatting toolbar (highlighted in Figure 112).
- Change the outline level for any of the paragraphs in a slide using the left and right arrow buttons (Promote or Demote) on the Text Formatting toolbar.
- Both move a paragraph and change its outline level using a combination of these four arrow buttons.
- Compare slides with your outline (if you have prepared one in advance). If you notice from your outline that another slide is needed, you can create it directly in the Outline view, or you can return to the Normal view to create it.
Notes View
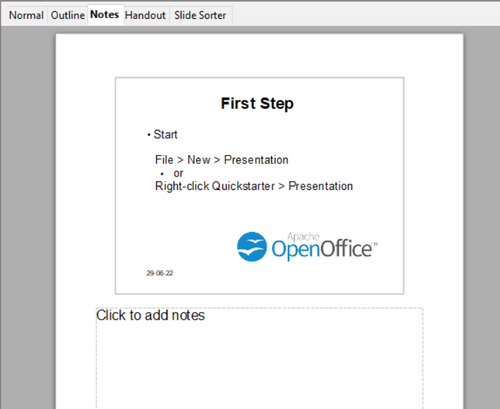
Use the Notes view (Figure 113) to add notes to a slide. These notes are not seen when the presentation is shown.
- Click the Notes tab in the Workspace.
- Select the slide to which you want to add notes.
- Click the slide in the Slides pane, or
- Double-click the slide's name in the Navigator.
- In the text box below the slide, click on the words Click to add notes and begin typing.
You can resize the Notes text box using the colored resizing handles which appear when you click on the edge of the box. You can also move the box by placing the pointer on the border, then clicking and dragging. To make changes in the text style, use the Styles and Formatting deck in the Sidebar or press the F11 key to open the Styles and Formatting window.
Handout View
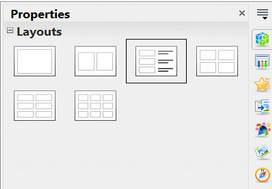
Handout view is for setting up the layout of your slide for a printed handout. Click the Handout tab in the workspace, then choose the Properties deck in the Sidebar. You can then select to print 1, 2, 3, 4, 6, or 9 slides per page.
Use this view also to customize the information printed on the handout. Refer to Chapter 10 of the Impress Guide for instructions on printing slides, handouts, and notes.
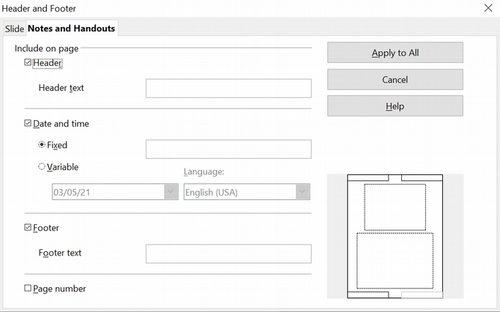
Select from the main menu Insert → Page Number or Insert → Date and Time and in the dialog box that opens, Figure 115, click on the Notes and Handouts tab. Use this dialog to select the elements you want to appear on each handout page and their contents. More details on how to use this dialog are provided in the Impress Guide.
Slide Sorter View
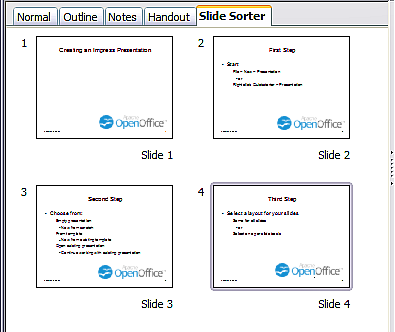
Slide Sorter view contains all the slide thumbnails. Use this view to work with a group of slides or with only one slide.
Customizing Slide Sorter View
To change the number of slides per row:
- Check View → Toolbars → Slide Sorter and View → Toolbars → Slide View to show or hide the slide sorter and view toolbars.
- Adjust the number of slides (up to a maximum of 15).
Moving a Slide Using Slide Sorter
To move a slide in a presentation in the Slide Sorter:
- Click the slide and the slide is highlighted (see Figure 116).
- Drag and drop it to the location you want.
Selecting and Moving Groups of Slides
To select a group of slides, use one of these methods:
- Use the Control (Ctrl) key: Click on the first slide and, while pressing the Control key, select the other desired slides.
- Use the ⇧ Shift key: Click on the first slide, and while pressing the ⇧ Shift key, select the final slide in the group. This selects all the other slides between the first and the last.
- Use the mouse: Click slightly to one side (left or right) of the first slide to be selected. Hold down the left mouse button and drag the mouse pointer until all the slides you want selected are highlighted.
To move a group of slides:
- Select a group of slides.
- Drag and drop the group to their new location.
Working in Slide Sorter View
You can work with slides in the Slide Sorter view just as you can in the Slide pane.
To make changes, right-click a slide and choose any of the following from the pop-up menu:
- Add a new slide after the selected slide.
- Delete Slide: deletes the selected slide.
- Rename Slide: allows you to rename the selected slide.
- Slide Layout: allows you to change the layout of the selected slide in the Sidebar.
- Slide Transition: allows you to change the transition of the selected slide using the Sidebar.
- For one slide, click the slide to select it and then add the desired transition.
- For more than one slide, select the group of slides and add the desired transition.
- Hide Slide: hidden slides are not shown in the slide show.
- Cut: removes the selected slide and saves it to the clipboard.
- Copy: copies the selected slide to the clipboard without removing it.
- Paste: inserts a slide from the clipboard.
| Content on this page is licensed under the Creative Common Attribution 3.0 license (CC-BY). |
