Formatting a Presentation
- What is Impress?
- Starting Impress
- The main Impress window
- Workspace views
- Creating a new presentation
- Formatting a presentation
- Adding and formatting text
- Adding pictures, tables, charts, media files, and other objects
- Working with master pages and styles
- Adding comments to a presentation
- Setting up the slide show
- Running a slide show
Formatting a Presentation
A new presentation contains only one empty slide. In this section we will start adding new slides and preparing them for the intended contents.
Inserting Slides
This can be done in a variety of ways; take your pick.
- Insert → Slide.
- Right-click on the present slide, and select Slide → New Slide from the pop-up menu.
- Click the Slide icon
 in the Presentation toolbar.
Sometimes, rather than starting from a new slide you want to duplicate a slide you have already inserted. To duplicate a slide, select the slide you want from the Slides pane and then choose Insert → Duplicate Slide.
Selecting a Layout
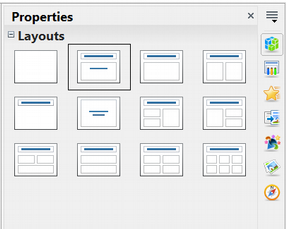
In the Sidebar, select the Properties deck. The Layouts panel will display the available layouts if no elements are selected in the slide. The Layouts differ in the number of elements a slide will contain, from a blank slide to a slide with six contents boxes and a title.
The first slide in a presentation is normally a title slide. The Title Slide (which also contains a section for a subtitle) or Title Only are suitable layouts for the first slide, while for most of the slides you will probably use the Title, Contents layout.
To create the title, click on Click to add title (assuming the Blank Slide layout was not used) and then type the title text. To adjust the formatting of the title, modify the Title presentation style in the Styles and Formatting deck of the Sidebar; see Chapter 2 in the Impress Guide for instructions.
If you are using the Title Slide layout, click on Click to add text to add a subtitle. Proceed as above to make adjustments to the formatting if required, modifying the Subtitle presentation style instead.
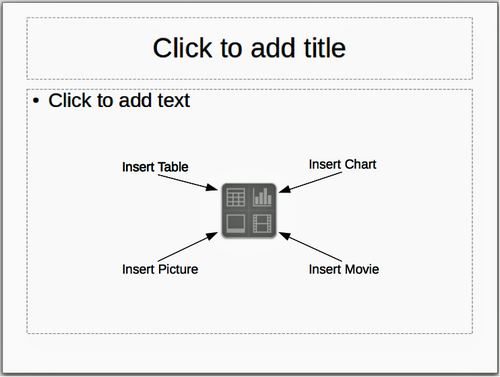
Several layouts contain one or more content boxes. Each of these boxes can be configured to contain one of the following elements: Text, Movie, Picture, Chart, or Table.
You can choose the type of contents by clicking on the corresponding icon that is displayed in the middle of the contents box as shown in Figure 122. If instead you intend to use the contents box for text, just click anywhere on the box to get a cursor.
If you have selected a layout with one or more contents boxes, this is a good time to decide what type of contents you want to insert.
Modifying the Slide Elements
At this stage, the slide contains elements that were included in the slide master, as well as those elements included in the selected slide layout. It is however unlikely that the predefined layouts will suit all your needs. You may want to remove any elements that are not required or insert objects such as text and graphics.
Although Impress does not have the functionality to create new layouts, it allows you to resize and move the layout elements. It is also possible to add slide elements without being limited to the size and position of the layout boxes.
To resize a contents box, click on the outer frame so that the 8 resizing handles are displayed. To move it place the mouse cursor on the frame so that the cursor changes shape. You can now click the left mouse button and drag the contents box to its new position on the slide.
To remove any unwanted elements, do this:
- Click the element to highlight it. The colored resizing handles show it is highlighted.
- Press the Delete key to remove it.
Adding Text to a Slide
To add text to a slide that contains a text frame, click on Click to add text in the text frame and then type your text. The Outline styles are automatically applied to the text as you insert it. You can change the outline level of each paragraph as well as its position within the text by using the arrow buttons on the Text Formatting toolbar (see “Outline View”).
Adding Pictures or Objects to a Slide
To add any pictures or objects to a slide, for example a picture, clip art, drawing, photograph, or spreadsheet, click on Insert then select from the drop-down menu what type of insert you require. For more information, see “Adding Pictures, Tables, Charts, Media Files, and Other Objects”.
Modifying the Appearance of All Slides
To change the background and other characteristics of all slides in the presentation, you need to modify the master page or choose a different master page as explained in “Working with Master Pages and Styles”.
A Slide Master is a slide with a specified set of characteristics that acts as a template and is used as the starting point for creating other slides. These characteristics include the background, objects in the background, formatting of any text used, and any background graphics.
Impress includes a range of slide masters, found in the Master Pages deck of the Sidebar. You can also create and save additional slide masters or add more from other sources. See Chapter 2 in the Impress Guide for information on creating and modifying slide masters.
If all you need to do is to change the background, you can take a shortcut:
- Select Format → Page and go to the Background tab.
- Select the desired background between solid color, gradient, hatching, and bitmap.
- Click OK to apply it.
A dialog box will open asking if the background should be applied to all the slides. If you click yes, Impress will automatically modify the master page for you.
| Inserting and correctly formatting a background is beyond the scope of this chapter, but you can find all the information you need in Chapter 4 of the Draw Guide or in Chapter 6 of the Impress Guide. |
Modifying the Slide Show
By default, the slide show will display all the slides in the same order as they appear in the slide sorter, without any transition between slides, and you need some keyboard or mouse interaction to move from one slide to the next.
You can use the Slide Show menu to change the order of the slides, choose which ones are shown, automate moving from one slide to the next, and other settings. To change the slide transition, animate slides, add a soundtrack to the presentation, and make other enhancements, you need to use functions in the Sidebar. See the Impress Guide for details on how to use all of these features.
| Content on this page is licensed under the Creative Common Attribution 3.0 license (CC-BY). |

