The Main Impress Window
- What is Impress?
- Starting Impress
- The main Impress window
- Workspace views
- Creating a new presentation
- Formatting a presentation
- Adding and formatting text
- Adding pictures, tables, charts, media files, and other objects
- Working with master pages and styles
- Adding comments to a presentation
- Setting up the slide show
- Running a slide show
The Main Impress Window
The main Impress window has three parts: the Slides pane, Workspace, and Sidebar. Additionally, several toolbars can be displayed or hidden during the creation of a presentation.
Slides Pane
The Slides' pane contains thumbnail pictures of the slides in your presentation, in the order they will be shown unless you change the slide show order. Clicking a slide in this pane selects it and places it in the Workspace. When a slide is in the Workspace, you can make changes any way you like.
Several additional operations can be performed on one or more slides simultaneously in the Slides pane:
- Add new slides to the presentation.
- Mark a slide as hidden so that it will not be shown as part of the presentation.
- Delete a slide from the presentation if it is no longer needed.
- Rename a slide.
- Duplicate a slide (copy and paste) or move it to a different position in the presentation (cut and paste).
It is also possible to perform the following operations, although there are more efficient methods than using the Slides pane:
- Change the slide transition following the selected slide or after each slide in a group of slides.
- Change the sequence of slides in the presentation.
- Change the slide design.
- Change slide layout for a group of slides simultaneously.
Sidebar
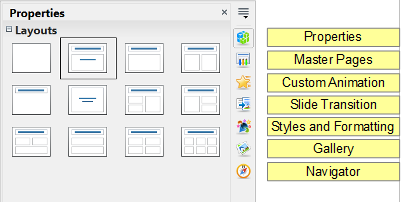
The Sidebar and the names of its components were introduced in Chapter 1. Introducing Apache Open Office. In Impress, it has seven decks, as shown in Figure 107. What is displayed to the left of the deck icons depends on the deck chosen and what is selected in the Workspace and may be entirely different from what is shown on your system.
Properties
This deck is very context dependent. Figure 107 shows the panel that is displayed when a slide is in the Workspace, but none of its components is selected. If a Text Box were selected, panels for setting the text and paragraph properties would be displayed and if a shape were selected, panels for setting area, line, and size and position would also be displayed.
Master Pages
Here you define the page (slide) style for your presentation. Impress includes several designs of Master Pages (slide masters). One of them—Default—is blank, and the rest have background and styled text. The deck has panels showing the Master Pages used in the current presentation, those used recently, and all of the available Master Pages.
| The Styles and Formatting can be used to modify the styles used in any slide master to suit your purpose. This can be done at any time. |
Custom Animation
A variety of animations can be used to emphasize or enhance different elements of each slide. The Custom Animation deck provides an easy way to add, change, or remove animations.
Slide Transition
The Slide Transition deck provides access to a number of slide transition options. The default is set to No Transition, in which the following slide simply replaces the existing one. However, many additional transitions are available. You can also specify the transition speed (slow, medium, fast), choose between an automatic or manual transition, and choose how long the selected slide should be shown (automatic transition only).
Styles and Formatting
This deck provides access to all the styles, which are grouped into the categories Presentation styles and Graphics styles. Styles and Formatting can also be accessed through the menu Format → Styles and Formatting or by pressing F11 .
The Gallery and Navigator decks are very similar to the features available in all OpenOffice applications. Use of the Navigator is explained in Chapter 1. The Gallery provides several categories of clip art.
Workspace
The Workspace (normally in the center) has five tabs: Normal, Outline, Notes, Handout, and Slide Sorter. These five tabs are called View buttons. The Workspace below the View buttons changes depending on the chosen view. The workspace views are later described in detail.
Toolbars
Many toolbars can be used during slide creation; they can be displayed or hidden by clicking View → Toolbars and selecting from the menu.
You can also select the icons that you wish to appear on each toolbar. For more information, refer to Chapter 1 (Introducing Apache OpenOffice) in this book.
Many of the toolbars in Impress are similar to the toolbars in Draw. Refer to the Draw Guide for details on the functions available and how to use them.
Status Bar
The Status bar, located at the bottom of the Impress window, contains information that you may find useful when working on a presentation. For details on the contents and use of these fields, see Chapter 1 (Introducing Apache OpenOffice).
| The sizes are given in the current measurement unit (not to be confused with the ruler units). This unit is defined in Tools → Options → OpenOffice Impress → General. |
From left to right, you will find:
- Information area, which changes depending on the selection.
For example:
| Selection | Examples of information shown |
| Text area | TextEdit: Paragraph x, Row y, Column z |
| Charts, spreadsheets | Embedded object (OLE) “ObjectName” selected |
| Graphics | Bitmap with transparency selected |
- Cursor position—the position of the cursor or of the top left corner of the selection measured from the top left corner of the slide, followed by the width and height of the selection or text box where the cursor is located.
- Unsaved changes—an asterisk or icon indicating that the file needs saving.
- Digital signature—an icon indicating whether the document is digitally signed. After the file has been saved, double-clicking on this flag opens the digital signatures dialog.
- Slide number—the slide number currently displayed in the Workspace and the total number of slides in the presentation.
- Page (slide) style—the style associated with the slide, handout, or notes page currently in the Workspace. Double-clicking on the style name opens the slide design dialog.
- Zoom slider—adjusts the zoom percentage of the Workspace displayed.
- Zoom percentage—indicates the zoom percentage of the Workspace displayed. Double-clicking on zoom percentage opens the zoom and layout dialog.
You can hide the information in the Status Bar by selecting View → Status Bar from the main menu.
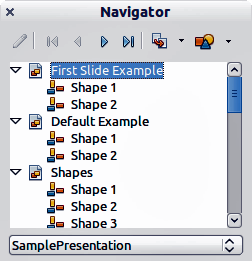
The Navigator displays all objects contained in a document. It provides another convenient way to move around a document and find items in it. To display the Navigator, click its icon ![]() among the Sidebar icons or on the Standard toolbar, choose View → Navigator on the menu bar, or press Ctrl + ⇧ Shift + F5 .
among the Sidebar icons or on the Standard toolbar, choose View → Navigator on the menu bar, or press Ctrl + ⇧ Shift + F5 .
The Navigator is more useful if you give your slides and objects (pictures, shapes, and so on) meaningful names, instead of leaving them as the default “Slide 1” and “Shape 2”.
| Content on this page is licensed under the Creative Common Attribution 3.0 license (CC-BY). |


