Using list (numbering) styles
List styles (also called numbering styles) work with paragraph styles. They define indentation, alignment, and the numbering or bullet characters used for numbered or bulleted lists. You can define many list styles to use for different purposes, from simple bulleted lists to complex multi-level lists.
List styles offer so many choices that they can seem more complex than they really are, and new users may easily be confused about where to begin and how to proceed. This section introduces one very simple use of a numbered list style. A more complex example is given in "Defining the appearance of nested lists" in Chapter 7 (Working with Styles).
Why use list styles?
As with other styles, the main reason is consistency and to speed up your work. Although you can create simple lists quickly by clicking the Numbering On/Off or Bullets On/Off icons on the Formatting toolbar, and use the icons on the Bullets and Numbering toolbar to create quite complex nested lists (as described in Chapter 3), the appearance of the resulting lists may not be what you want—and you might want to have more than one style of list. You can use the Bullets and Numbering choice on the Format menu to manually format the appearance of some or all of the lists, but what if you later need to change their appearance?
Creating a simple list style
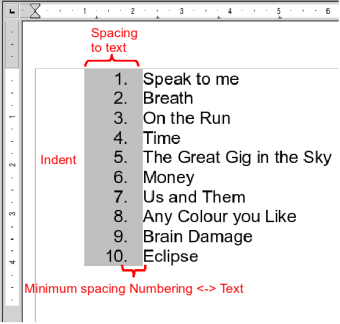
In this example we will create a numbered list style that can be used to number the songs on a CD. The numbers are right-aligned and some space is left between the number and the title of the track. The final result is illustrated below.

A numbered list of CD tracks, highlighting the various elements.
The process has two steps:
Step 1: Create the numbered list style.
Step 2. Apply the list style to the paragraphs you want numbered.
Step 1: Create the numbered list style.
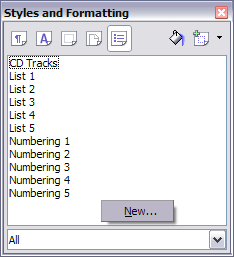
Before you begin, press F11 to open the Styles and Formatting window, if it is not already open.
- Select the List Styles icon at the top of the Styles and Formatting window (fifth from the left).
- Right-click in the blank area below the list of styles and choose New. (You could modify one of the existing styles, but it’s easier to remember which style is for what special purpose if you create a new one.) The Numbering Style dialog box is displayed. For the CDTracks list style we need to customize fields in the Organizer, the Options and the Position pages.
- The Organizer page of the Numbering Style dialog serves the same purpose as in the Paragraph style dialog but has fewer options. Give the new list style a name, for example CDTracks.
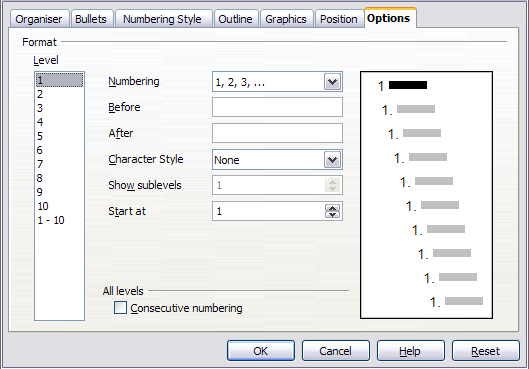
- On the Options page, you can set up parameters for each individual level of the structure or for all the levels at once. In this example we need only one level (1). The right-hand side of the dialog box shows a preview of what the numbered list will look like.
- In the Level box, choose 1.
- In the Numbering list, choose 1,2,3.
- Leave the Before and After boxes blank, or delete anything that is in them.
- Leave Character Style as None.
- Make sure Start at is 1.
- Show sublevels should be grayed out. Do not select the checkbox for Consecutive numbering.
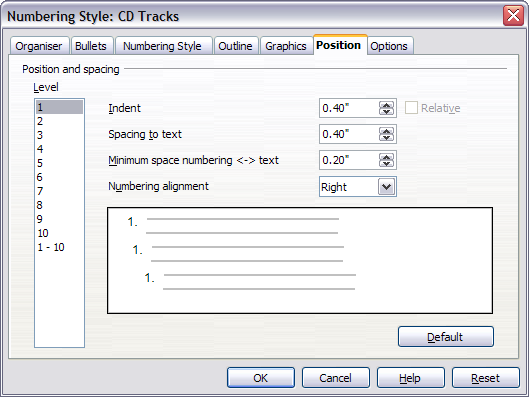
- The Position page provides the following fields:
- Indent: Determines the indentation of the number or bullet area. The indentation is measured from the left margin of the paragraph linked to the numbering style. In other words, if the paragraph style already has an indentation, when the list style is applied the indentations are summed together. When a level different from Level 1 is selected, if the Relative checkbox is selected, the indentation is applied relative to the previous level.
- Spacing to text: This value determines how much space will be used by the numbering symbol. OOo will reserve this space even if only part of it is used.
- Minimum spacing numbering <–> text: This is the spacing between the right edge of the numbering symbol and the text. If the spacing to text is not sufficient, OOo will expand the numbering area. Setting the minimum spacing between numbering and text is very useful when right-aligning the numbering or when there is a long text before or after the numbering.
- Numbering alignment: Select in the drop-down menu how the numbering (including any text before or after) should be aligned: left, centered, or right.
- In the Level box, choose 1.
- For Indent, choose 1.0cm. (You may need to adjust this later.)
- For Spacing to text, choose 1.0cm.
- For Minimum space..., choose 0.5cm.
- For Numbering alignment, choose Right.
- Do nothing on the other pages of this dialog box.
- Click OK to save this style.
| Although the icon at the top of the Styles and Formatting window is labelled List Styles, the dialog that opens is labelled Numbering Style. |

The Options dialog settings for the CDTracks list style.

Setting the alignment and indentation for the CDTracks list style. As we are creating a simple list, all we need to do in this page is:
Step 2. Apply the list style to the paragraphs you want numbered.
Now that the list style is available, it can be quickly applied to any list in the document:
- If starting a new list, before pressing Enter to start a new line double-click on the desired list style name in the Styles and Formatting window.
- If you already have a list, select it and then double-click on the desired list style name in the Styles and Formatting window.
Restarting numbering (if required)
If you have more than one list in a chapter, the second and subsequent lists may continue numbering from the previous list. To restart at 1, place the cursor anywhere in the paragraph you want numbered 1, right-click and choose Restart numbering.
To stop using numbering, click the Numbering On/Off icon on the Standard toolbar.
| Content on this page is licensed under the Creative Common Attribution 3.0 license (CC-BY). |
