Creating custom styles
Introducing custom styles
You have seen that the Styles and Formatting window provides several predefined styles, such as Heading 1 and Text body. But what if you need something different, like a poem style, that is not in Styles and Formatting? With OpenOffice.org you can make your own styles to suit your needs.
In this section, we will create a Poem paragraph style, and a PoemHeading paragraph style, with the following properties:
- Poem: Centered, with font-size 10.
- PoemHeading: Centered, bold, with font-size 12.
In addition, a PoemHeading is to be followed by a Poem. In other words, when you press Enter, the style changes to Poem.
Note The keen reader may have noticed this behavior already. After you type a heading and press Enter, the style switches back to Text body.
Creating the Poem paragraph style
Our first example is the Poem style. We use the Default style as a starting point.
- Click the Styles and Formatting icon inline:Graphic16.png or press F11.
- Click the Paragraph Styles icon (first from the left).
- Right-click Default and choose New.
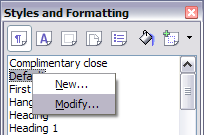
Create a new style.

This opens the Paragraph Style dialog box, with the Organizer tab selected. To create a custom style, you have to understand and configure the top three entries.
| Style fields | Description | |
| Name | This is the name of the style itself, like Heading 1 or Text body. Set (type in the text box) the name to Poem. | |
| Next Style | This is the default style that follows the Poem style. When you press Enter while typing text in the Poem style, this style is used. Set this value to Poem. When you press Enter, the text will remain in the Poem style. | |
| Linked with | If the Poem style is linked with another, say Default, then any change in Default will affect Poem, just as you saw with Heading in the previous section. For our example, this is not the behavior we want. Set this entry to - None -. This means that Poem is not linked with any other style. |
After making these changes, your screen should look like the illustration below.

Initial configuration for the Poem style. Set the first three entries as shown.
The next step is to configure the alignment and font properties of this style.
- On the Alignment page, select the Center option.
- On the Font page, select 12pt font-size.
Click OK to save the new Poem style.
Congratulations! You just made your very own style.
Creating the PoemHeading style
Create a new PoemHeading style. Use the same procedure as before, with these changes:
- Next style: Select Poem, not PoemHeading.
- Linked with: Heading.
The window should look like the picture below.

Settings for the PoemHeading style.
Now set the settings of the new style:
- On the Alignment page, select Center.
- On the Font page, choose Bold and size 14pt.
Click OK to save the new PoemHeading style.
Sample poem
It is a good idea to test out your new styles and see if you are happy with them. Your poem should look similar to the one below.

Sample poem.
Changing the formatting of your styles
One of the main advantages of styles is that they allow the document formatting to be changed after the content has been written. For example, suppose you have written a 100-page book of poetry. Then you decide you don't like the way the poems look after all. Or, perhaps, your publisher doesn't like it.
To learn about reconfiguring styles, we will make the following changes:
- The Poem style will be indented instead of centered.
- Add a PoemAuthor style based on Poem, except it is bold and has more indentation.
Indent Poem and PoemHeading
First, set the Poem style to left alignment:
- In the Styles and Formatting window, select Poem, right-click and select Modify.
- On the Alignment page, select Left.
Set the indentation:
- Click the Indents & Spacing tab.
- Under Indent, set the indentation before the text to 5cm (or about 2in).
Done! Click OK, and you should see the text change. Do the same thing for PoemHeading.
Create PoemAuthor style
The purpose of this style is to set apart the name of the author from the rest of the poem. You already know how to create a new style. Follow the same procedure as before (starting from the Poem style). Use the following configuration:
- Name: PoemAuthor
- Next style: Default
- Linked with: Poem
Now, configure PoemAuthor just like you configured Poem, with the following changes:
- Font: Bold
- On the Indents & Spacing page:
- Under Indent, set the Before text field to 8.00'cm (3.2 in).
- Under Spacing, set the spacing above the paragraph to 0.50cm (0.2 in). This creates an extra space between the poem and the name of the author.
The picture below shows how the Indents & Spacing page should look at this point. Click OK to save the style. Now set the author of the poem (in the example, Anon) to the newly created PoemAuthor style, as described in First steps.

Indentation and spacing for the PoemAuthor style.
Final result
After all these changes, the poem should look similar to the one below.

Final result, using three custom styles.
Tips and tricks
You can make the Styles and Formatting window display only custom styles. Click on the menu at the bottom of the Styles and Formatting window and select Custom Styles. As shown below, Styles and Formatting only displays Poem, PoemAuthor, and PoemHeading.

Displaying only custom styles.
| Content on this page is licensed under the Creative Common Attribution 3.0 license (CC-BY). |