The Writer interface
- The Writer interface
- Working with documents
- Working with text
- Formatting text
- Formatting pages
- Adding comments and graphics to a document
- Creating a table of contents, index, or bibliography
- Printing from Writer
- Sending a fax
- Tracking changes to a document
- Fields, mail merge, master documents, forms
- Linking to another part of a document
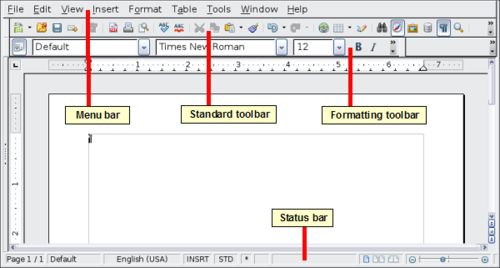
The main Writer workspace is shown below. The menus and toolbars are described in Chapter 1 (Introducing OpenOffice.org).
Some other features of the Writer interface are covered in this chapter.
Status bar
The Writer status bar provides information about the document and convenient ways to quickly change some document features.
Page number
Shows the current page number, the sequence number of the current page (if different), and the total number of pages in the document. For example, if you restarted page numbering at 1 on the third page, its page number is 1 and its sequence number is 3.
If any bookmarks have been defined in the document, a right-click on this field pops up a list of bookmarks; click on the required one.
To jump to a specific page in the document, double-click in this field. The Navigator opens. Click in the Page Number field and type the sequence number of the required page. After a brief delay, the display jumps to the selected page.
Page style
Shows the style of the current page. To change the page style, right-click on this field. A list of page styles pops up; choose a different style by clicking on it.
To edit the page style, double-click on this field. The Page Style dialog opens.
Language
Shows the language for the selected text.
Click to open a menu where you can choose another language for the selected text or for the paragraph where the cursor is located. You can also choose None (Do not check spelling) to exclude the text from a spelling check or choose More... to open the Character dialog.
Insert mode
Click to toggle between Insert and Overwrite modes when typing.
Selection mode
Click to toggle between STD (Standard), EXT (Extend), ADD (Add) and BLK (Block) selection. EXT is an alternative to Shift+click when selecting text. See Working with text for more information about ADD and BLK.
Unsaved Changes
An asterix appears here if changes to the document have not been saved.
Digital signature
If the document has been digitally signed, an icon [[Image:]] shows here. You can double-click the icon to view the certificate.
Section or object information
When the cursor is on a section, heading, or list item, or when an object (such as a picture or table) is selected, information about that item appears in this field. Double-clicking in this area opens a relevant dialog. For details, consult the Help or the Writer Guide.
View layout
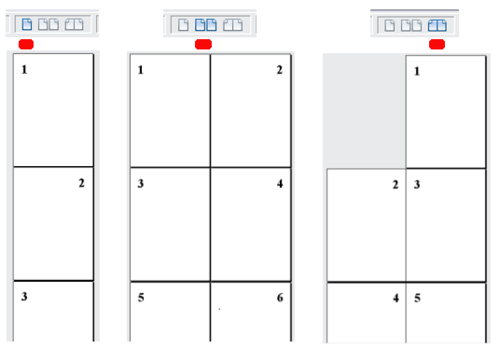
Click an icon to change between single page, side-by-side, and book layout views. You can edit the document in any view.
Zoom
To change the view magnification, drag the Zoom slider, or click on the + and – signs, or right-click on the zoom level percent to pop up a list of magnification values from which to choose. Zoom interacts with the selected view layout to determine how many pages are visible in the document window.
Changing document views
Writer has several ways to view a document: Print Layout, Web Layout, and Full Screen. To access these and other choices, go to the View menu and click on the required view. (When in Full Screen view, press the Esc key to return to either Print or Web Layout view.)
When in Print Layout, you can use both the Zoom slider and the View Layout icons on the Status bar. When in Web Layout, you can use the Zoom slider.
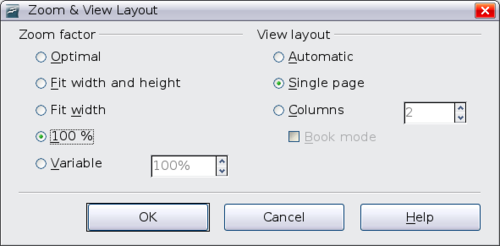
You can also choose View > Zoom from the menu bar to display the Zoom & View Layout dialog, where you can set the same options as on the Status bar. In Web Layout view, most of the choices are not available.
Moving quickly through a document
In addition to the navigation features of the Status bar (described above), you can use the main Navigator window and the Navigation toolbar as described in Chapter 1 (Introducing Apache OpenOffice).
In Writer, you can also display the Navigation toolbar by clicking on the small Navigation icon near the lower right-hand corner of the window below the vertical scroll bar, as shown below.
The Navigation toolbar shows icons for all the object types shown in the Navigator, plus some extras (for example, the results of a Find command).
Click an icon to select that object type. Now all the Previous and Next icons (in the Navigator itself, in the Navigation Toolbar, and on the scroll bar) will jump to the next object of the selected type. This is particularly helpful for finding items like index entries, which can be difficult to see in the text. The names of the icons (shown in the tooltips) change to match the selected category; for example, Next Graphic, Next Bookmark, or Continue search forward.
For more uses of the Navigator in Writer, see the Writer Guide.
| Content on this page is licensed under the Creative Common Attribution 3.0 license (CC-BY). |


