Creating a new presentation
This section describes how to set up a new presentation. The settings selected here are general/they apply to all the slides. The section Working with slides explains how to apply settings to specific slides. These explanations can also apply to some of the general settings.
Planning a presentation
The first thing to do is to decide what you are going to do with the presentation. For example, putting a group of digital photos together in a presentation requires very little planning. However, using a presentation to increase the knowledge of others about your topic requires much more planning.
| This chapter has been put into presentation form and is available for download from the OOoAuthors website. It was developed by using the steps in this chapter. |
You need to ask and answer many questions before you begin creating a presentation. If you are not acquainted with creating presentations, the answers will be more general. Those who have created a variety of presentations in the past will want to have more specific answers.
Who is to see the presentation? How will it be used? What is the subject matter? What should be in its outline? How detailed should the outline be? Will an audio file be played? Is animation desirable? How should the transition between slides be handled? These are some of the many questions that should be asked, answered, and written down before creating the presentation. Sound and animation are more advanced topics and are explained in the Impress Guide.
Again, it is not always necessary at this point to have specific answers to every question. Making an outline is extremely important. You may already know exactly what some of the slides will contain. You may only have a general idea of what you want on some of the slides. That is alright. You can make some changes as you go. Change your outline to match the changes you make in your slides.
The important part is that you have a general idea of what you want and how to get it. Put that information on paper. That makes it much easier to create the presentation.
Starting the Presentation Wizard
You can start Impress in either of two ways:
- Click the triangle to the right of the New Icon and select Presentation from the drop-down menu.
- Choose File > New > Presentation from the menu bar.
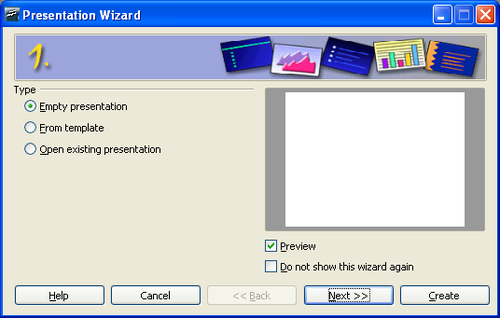
When you start Impress, the Presentation Wizard appears.
| If you do not want the wizard to start every time you launch Impress, select the Do not show this wizard again checkbox. |
Select Empty Presentation under Type. It creates a presentation from scratch.
| Leave the Preview checkbox selected, so templates, slide designs, and slide transitions appear in the preview box as you choose them. |
| From Template uses a template design already created as the basis for a new presentation. The wizard changes to show a list of available templates. Choose the template you want. Open Existing Presentation continues work on a previously created presentation. The wizard changes to show a list of existing presentations. Choose the presentation you want. Both of these options are covered in the Impress Guide. |
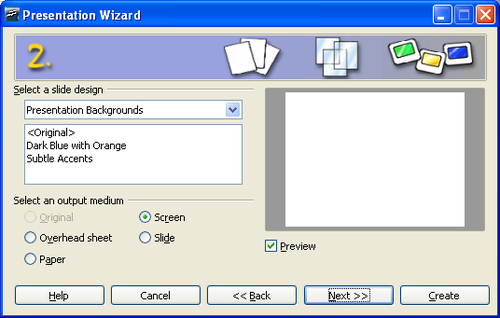
Click Next. The Presentation Wizard step 2 appears. The illustration below shows the Wizard as it appears if you selected Empty Presentation at step 1. If you selected From Template, an example slide is shown in the Preview box.
Choose a design under Select a slide design. The slide design section gives you two main choices: Presentation Backgrounds and Presentations. Each one has a list of choices for slide designs. If you want to use one of these other than <Original>, click it to select it.
The types of Presentation Backgrounds are shown in Figure 2. By clicking an item, you will see a preview of the slide design in the Preview window. Impress contains three choices under Presentations: <Original>, Introducing a New Product, and Recommendation of a Strategy.
- <Original> is for a blank presentation slide design.
- Both Introducing a New Product and Recommendation of a Strategy have their own prepackaged slide designs. Each design appears in the Preview window when its name is clicked.
| Introducing a New Product and Recommendation of a Strategy are prepackaged presentation templates. They can be used to create a presentation by choosing From template in the first step (Figure 1). |
Select how the presentation will be used under Select an output medium. Most often, presentations are created for computer screen display. Select Screen.
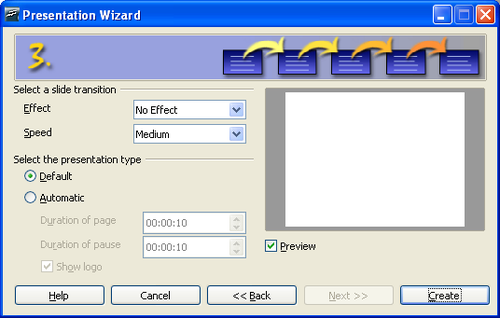
Click Next. The Presentation Wizard step 3 appears.
Choose the desired option from the Effect drop-down menu.
Select the desired speed for the transition between the different slides in the presentation from the Speed drop-down menu. Medium is a good choice for now.
Click Create. A new presentation is created.
| If you selected From template on step 1 of the Wizard, the Next button will be active on step 3 and other pages will be available. These pages are not described here. |
| Content on this page is licensed under the Creative Common Attribution 3.0 license (CC-BY). |


