Alignment using the grid and snap guides
- The Drawing toolbar
- Creating lines and shapes
- Working with 3D shapes
- Grouping shapes together
- Arranging shapes
- Flipping shapes
- Aligning shapes
- Alignment using the grid and snap guides
- Converting an object to a different type
- Setting up interaction with a shape or image
- Animating images
- Using Fontwork
The section Aligning shapes discussed the alignment of objects relative to each other or to the page border. However, sometimes it is important to align objects to specific points of the page or to make sure that objects that appear on multiple slides are placed in exactly the same position. For this purpose Impress provides two mechanisms: the Grid and the Snap Guides (also called Snap Lines).
Using the grid
Options for the grid are available in the menu that opens by right-clicking on an empty part of the page in Normal view and choosing Grid or by selecting View > Grid from the menu bar. In both cases a submenu with three options opens:
- Visible Grid: displays the grid.
- Snap to Grid: the anchor points of an object will always be placed on a grid when the object is moved or resized.
- Grid to Front: displays the grid in the foreground.
To set up the grid spacing and snapping options, choose Tools > Options > OpenOffice.org Impress > Grid from the menu bar.
Using snap guides
Options for the guides are available in the menu that opens by clicking on an empty part of the page in Normal view and choosing Snap Lines or by selecting View > Guides from the menu bar. A submenu with three options opens:
- Visible Guides (Snap Lines Visible): the guides are shown on the slide.
- Snap to Guides (Snap to Snap Lines): the anchor points of the objects snap to the guides when the objet is moved or resized.
- Guides to Front (Snap Lines to Front): the guides are brought to the foreground and cover the objects.
To create a new Guide:
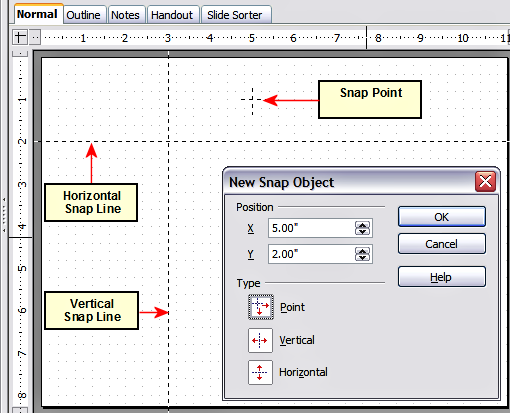
- Right-click on an empty part of the work area and select Insert Snap Point/Line from the pop-up menu.
- In the dialog that appears, specify the type (Point, Vertical line, or Horizontal line).
- Depending on the choice made, the two edit fields X and Y become active; enter the position of the Guide.
- Click OK to close the dialog.
| When positioning the Snap Guides, it is useful to display the rulers. To do so, select View > Rulers. |
| Drag a Snap Guide directly onto the slide by clicking on the ruler and then dragging onto the slide. |
To edit a Guide:
- Right-click next to or on the guide to be edited.
- Select Edit Snap line from the pop-up menu.
- Enter the new value (or values) and click OK.
To delete a Guide:
- Right-click next or on the guide to be deleted.
- Choose Delete Snap line from the pop-up menu.
The figure below show the three types of guides, the grid on a slide, and the dialog to create a new Guide.
| Content on this page is licensed under the Creative Common Attribution 3.0 license (CC-BY). |
