Contrôle de l'impression
Contents
Utiliser la boîte de dialogue d'impression
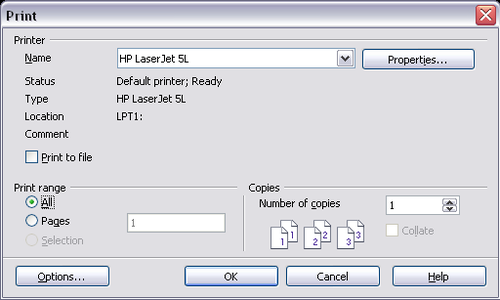
Pour un meilleur contrôle de l'impression, utilisez Fichier > Imprimer pour afficher la boîte de dialogue Imprimer.
À partir de la boîte de dialogue Imprimer, vous pouvez choisir :
- Quelle imprimante utiliser (si plus d'une imprimante est installée sur votre système) et les propriétés de l'imprimante - par exemple, l'orientation (portrait ou paysage), quel bac à papier utiliser et sur quelle taille de papier imprimer. Les propriétés disponible dépendent de l'imprimante sélectionnée ; consultez la documentation de l'imprimante pour plus de détails.
- Quelles pages imprimer, combien d'exemplaires imprimer et dans quel ordre les imprimer.
- Utilisez un tiret pour spécifier des plages de pages et des virgules ou point virgules pour séparer les plages ; par exemple : 1, 5, 11-14, 34-40.
- Sélection est la partie mise en surbrillance sur une ou plusieurs pages.
- Quels éléments imprimer. Cliquez sur le bouton Options pour afficher la boîte de dialogue Options d'impression.
Selecting print options for a document
Selections on the Printer Options dialog box apply to this printing of this document only. To specify default printing options for Writer, see Selecting default print options.
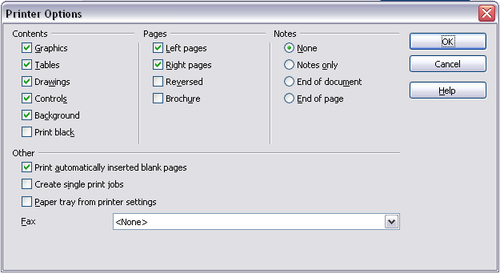
Some items of interest on the Printer Options dialog box include:
- In the Contents section, you might choose not to print graphics or page background in drafts, for example (to save toner or ink).
- In the Pages section, you can choose:
- Print only left (even-numbered) pages or only right (odd-numbered) pages. These settings are useful when you want to print on both sides of the page, but do not have a printer that handles this automatically.
- Print in reversed page order.
- Brochure: the results of this selection are discussed in Printing a brochure.
- In the Notes section, you can choose whether to print any notes that have been added to your document (using Insert > Note), and where to print the notes.
Selecting default print options
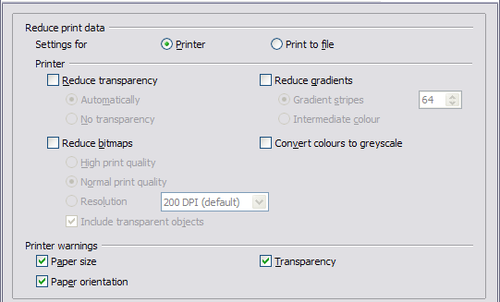
Selections on the Printer Options dialog box over-ride any default settings. To specify default settings for printing, use Tools > Options > OpenOffice.org Writer > Print. The page displayed contains the same choices as the Printer Options dialog box.
Other printer settings are found in Tools > Options > OpenOffice.org > Print. Use this page to specify quality settings for printing, and whether to have OOo warn you if the paper size or orientation of your document does not match the printer settings.
Printing in black and white on a color printer
You may wish to print documents in black and white on a color printer, to save expensive color ink or toner. Common uses are for drafts or documents to be photocopied in black and white. Several choices are available.
To print the current document in black and white or grayscale:
- Click File > Print to open the Print dialog box.
- Click Properties to open the properties dialog box for the printer. The available choices vary from one printer to another, but you should find an option for Color. See your printer's help or user manual for more information.
- The choices for color may include black and white or grayscale. Choose one of these. Grayscale is best if you have any graphics in the document. Click OK to confirm your choice and return to the Print dialog box, then click OK again to print the document.
To set up OOo to print all color text and graphics as grayscale:
- Click Tools > Options > OpenOffice.org > Print to display the dialog box shown in Selecting default print options.
- Select the Convert colors to grayscale checkbox. Click OK to save the change.
To set up OOo Writer to print all color text as black, and all graphics as grayscale:
- Click Tools > Options > OpenOffice.org Writer > Print.
- Under Contents, select the Print black checkbox. Click OK to save the change.
Previewing pages before printing
The normal page view in Writer shows you what each page will look like when printed, but it shows only one page at a time. If you are designing a document to be printed double-sided, you may want to see what facing pages look like. Writer provides two ways to do this:
- View Layout (editable view) —see Chapter 1 (Introducing Writer).
- Page Preview (read-only view) —from which you can also print multiple pages onto one sheet of paper.
To use Page Preview:
- Click File > Page Preview, or click the Page Preview button
 . The Writer window changes to display the current page and the following page, and shows the Page Preview toolbar in place of the Formatting toolbar.
 - Click the Book Preview icon
 to display left and right pages in their correct orientation.
 - To print the document in this page view, click the Print page view icon
 to open the Print dialog box. Choose your options and click OK to print as usual.
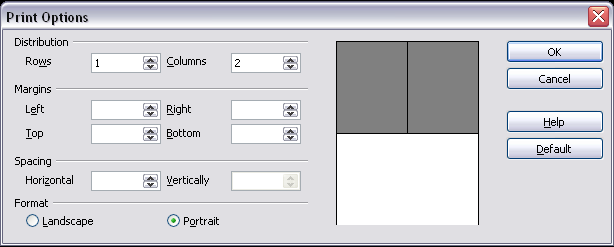
 - To choose margins and other options for the printout, click the Print options page view icon
 to display the Print Options dialog box.
| Content on this page is licensed under the Creative Common Attribution 3.0 license (CC-BY). |


