Notes2 Design Printing
< Back to the Notes2 main page
Summary
Notes can be part of a document, therefore it is desired to print the Notes information.
Rationale
Users tend to review documents "offline". Depending on the use case, users wish to print:
- the document
- the Notes (without the document)
- both the document and the Notes
Assumptions
The user requires, that it is easy to recognize if a document has been printed with or without Notes. This has impact on how the Writer page content is visualized in the printed pages (In Microsoft Word, it is sometimes hard to recognize if the document pages have been scaled in the printing output, especially if the document contains Notes but the current page does not.)
- If the user selects Notes for printing, then the user requires to print all Notes information (all Notes information: e.g. Notes infomation is not truncated or supressed). (In Microsoft Word 2003, the Notes/markup output is limited to one printed page. In Apple Pages 2, it seems that it is not possible to print Notes at all.)
- If the user selects Writer pages for printing, then the user wishes to print all Notes on these pages (select: one or more pages). This has impact how Writer pages will be handled which do contain more Notes information (number of Notes, size of Notes User Data).
- The user wishes, that the Notes pages can also be printed to PDF (printed: showing the Notes instead of usual saving of the document with PDF comments). Therefore the term "printing" should be avoided on the resulting Notes pages.
- The user wishes, that printing material is not wasted (printing material: e.g. paper, toner, ink). That may have impact on using elements like large colored backgrounds. (Even light gray will have an impact on 1000 printed pages.)
Proposed Designs
Proposal "Print Notes Next to Writer Page"
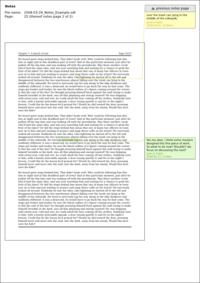
Notes will be printed on pages along with the document. Therefore, the original page will be resized and the notes layed out similar to the screen view.
Design decisions
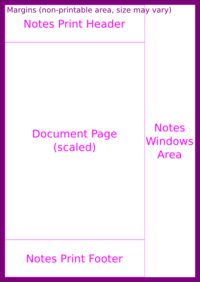
- The basic design is shown in the mockup below (Example: the structure of a ISO A4 page, original page scaled down to 70 %, text direction LTR.)
- The document is scaled down and located at the middle left (LTR) or right (RTL).
- Above and below the scaled page, there is room for a header and footer. The header contains:
- The information that Notes are being printed: "Notes"
- The file name of the document with the extension (proposal).
- The page number of the document. If the output of the Notes of one Writer page is spread to several printed pages, then the Note page number is added.
- At the right side (LTR) or the left side (RTL) there is room for the Note Windows. This area is similar to the Note Side Pane in the Writer document view.
- Changes in comparison with Notes screen view:
- The Notes Side Pane does not have a background color to save printing materials (Even for light gray, 1000 pages make a difference!)
- All Notes Windows do have a shadow to make them better distinguishable and to "separate" them better from the scaled document page (distinguishable: group the Note Property Data and Note User Data).
- The Notes Window background will have a solid color, bcause some printers have trouble to print subtle color shades (solid color: no gradients are used). And, print rendering may be faster as well.
- Notes will show the full Notes User Data, because accessing content via e.g. scrollbars is not possible.
- It will be avoided to print elements that interfere with the non-printable area. Example: An additional vertical separator line between the scaled page and the Notes Side Pane would be cut of at the top and bottom of the page. We may change that decision when everyone owns at least one printer that support borderless printing. Otherwise, it looks really awfull, trust me :-)
- If Notes are selected for printing, then the print preview should respect that setting and show the resulting Notes pages.
Cases
- In any case, use the defined page layout.
- Case 1: There is no Note anchored to a Writer page.
- Don't show any note (clever, hey?).
- Case 2: There are few Notes information anchored to a Writer page.
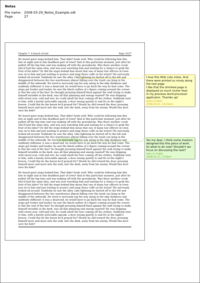
- Distribute the Notes Windows on the page.
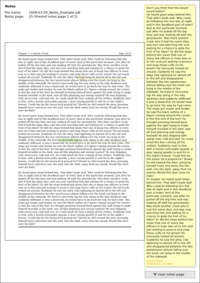
- Case 3: There are too many Notes anchored to a Writer page (too many: Sum of the Notes' height is greater than the current print page height).
- The Notes are spread across several printed pages until all Notes have been printed.
- Add the information on the current Note page number (refer to "design decisions").
- Each Notes page will contain the current scaled down Writer page.
- For all Notes pages of the current Writer page: If there are remaining Notes on the next pages, then add a placeholder at the bottom of the Notes Side Pane (similar to the scroll buttons). Draw all Notes Connector Lines of the remaining Notes to the place holder.
- For the second to the last Notes page of the current Writer page: If there are Notes on the previous Notes pages, then add a placeholder at the top of the Notes Side Pane (similar ot the scroll buttons). Draw all Notes Connector Lines of the Notes on the previous Notes pages to this place holder.
- Case 4: There are very large Notes anchored to a Writer page (very large: the resulting height of the Note Window is greater than the height of the current page).
- The Note(s) are spread across several printed pages until the complete Note(s) have been printed.
- Add the information on the current Note page number (refer to "design decisions").
- Each Notes page will contain the current scaled down Writer page.
- For the first Note page: The Note Window is cut at the bottom of the Note Side Pane and a place holder is added at the bottom of the Notes Side Pane. The Notes Window is merged with the place holder (to show that the rest is located on the next Notes page).
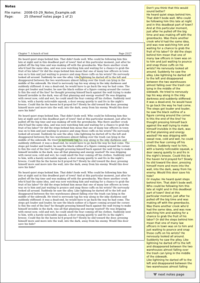
- For the last Note page: The Note Window is cut at the top of the Note Side Pane and continues the Note Window of the previous page. A place holder is added at the top of the Notes Side Pane and is merged with the continued Note (to show that the previous part is located on the previous Notes page).
- For the pages between the first and the last Note page: Continue the Notes User Data and use placeholders both at the top and the bottom of the Notes Side Pane.
- Case 5: There are many and very large Notes anchored to a Writer page. (This is a combination of case 3 and case 4.)
- Please refer to the corresponding mockup.
Mockups
| The mockup shows the structure of the Note page. Example: ISO A4 page | |
| The mockup shows the placement of few Note Windows (Case 2). | |
| The mockup shows the placement of many Note Windows which do not fit on one printed page (Case 3).
In this example, the "many" Notes are substituted by one Note which fits exactly on one printed page and an additional small note. | |
| The mockup shows the placement of two Notes, one of them higher than the current printed page. (Case 5).
In this example, the first Note page containing the beginning of the first Note is shown. | |
| The mockup shows the placement of two Notes, one of them higher than the current printed page. (Case 5)
This example displays the second (or last) Note page containing the rest of the first Note and the second Note. |
Open Points
- Improve the recognizability of repeated pages (e.g. watermark, explanation in the Notes Print Header, ...)
Proposal "Print Notes Only"
It may be necessary to print Notes separate to the Writer page content. The following use cases exist (the implementation of the following cases is not yet decided):
- Print Notes only
- Print Notes at the end of a Writer page
- Print Notes at the end of the Writer document
Design decisions (Draft)
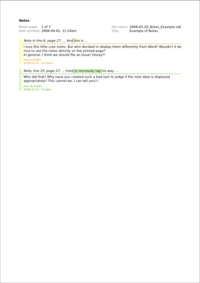
- Representation of the Note:
- The color background is reduced to a small stripe at the left to save printing material.
- The stripe at the left groups the Note User Data and the Note Anchor (otherwise it would be hard to identify the corresponding Note User Data if the Note Anchor information is more than one text line)
- Representation of the Note Anchor:
- The style of the anchor is similar to the visualization on screen.
- If the current Note has a Note Anchor Point, then provide show some information before and after the Note Anchor (e.g. text, name of the object).
- If the current Note has a Note Anchor Area, then provide the enclosed information (e.g. text).
- If the the output contains "Notes only" or "Notes at the end of the document, then provide the information that Notes are being printed and the page number of the Notes pages (refer to proposal "Print Notes Next To Writer Page").
Mockups
| The mockup shows a single page which contains a list of Notes in the document. |
Proposal "Print Notes Inside Body Text"
In issue 94514, the user hfinger proposed another kind of Notes visualization for printing: The Notes User Data is inserted between the OpenOffice.org Writer body text.
Besides the discussion in the issue comments, the proposal is now preliminary estimated from UX point-of-view.
Advantages:
- Notes User Data is shown at the position of the commented Writer document text (no additional mapping required for the user, neither anchor nor anchor connector line required )
Disadvantages:
- alters the layout of the Writer document (the additional space required for the Notes Data influences the document text layout, e.g. notes with a "bullet points" list)
- for non-text-only Writer objects, the realization might be problematic (Notes may be anchored to "freely positioned" graphics or tables in future versions of Writer)
- Notes might be overlooked inside the Writer text (In the current proposals, the Notes do have a distinct location on the printed page or do not even include the document text. This may be solved by some visual information, e.g. markers at the page boundaries.)
Selected Design
tbd
Implementation
tbd
Code Changes
tbd
Outstanding Issues
- Proposal how to integrate/change the printing of Notes in the printing dialog.
- Decide which use cases require implementation of the Notes printing (especially for the proposal "Print Notes Only").
- Check the grayscale and black/white output.
