Using sections for page layout
]
Introduction to sections
A section is a block of text that has special attributes and formatting. You can use sections to:
- Write-protect text
- Hide text
- Dynamically insert the contents of another document
- Add columns, margin indents, a background color, or a background graphic to a portion of your document
- Customize the footnotes and endnotes for a portion of your document
| Users of Microsoft Word, please note: Writer uses page styles for the type of page layout control that Word does with sections. Please see Setting up basic page layout using styles, Applying page styles, and Working with page styles. |
Creating sections
To create a section:
- Place the cursor at the point in your document where you want to insert the new section. Or, select the text that you want to place in the new section.
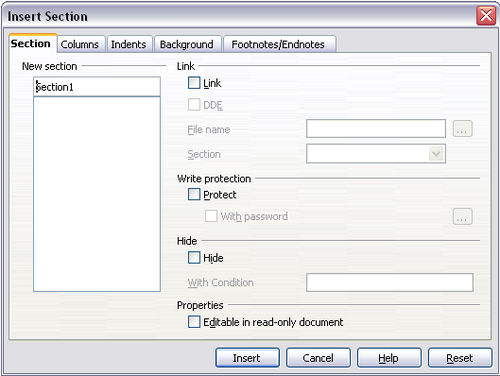
- From the main menu, choose Insert > Section. The Insert Section dialog box opens.
- Click the Section tab, if it is not already displayed. (See Using the Section page.)
The Insert Section dialog box has five tabbed pages:
- Use the Section page to set the section's attributes.
- Use the Columns page to format the section into columns.
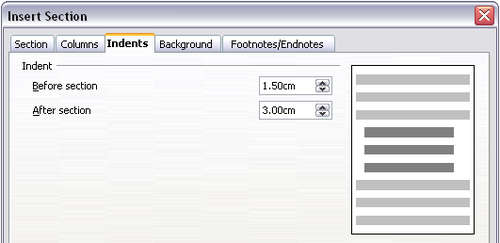
- Use the Indents page to set indents in the right and left margins of the section.
- Use the Background page to add color or a graphic to the section's background.
- Use the Footnotes/Endnotes page to customize the section's footnotes and endnotes.
At any time, you can reset a tabbed page to its default settings by clicking the Reset button. (Note, however, that you cannot reset the Section page. If you wish to undo changes to the Section page, you must do so manually.)
Using the Section page
Use the Section page to set the attributes of the current section.
Naming sections
Writer automatically enters a name for the current section in the top box of the New section area. To change the name, select it and type over it. The name is displayed in the Sections category of the Navigator window. If you give your sections meaningful names, you can navigate to them more easily.
Linking sections
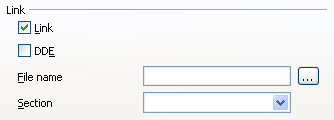
You can insert the contents of another document into the current section and then have Writer update the section whenever the other document is updated. This is called linking the section to the other document.
To link the current section to another document, follow these steps:
- In the Link area, check the Link checkbox.
- Click the (...) button to the right of the File name field. The Insert dialog box opens.
- Find and select the document you want to insert and then click the Insert button. The Insert dialog box closes and the name of the selected document appears in the File name field.
- If you want to insert only a section of the selected document, select the desired section from the Section drop-down list.
| The section must already exist in the selected document. You cannot create a section in the selected document at this point. |
You can update links automatically or manually. See Updating links.
Write-protecting sections
To write-protect the current section so that its contents cannot be edited, check the Protect checkbox in the Write protection area.
Password-protecting sections
To prevent others from editing the section's attributes or format, protect the section with a password, as follows:
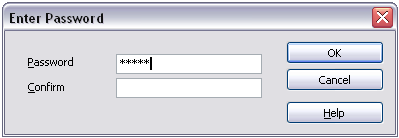
- Check the With password checkbox. The Enter Password dialog box opens.
- Type a password in the Password field and then confirm the password by typing it again in the Confirm field.
- Click OK. The Enter Password dialog box closes. Anyone who tries to edit the section's attributes or format will be prompted to enter the password.
| Passwords must contain at least five characters. The OK button remains inactive until you have typed five characters. |
Hiding sections
You can hide the current section so that it will not be displayed on the screen or printed. You can also specify conditions for hiding the section. For example, you can hide the section only from certain users.
| You cannot hide a section if it is the only content on the page or if the section is in a header, footer, footnote, endnote, frame, or table cell. |
To hide a section, check the Hide checkbox in the Hide area.
To hide the section only under certain conditions, enter the desired conditions in the With Condition field. The syntax and operators that you use to enter conditions are the same ones that you use to enter formulas. For syntax and a list of operators, see Writer's online help under "conditions".
If the section is write-protected with a password, the password must be entered to hide or reveal the text.
Formatting a Section into Columns
Use the Columns page of the Insert Section dialog box to format the current section into columns. This page is very similar to the Columns dialog box shown in Defining the number of columns on a page. Please refer to that topic for details.
Indenting the Section from Margins
Use the Indents page, pictured below, to set indents in the right and left margins of the current section. Enter the desired left-margin indent in the Before section box. Enter the desired right-margin indent in the After section box. The preview box on the right-hand side of the page shows you how the section will look with the indents applied.
Changing the Background of the Section
Use the Background page to add color or a graphic to the background of the current section. This page is similar to the Background pages for paragraphs, frames, tables, and other objects in OOo. For more information, refer to Chapter 7 (Working with Styles).
Customizing Footnotes/Endnotes in a Section
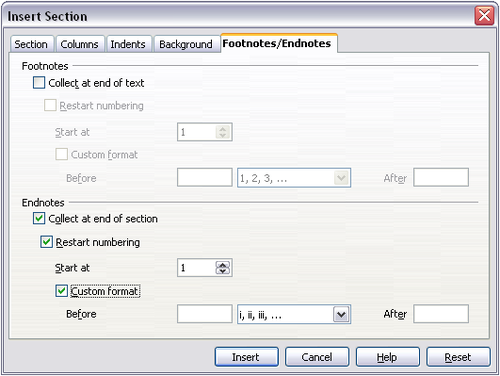
Use the Footnotes/Endnotes page, pictured below, to customize the current section's footnotes and endnotes.
Customizing footnotes
If you want the current section's footnotes to appear separately from the other footnotes in the document, check the Collect at end of text check box in the Footnotes area.
To number the current section's footnotes separately from the other footnotes in the document, follow these steps:
- In the Footnotes area, make sure that the Collect at end of text check box is checked.
- Check the Restart numbering checkbox.
- If you want the section's footnotes to start at a number other than 1, enter the desired starting number in the Start at spin box.
To edit the format of the section's footnotes, follow these steps:
- In the Footnotes area, make sure that the Collect at end of text and Restart numbering options are selected.
- Select the Custom format option.
- From the drop-down list under and to the right of the Custom format option, select a numbering format for the footnotes.
- To add text to the selected numbering format, use the Before and After fields. For example, if you want the footnote numbers to be preceded by the word "Note" and followed by a colon, fill the Before and After fields like this:
Customizing endnotes
If you want the current section's endnotes to appear at the end of the section rather than at the end of the document, check the Collect at end of section checkbox in the Endnotes area.
To number the current section's endnotes separately from the other endnotes in the document, follow these steps:
- In the Endnotes area, make sure that the Collect at end of section option is selected.
- Select the Restart numbering option.
- If you want the section's endnotes to start at a number other than 1, enter the desired starting number in the Start at spin box.
To edit the format of the section's endnotes, follow these steps:
- In the Endnotes area, make sure that the Collect at end of section and Restart numbering checkboxes are checked.
- Select the Custom format option.
- From the drop-down list under and to the right of the Custom format option, select a numbering format for the endnotes.
- To add text to the selected numbering format, use the Before and After fields, as shown above for footnotes.
Saving a new section
To save a new section so that it appears in your document, click the Insert button. The Insert Section dialog box closes and the new section appears in your document.
Editing and deleting sections
You can edit a section’s attributes and formatting, and you can also delete sections by using Format > Sections.
Selecting a section
To select the section that you want to edit or delete, follow these steps:
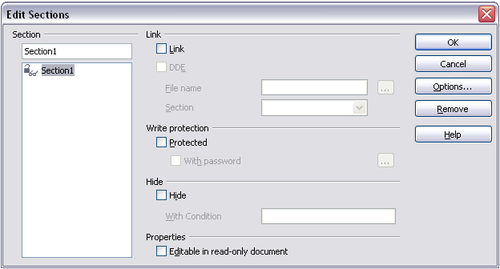
- From the main menu, choose Format > Sections. The Edit Sections dialog box opens.
- The name of the current section appears in the Section area, in the field above the list box. If you want to edit or delete a different section, click the name of the desired section in the list. The selected section becomes the current section, and its name appears in the field above the list box.
Deleting sections
To delete the current section, click the Remove button.
Editing section attributes
To rename the current section, simply type over its name in the Section area.
From the Edit Sections dialog box, you can also edit the current section's link, write-protect, and hide attributes. To learn how to edit these attributes, see:
Editing the format of a section
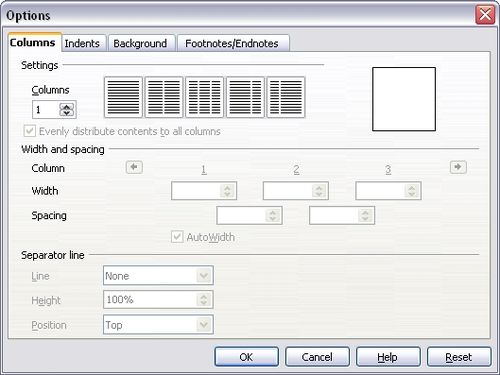
To edit the format of the current section, click the Options button. The Options dialog box opens.
The Options dialog box has four tabbed pages: Columns, Indents, Background, and Footnotes/Endnotes. To learn how to use these pages, see:
- Using the Columns page
- Using the Indents page
- Using the Background page
- Using the Footnotes/Endnotes page
To reset a page to its most recently saved settings, click the Reset button.
To save your Options settings and return to the Edit Sections dialog box, click OK.
Updating links
You can have Writer update linked sections automatically, and you can also update links manually.
Updating links automatically
To set Writer to update links without prompting you, or to turn off automatic updating, follow these steps:
- Choose Tools > Options > OpenOffice.org Writer > General. The dialog box displays general text document settings.
- In the Update area, under Update links when loading, select one of the following three options:
- Select Always if you want Writer to update links automatically, without prompting you, whenever you open a document that contains links.
- Select On request if you want Writer to prompt you before updating links.
- Select Never if you do not want Writer to update links.
- Click OK to save your settings. The Options dialog box closes.
Updating links manually
To update a link manually:
- Open the document that contains the link.
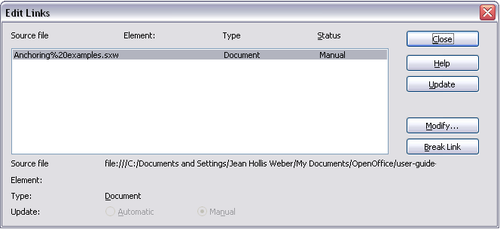
- Choose Edit > Links. The Edit Links dialog box opens.
- The list in the Edit Links dialog box displays the names of all the files that are linked to the current document. Click the file that corresponds to the link that you want to update.
- Click the Update button. The most recently saved contents of the linked file appear in the current document.
- To close the Edit Links dialog box, click Close.
| Content on this page is licensed under the Creative Common Attribution 3.0 license (CC-BY). |
