Creating headers and footers
]
Headers are portions of a document that always appear at the top of a page; footers appear at the bottom of a page. Typically, headers display the title or chapter name of a document.
In OOo, headers are specified by page styles; therefore, when inserted, all the pages with the same page style will display the same header. Chapter 7 describes how to format a header as part of the page style formatting. For the purpose of this example, we will insert a header in the Default pages using manual formatting.
Select from the main menu Insert > Header > [Page Style]. The submenu contains as many entries as page styles used in your document. In addition the submenu includes the entry All, which activates headers on all the pages of the document.
For our example, select the Default menu item to activate the headers only on the pages that use the Default page style. Similarly, to insert a footer, choose Insert > Footer.
Depending on which option you choose, an area will appear at the top or bottom of the page. In this area you can enter text and graphics that will appear on every page.
Items such as document titles, chapter titles, and page numbers, which often go into headers and footers, are best added as fields. That way, if something changes, the headers and footers are all updated automatically.
Fields are covered in Chapter 14 (Working with Fields), but one example here may be useful. To insert the document title into the header:
- Select File > Properties > Description, enter a title for your document in the Title area, and click OK to close the dialog box.
- Add a header (Insert > Header > Default).
- Place the cursor in the header part of the page.
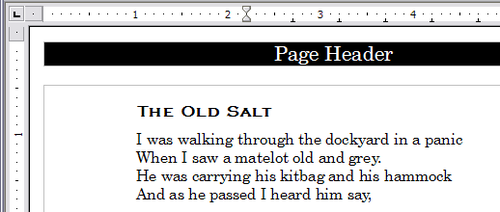
- Select Insert > Fields > Title. The title should appear on a gray background (which does not show when printed and can be turned off).
- To change the title for the whole document, choose File > Properties > Description.
In Writer headers and footers are considered paragraphs and therefore you can format the header or footer text using the same techniques you use for formatting text in the main body of the document.
Portrait headers on landscape pages
When you define a header and footer on a landscape page, they will be aligned with the long side of the page. If your landscape pages are going to be inserted between portrait pages, you might want the headers and footers to be on the short sides of the landscape pages, so the final printed product looks like the contents of the landscape pages have been rotated 90 degrees on portrait pages.
You can set up portrait headers and footers on landscape pages by using a trick involving frames. These are a bit tedious to set up, but once you have done so, you can copy and paste them to other landscape pages. There does not appear to be a way to make this part of the landscape page style.
To set up portrait headers and footers on landscape pages:
- Calculate the required margins so the text area of the landscape page is the same size as the text area on the portrait pages, taking into account the space for headers and footers on the portrait pages. For example, this book uses the margins shown in the following table. The landscape right and left margins are 1 cm larger than the portrait top and bottom margins, respectively. This difference accounts for the extra space used by the portrait header and footer (0.5 cm for the height of the header or footer and a 0.5 cm gap between the header or footer and the main text).
- Create the landscape page style.
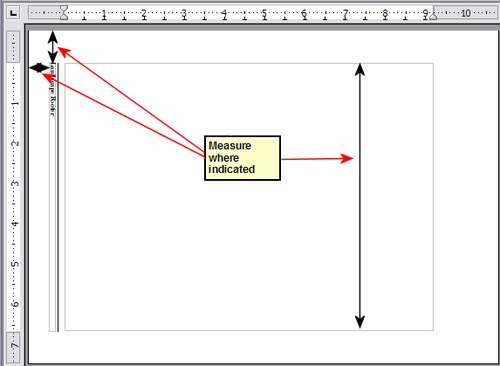
- Measure the distance from the upper and left edges of the page to the upper left-hand corner of the space where you want the footer to appear. Measure the width and length of the space the footer will occupy (to match footers on portrait pages).
- In a blank paragraph in the text, type the footer text or insert fields such as the page number or the chapter number and name—to match the footer text and fields on the portrait pages. Assign the Footer style to this paragraph so the typeface, font size, and tab settings match those of the footers on the portrait pages.
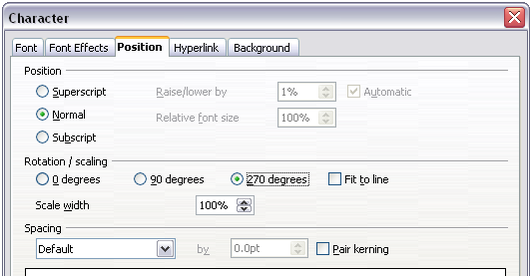
- Select the text (including the fields) you just entered. Choose Format > Character. On the Character dialog box, choose the Position tab and set Rotation / Scaling to 270 degrees (counterclockwise). Click OK.
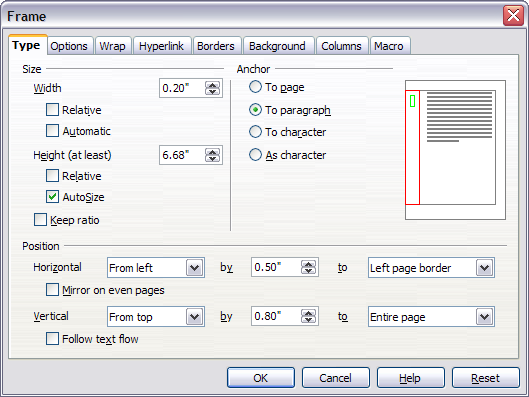
- With the text still selected, choose Insert > Frame. In the Frame dialog box, choose the Type tab and enter the width, height, and horizontal and vertical position for the footer.
- If your footer has a line above the text, on the Borders page, select a right border and specify the line width and spacing to the frame's contents.
- Click OK to save these settings. The footer should now appear in the required position and orientation.
| Portrait page | (right page) | Landscape page | (right page) |
|---|---|---|---|
| Top margin | 1.5 cm | Right margin | 2.5 cm |
| Bottom margin | 1.5 cm | Left margin | 2.5 cm |
| Left (inner) margin | 2.8 cm | Top margin | 2.8 cm |
| Right (outer) margin | 1.8 cm | Bottom margin | 1.8 cm |
Repeat these steps (using appropriate measurements) to set up a portrait header on the landscape page.
| Content on this page is licensed under the Creative Common Attribution 3.0 license (CC-BY). |


