Applying page styles
To apply a page style, place the cursor anywhere on the page to which the style should be applied. You can easily check which page style is applied because it is shown on the status bar.
If you want to apply a different style, you can either right-click on the style in the status bar and select a new stype from the pop-up menu, or you can open the Styles and Formatting window, select the page style icon at the top of the window (fourth icon), and then double click on the desired style.
As discussed in Chapter 7 (Working with Styles), a correctly set up page style will, in most cases, contain information on what the page style of the next page should be. For example, when you apply a Left page style to a page, you can indicate in the style settings that the next page has to apply a Right page style, a First page style could be followed by either a Left page style or a Default page style, and so on.
Another very useful mechanism to change the page style is to insert a manual page break and specify the style of the subsequent page. The idea is simple: you break a sequence of page styles and start a new sequence. To insert a page break, choose Insert > Manual Break and choose Page break. This section illustrates two common scenarios where page breaks are useful.
Example: Chapters
A possible scenario: You are writing a book that is divided into chapters. Each chapter starts with a page style called New Chapter. The following pages use the Default page style. At the end of each (except the last) chapter, we return to the New Chapter page style for the first page of the next chapter.
OOo doesn’t have a predefined New Chapter style, so you must create a custom style (see Chapter 7). Let’s suppose that you already have the page styles with the following properties:
| Page style | Next Style |
| New Chapter | Default |
| Default | Default |
At some point, you will want to start a new chapter. Follow these steps:
- Put the cursor at the end of the chapter, on a blank line (empty paragraph) of its own.
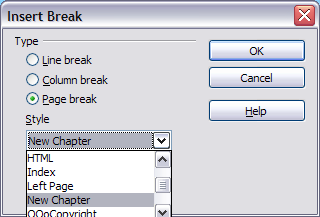
- Choose Insert > Manual Break. The Insert Break dialog box appears.
- Under Type, choose Page break and under Style, select New Chapter.
The figure below illustrates the flow of page styles when using page breaks.
Example: Page with special formatting
Sometimes you may need to insert a page with special formatting. For example, a landscape page or a page with more columns. This can also be done with page breaks. Suppose that the current page has the Default page style.
- Choose Insert > Manual Break.
- Select the desired page style (say, Special Page) in the Insert Break dialog box.
- Fill in the contents for this page. Then insert another page break.
- Then select Default again. The pagination continues on as normal, except that one page has been replaced by a different page style.
This concept is illustrated below.
| Content on this page is licensed under the Creative Common Attribution 3.0 license (CC-BY). |


