Positioning graphics
Graphics can be positioned in OOo Calc to work together and build more complex features.
Arranging graphics
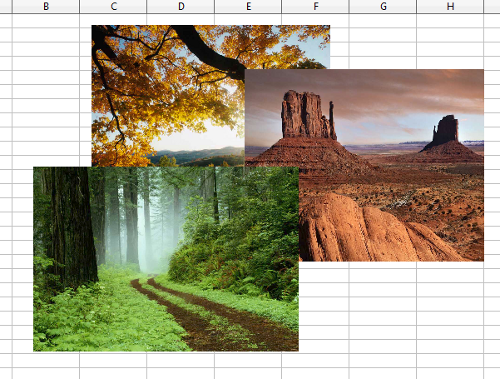
Graphics in a Calc document are maintained in a similar manner to a deck of cards. As you add more images to the document, each image occupies a new layer at the top of the stack. To arrange graphics, you tell Calc to change the order of layers in the stack.
Calc provides four basic options to re-arrange the order of images. These options can be accessed from both the Picture toolbar and the picture context menu. These options can be accessed from the picture context menu.
Bring to Front
Places the image on top of any other graphics or text.
Bring Forward
Brings the image one level up in the stack (z-axis). Depending on the number of overlapping objects, you may need to apply this option several times to obtain the desired result.
Send Backward
The opposite of Bring Forward; sends the selected image one level down in the object stack.
Send to Back
Sends the selected graphic to the bottom of the stack, so that other graphics and text cover it.
To Background and To Foreground
An image or a drawing object can be sent to the background as well. This is not the same as Bring Forward and Send Backward, which set the order of a number of overlapping graphics. This feature pushes a graphic to the back of the spreadsheet, behind the cells, allowing cells to be edited without affecting the graphic.
A graphic in the background will have To Foreground as a menu item, instead of To Background.
Anchoring graphics
Anchors tell a graphic where to stay in relation to other items.
Anchor to page
Anchoring a graphic to the page allows it to be positioned in a specific place on the page. The graphic does not move when cells are added or deleted. This is equivalent to an absolute reference. The graphic will always stay by cell B10 if that is where it is placed.
Anchor to cell
Anchoring a graphic to a cell ensures that the graphic always stays with the content it is originally anchored to. If a graphic is anchored to cell B10, and a new row is inserted, the graphic will then be anchored to cell B11. This is equivalent to a relative reference.
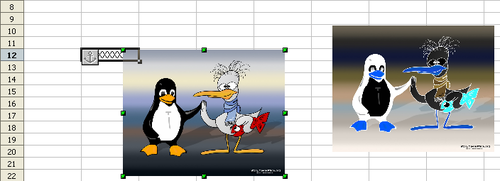
In the example shown below, the normal Otto and Tux picture is anchored To Cell B10 (XXX shows where the picture is anchored). The inverse Otto and Tux picture is anchored to the page.
If two rows are inserted above the pictures, the normal picture (anchored to the cell) will shift down two rows and the anchor will change. The inverse picture (anchored to the page) will not move. This is illustrated below. Note that the anchor symbol and the XXX have moved down to cell B12.
Aligning graphics
You can align several graphics relative to each other. To do this:
- Select all of the graphics to be aligned (Shift+click on each in turn). The graphics will be surrounded by an invisible bounding box with 8 green handles.
- On the Picture toolbar, click on the Alignment icon and select one of the six options. Or position the mouse pointer over any of the graphics. When the pointer changes shape from an arrow to a hand, right-click and choose Alignment, then select from the six options.
The six options include three for aligning the graphics horizontally (left, center, right) and three for aligning the graphics vertically (top, center, bottom).
| Content on this page is licensed under the Creative Common Attribution 3.0 license (CC-BY). |


