Difference between revisions of "IT/Documentation/OOo3 User Guides/Getting Started/Navigating within spreadsheets"
(Navigare nei fogli elettronici) |
|||
| Line 1: | Line 1: | ||
| − | + | {{DISPLAYTITLE:Navigare nei fogli elettronici}} | |
| + | {{Documentation/GSCalc3ITTOC | ||
| + | |ShowPrevNext=block | ||
| + | |PrevPage=IT/Documentation/OOo3_User_Guides/Getting Started/Saving spreadsheets | ||
| + | |NextPage=IT/Documentation/OOo3_User_Guides/Getting Started/Selecting items in a spreadsheet | ||
| + | }}__notoc__ | ||
| + | |||
| + | |||
| + | |||
| + | |||
| + | |||
| + | |||
| + | Pagina in traduzione | ||
| + | |||
| + | |||
| + | |||
| + | |||
| + | |||
| + | |||
| + | |||
== Andare in una cella specifica == | == Andare in una cella specifica == | ||
=== Usare il mouse === | === Usare il mouse === | ||
| Line 73: | Line 92: | ||
|} | |} | ||
| + | |||
| + | |||
| + | |||
| + | |||
| + | |||
| + | |||
| + | |||
| + | |||
| + | |||
| + | |||
| + | |||
| + | == Going to a particular cell == | ||
| + | === Using the mouse === | ||
| + | Place the mouse pointer over the cell and click. | ||
| + | |||
| + | === Using a cell reference === | ||
| + | Click on the little inverted black triangle just to the right of the Name box. The existing cell reference will be highlighted. Type the cell reference of the cell you want to go to and press ''Enter''. Or just click into the Name box, backspace over the existing cell reference and type in the cell reference you want. | ||
| + | |||
| + | === Using the Navigator === | ||
| + | Click on the Navigator button [[Image:Nav-icon.jpg]] in the Standard toolbar (or press ''F5'') to display the Navigator. Type the cell reference into the top two fields, labeled Column and Row, and press ''Enter''. In the figure below, the Navigator would select cell G28. | ||
| + | |||
| + | [[Image:Calc-navigator3.png|thumb|none|500px|''Calc Navigator'']] | ||
| + | |||
| + | == Moving from cell to cell == | ||
| + | In the spreadsheet, one cell, or a group of cells, normally has a darker black border. This black border indicates where the ''focus'' is. | ||
| + | |||
| + | [[Image:GroupCells3.png|thumb|none|500px|''(Left) One selected cell and (right) a group of selected cells'']] | ||
| + | |||
| + | === Using the mouse === | ||
| + | To move the focus using the mouse, simply move the mouse pointer to the cell where the focus should be and click the left mouse button. This changes the focus to the new cell. This method is most useful when the two cells are a large distance apart. | ||
| + | |||
| + | === Using the Tab and Enter keys === | ||
| + | * Pressing ''Enter'' or ''Shift+Enter'' moves the focus down or up, respectively. | ||
| + | * Pressing ''Tab'' or ''Shift+Tab'' moves the focus right or left, respectively. | ||
| + | |||
| + | === Customizing the Enter key === | ||
| + | You can customize the direction in which the ''Enter'' key moves the focus, by selecting '''Tools > Options > OpenOffice.org Calc > General'''. | ||
| + | |||
| + | [[Image:Custom-enter-calc.png|thumb|none|500px|''Customizing the effect of the Enter key'']] | ||
| + | |||
| + | The four choices for the direction of the ''Enter'' key are shown on the right side of Figure 7. Depending on the file being used or on the type of data being entered, different directions can be useful. | ||
| + | |||
| + | The ''Enter'' key can also be used to switch into and out of editing mode. Use the options under ''Input settings'' to change the ''Enter'' key settings. | ||
| + | |||
| + | === Using the arrow keys === | ||
| + | Pressing the arrow keys on the keyboard moves the focus in the direction of the arrows. | ||
| + | |||
| + | === Using Home, End, Page Up and Page Down === | ||
| + | * ''Home'' moves the focus to the start of a row. | ||
| + | * ''End'' moves the focus to the column furthest to the right that contains data. | ||
| + | * ''Page Down'' moves the display down one complete screen and ''Page Up'' moves the display up one complete screen. | ||
| + | * Combinations of ''Control'' and ''Alt'' with ''Home'', ''End'', ''Page Down'', ''Page Up'', and the cursor keys move the focus of the current cell in other ways. | ||
| + | |||
| + | {{Documentation/Tip| Holding down ''Alt+Cursor key'' resizes a cell.}} | ||
| + | |||
| + | === Customizing the Enter Key === | ||
| + | |||
| + | You can customize the direction in which the Enter key moves the focus, by selecting '''Tools''' > '''Options''' > '''OpenOffice.org Calc''' > '''General'''. | ||
| + | |||
| + | [[Image:Customizing-Enter-Key.png|thumb|none|500px| Customizing the effect of the Enter key]] | ||
| + | |||
| + | == Moving from sheet to sheet == | ||
| + | Each sheet in a spreadsheet is independent of the others though they can be linked with references from one sheet to another. There are three ways to navigate between different sheets in a spreadsheet. | ||
| + | |||
| + | === Using the keyboard === | ||
| + | Pressing ''Control+PgDn'' moves one sheet to the right and pressing ''Control+PgUp'' moves one sheet to the left. | ||
| + | |||
| + | === Using the mouse === | ||
| + | Clicking one of the Sheet Tabs at the bottom of the spreadsheet selects that sheet. | ||
| + | |||
| + | If you have a lot of sheets, then some of the sheet tabs may be hidden behind the horizontal scroll bar at the bottom of the screen. If this is the case, then the four buttons at the left of the sheet tabs can move the tabs into view. The figure below shows how to do this. | ||
| + | |||
| + | [[Image:SheetTabArrows.png|thumb|none|500px|''Sheet tab arrows'']] | ||
| + | |||
| + | Notice that the sheets here are not numbered in order. Sheet numbering is arbitrary—you can name a sheet as you wish. | ||
| + | |||
| + | {{Documentation/Note| The sheet tab arrows only appear if you have some sheet tabs that can not be seen. Otherwise they will appear faded.}} | ||
| + | |||
| + | |||
| + | {{CCBY}} | ||
| + | [[Category:Getting Started (Documentation)]] | ||
Revision as of 15:46, 23 April 2010
- I componenti della finestra principale di Calc
- Creare nuovi fogli elettronici
- Aprire fogli elettronici
- Salvare fogli elettronici
- Navigare nei fogli elettronici
- Selezionare elementi di una scheda in un foglio elettronico
- Lavorare con le schede
- Viste di Calc
- Introdurre dati utilizzando la tastiera
- Velocizzare l'inserimento dei dati
- Modifica dei dati
- Formattazione dei dati
- Formattazione automatica di celle e schede
- Formattazione dei fogli elettronici utilizzando dei temi
- Nascondere e mostrare i dati
- Ordinare i record
- Stampa
Pagina in traduzione
Andare in una cella specifica
Usare il mouse
Posizionate il puntatore del mouse sopra la cella e fate clic.
Usare un riferimento cella
Fate clic sul piccolo pulsante con un triangolo rovesciato posto sulla destra del riquadro Nome (Errore: sorgente del riferimento non trovata). Si evidenzierà il riferimento alla cella attuale. Digitate il riferimento della cella in cui volete andare e premete (Invio), oppure fate clic direttamente nel riquadro Nome, cancellate il riferimento presente e digitate quello desiderato.
Fate clic sul pulsante Navigatore [[Image:]] nella barra degli strumenti Standard (o premete F5) per aprire il Navigatore. Digitate il riferimento di cella nei due campi in alto (Colonna e Riga) e premete (Invio). Nella Figura 1 il navigatore seleziona la cella G28.
Spostarsi da una cella all'altra
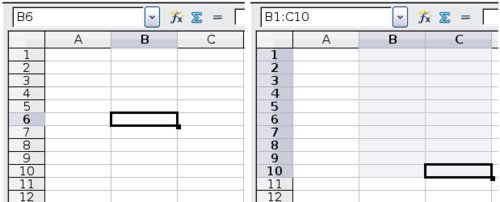
Nel foglio elettronico una cella, o un gruppo di celle, normalmente ha un bordo nero più scuro. Questo bordo indica la selezione (si veda la Figura 2).
Usare il mouse
Per spostare la selezione utilizzando il mouse, è sufficiente spostare il puntatore del mouse sulla cella da selezionare e fare clic. Questo sposta la selezione sulla nuova cella. Questo metodo è utile soprattutto quando le due celle sono molto distanti tra loro.
Usare i tasti (Tab) e (Invio)
- Premendo (Invio) o (Maiusc)+(Invio), la selezione si sposta, rispettivamente, in basso o in alto.
- Premendo (Tab) o (Maiusc)+(Tab), la selezione si sposta, rispettivamente, a destra o a sinistra.
Personalizzare il tasto Invio
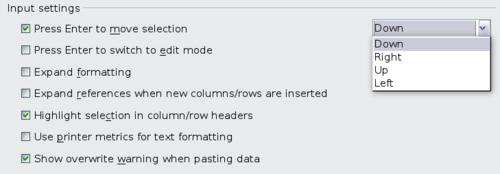
È possibile impostare la direzione nella quale viene spostata le selezione premendo il tasto Invio, selezionando Strumenti > Opzioni > OpenOffice.org Calc > Generale.
Le quattro possibili direzioni in cui si muove il tasto Invio sono mostrate nella parte destra della Figura 3. In base al file usato o al tipo di dati che vengono immessi, possono essere utili direzioni differenti.
Il tasto Invio può anche essere usato per entrare ed uscire dal modo modifica. Usate le opzioni sotto la voce Impostazioni di immissione in Figura 3 per modificare le impostazioni del tasto Invio.
Usare le frecce
Premendo le frecce sulla tastiera, la selezione si sposta nella direzione indicata.
Usare i tasti (Inizio), (Fine), (Pag su) e (Pag giù)
- Il tasto (Home) sposta la selezione all'inizio della riga.
- Il tasto (Fine) sposta la selezione alla colonna contenente dati più a destra.
- Il tasto (Pag giù) sposta la visualizzazione più in basso di una videata e il tasto (Pag su) la sposta di una videata in alto.
- La combinazione di (Ctrl) e (Alt) con (Inizio) , (Fine) , (Pag giù) , (Pag su) o le frecce sposta la selezione in altri modi.
| |
Premendo (Alt)+freccia si ridimensiona la cella.
Premendo F1 e scrivendo tasti di scelta rapida, si accede all'elenco completo dei tasti di scelta rapida.
|
Spostarsi da una scheda all'altra
Le singole schede di un foglio elettronico sono indipendenti le une dalle altre, anche se possono essere collegate con riferimenti da una scheda all'altra. Potete navigare tra le diverse schede di un foglio elettronico in tre modi.
Usare la tastiera
Premendo (Ctrl)+(Pag giù) ci si sposta a destra di una scheda e premendo(Ctrl)+(Pag Su) di una scheda a sinistra.
Usare il mouse
Facendo clic su una delle schede delle tabelle alla base del foglio elettronico, si seleziona il relativo foglio.
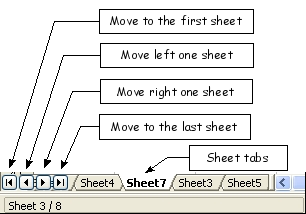
Se le schede sono numerose, alcune possono essere nascoste dietro la barra di scorrimento orizzontale alla base dello schermo. In questo caso, potete usare i quattro pulsanti a sinistra delle schede per poterle vedere. La Figura 4 mostra come procedere.
Notate che nella figura le schede non sono numerate in ordine. La numerazione delle schede è arbitraria: potete denominare le schede a vostro piacimento.
| |
Le frecce delle schede che vedete nella Figura 4 appaiono solo se ci sono delle schede nascoste. Altrimenti appaiono grigie come nella Errore: sorgente del riferimento non trovata. |
Going to a particular cell
Using the mouse
Place the mouse pointer over the cell and click.
Using a cell reference
Click on the little inverted black triangle just to the right of the Name box. The existing cell reference will be highlighted. Type the cell reference of the cell you want to go to and press Enter. Or just click into the Name box, backspace over the existing cell reference and type in the cell reference you want.
Click on the Navigator button ![]() in the Standard toolbar (or press F5) to display the Navigator. Type the cell reference into the top two fields, labeled Column and Row, and press Enter. In the figure below, the Navigator would select cell G28.
in the Standard toolbar (or press F5) to display the Navigator. Type the cell reference into the top two fields, labeled Column and Row, and press Enter. In the figure below, the Navigator would select cell G28.
Moving from cell to cell
In the spreadsheet, one cell, or a group of cells, normally has a darker black border. This black border indicates where the focus is.
Using the mouse
To move the focus using the mouse, simply move the mouse pointer to the cell where the focus should be and click the left mouse button. This changes the focus to the new cell. This method is most useful when the two cells are a large distance apart.
Using the Tab and Enter keys
- Pressing Enter or Shift+Enter moves the focus down or up, respectively.
- Pressing Tab or Shift+Tab moves the focus right or left, respectively.
Customizing the Enter key
You can customize the direction in which the Enter key moves the focus, by selecting Tools > Options > OpenOffice.org Calc > General.
The four choices for the direction of the Enter key are shown on the right side of Figure 7. Depending on the file being used or on the type of data being entered, different directions can be useful.
The Enter key can also be used to switch into and out of editing mode. Use the options under Input settings to change the Enter key settings.
Using the arrow keys
Pressing the arrow keys on the keyboard moves the focus in the direction of the arrows.
Using Home, End, Page Up and Page Down
- Home moves the focus to the start of a row.
- End moves the focus to the column furthest to the right that contains data.
- Page Down moves the display down one complete screen and Page Up moves the display up one complete screen.
- Combinations of Control and Alt with Home, End, Page Down, Page Up, and the cursor keys move the focus of the current cell in other ways.
Customizing the Enter Key
You can customize the direction in which the Enter key moves the focus, by selecting Tools > Options > OpenOffice.org Calc > General.
Moving from sheet to sheet
Each sheet in a spreadsheet is independent of the others though they can be linked with references from one sheet to another. There are three ways to navigate between different sheets in a spreadsheet.
Using the keyboard
Pressing Control+PgDn moves one sheet to the right and pressing Control+PgUp moves one sheet to the left.
Using the mouse
Clicking one of the Sheet Tabs at the bottom of the spreadsheet selects that sheet.
If you have a lot of sheets, then some of the sheet tabs may be hidden behind the horizontal scroll bar at the bottom of the screen. If this is the case, then the four buttons at the left of the sheet tabs can move the tabs into view. The figure below shows how to do this.
Notice that the sheets here are not numbered in order. Sheet numbering is arbitrary—you can name a sheet as you wish.
| Content on this page is licensed under the Creative Common Attribution 3.0 license (CC-BY). |


