Difference between revisions of "Documentation/OOoAuthors User Manual/Impress Guide/The Drawing toolbar"
From Apache OpenOffice Wiki
m |
|||
| (7 intermediate revisions by 2 users not shown) | |||
| Line 1: | Line 1: | ||
| + | {{DISPLAYTITLE:The Drawing toolbar}} | ||
{{ImpressCreatingTOC|PrevNext=block | {{ImpressCreatingTOC|PrevNext=block | ||
| − | | | + | |ShowPrevNext=block |
| − | | | + | |PrevPage=Documentation/OOoAuthors User Manual/Impress Guide/Creating Graphic Objects |
| − | + | |NextPage=Documentation/OOoAuthors_User_Manual/Impress Guide/Creating lines and shapes }}__notoc__ | |
| − | + | ||
The Drawing toolbar collects the majority of the tools normally used to create graphic objects. If this toolbar is not showing, select '''View > Toolbars > Drawing''' from the main menu bar. | The Drawing toolbar collects the majority of the tools normally used to create graphic objects. If this toolbar is not showing, select '''View > Toolbars > Drawing''' from the main menu bar. | ||
| Line 20: | Line 20: | ||
: [[Image:Curves.png|Curves]]<br>Available curve options. | : [[Image:Curves.png|Curves]]<br>Available curve options. | ||
| − | * '''Connectors''': draws a connector line between two figures. Click the black triangle for additional connectors, shown below. The use of connectors is described in [[#Working with connectors|Working with connectors]]. | + | * '''Connectors''': draws a connector line between two figures. Click the black triangle for additional connectors, shown below. The use of connectors is described in [[Documentation/OOoAuthors User Manual/Impress Guide/Creating lines and shapes#Working with connectors|Working with connectors]]. |
: [[Image:Connectors.png|Connectors]]<br>Connectors options. | : [[Image:Connectors.png|Connectors]]<br>Connectors options. | ||
| Line 33: | Line 33: | ||
* '''Edit points''': select this tool, then select a shape or a line, to edit the individual points that form the shape or line. | * '''Edit points''': select this tool, then select a shape or a line, to edit the individual points that form the shape or line. | ||
| − | * '''Glue points''': select this tool to edit the glue points of a graphic object. Glue points are the positions where connector lines terminate or start. See [[#Managing glue points|Managing glue points]] for instructions. | + | * '''Glue points''': select this tool to edit the glue points of a graphic object. Glue points are the positions where connector lines terminate or start. See [[Documentation/OOoAuthors User Manual/Impress Guide/Creating lines and shapes#Managing glue points|Managing glue points]] for instructions. |
| − | * '''Fontwork''': opens the Fontworks gallery. See [[ | + | * '''Fontwork''': opens the Fontworks gallery. See [[Documentation/OOoAuthors User Manual/Impress Guide/Using Fontwork|Using Fontwork]] for further information. |
| − | * '''From file''': equivalent to '''Insert > Picture > From file''' on the main menu. See [[Impress Guide/Adding and Formatting Pictures|Chapter 4]] for details. | + | * '''From file''': equivalent to '''Insert > Picture > From file''' on the main menu. See [[Documentation/OOoAuthors User Manual/Impress Guide/Adding and Formatting Pictures|Chapter 4]] for details. |
| − | * '''Gallery''': opens the gallery. Equivalent to '''Tools > Gallery''' on the main menu. See [[Impress Guide/Adding and Formatting Pictures|Chapter 4]] for details. | + | * '''Gallery''': opens the gallery. Equivalent to '''Tools > Gallery''' on the main menu. See [[Documentation/OOoAuthors User Manual/Impress Guide/Adding and Formatting Pictures|Chapter 4]] for details. |
| − | * '''Rotate''': select this tool to rotate an object. As rotation is considered a formatting attribute, this is discussed in [[Impress Guide/Formatting Graphic Objects|Chapter 6]]. | + | * '''Rotate''': select this tool to rotate an object. As rotation is considered a formatting attribute, this is discussed in [[Documentation/OOoAuthors User Manual/Impress Guide/Formatting Graphic Objects|Chapter 6]]. |
* '''Align object''': see [[Documentation/OOoAuthors User Manual/Impress Guide/Aligning shapes|Aligning shapes]]. | * '''Align object''': see [[Documentation/OOoAuthors User Manual/Impress Guide/Aligning shapes|Aligning shapes]]. | ||
* '''Arrange object''': see [[Documentation/OOoAuthors User Manual/Impress Guide/Arranging shapes|Arranging shapes]]. | * '''Arrange object''': see [[Documentation/OOoAuthors User Manual/Impress Guide/Arranging shapes|Arranging shapes]]. | ||
| − | * '''Extrusion On/Off''': switches 3D effects on or off for the selected object. Clicking this button also opens the 3D settings toolbar. See [[ | + | * '''Extrusion On/Off''': switches 3D effects on or off for the selected object. Clicking this button also opens the 3D settings toolbar. See [[Documentation/OOoAuthors User Manual/Impress Guide/Working with 3D shapes|Working with 3D shapes]] for details. |
| − | * '''Interaction''': opens a dialog where you can specify the interaction between the user and the object. See [[ | + | * '''Interaction''': opens a dialog where you can specify the interaction between the user and the object. See [[Documentation/OOoAuthors User Manual/Impress Guide/Setting up interaction with a shape or image|Setting up interaction with a shape or image]]. |
| − | * '''Visible buttons''': use the black triangle to open a menu that allows to add or subtract buttons to the toolbar. The step by step procedure is given in [[Getting Started/Menus and Toolbars|Chapter 4]] of the [[Getting Started]] guide. | + | * '''Visible buttons''': use the black triangle to open a menu that allows to add or subtract buttons to the toolbar. The step by step procedure is given in [[Documentation/OOoAuthors User Manual/Getting Started/Menus and Toolbars|Chapter 4]] of the [[Documentation/OOoAuthors User Manual/Getting Started|Getting Started]] guide. |
| + | |||
| − | {{ | + | {{CCBY}} |
| + | [[Category: Impress Guide (Documentation)]] | ||
Latest revision as of 01:47, 13 January 2009
- The Drawing toolbar
- Creating lines and shapes
- Working with 3D shapes
- Grouping shapes together
- Arranging shapes
- Flipping shapes
- Aligning shapes
- Alignment using the grid and snap guides
- Converting an object to a different type
- Setting up interaction with a shape or image
- Animating images
- Using Fontwork
The Drawing toolbar collects the majority of the tools normally used to create graphic objects. If this toolbar is not showing, select View > Toolbars > Drawing from the main menu bar.
-

First section of Drawing toolbar with drawing objects tools.

The toolbar can be divided into two parts. The first part (shown above) contains drawing objects. The tools in this part of the Drawing toolbar are:
- Select: selects objects. To select multiple objects click on the top leftmost object and while keeping the mouse button pressed, drag the mouse to the bottom rightmost object of the intended selection. A marching ants rectangle identifying the selection area is displayed. It is also possible to select several objects by pressing the Control button while selecting the individual objects.
- Line: draws a straight line.
- Arrow: draws a straight line ending with an arrowhead. The arrowhead will be placed where you release the mouse button.
- Rectangle: draws a rectangle. Press the Shift button to draw a square.
- Ellipse: draws an ellipse. Press the Shift button to draw a circle.
- Text: creates a text box with text aligned horizontally.
- Vertical text: creates a text box with text aligned vertically. This tool is available only when Asian language support has been enabled in Tools > Options > Language Settings > Languages.
- Curve: draws a curve. Click the black triangle for more options, shown below. Note that the title of the submenu when undocked is Lines.
-

Available curve options.

- Connectors: draws a connector line between two figures. Click the black triangle for additional connectors, shown below. The use of connectors is described in Working with connectors.
-
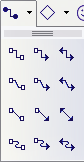
Connectors options.

- Basic Shapes, Symbol Shapes, Block Arrows, Flowcharts, Callouts, Stars: click the black triangle to open a toolbar showing the available shapes in that category. The default shapes are shown below. Select the desired shape, then draw as normal. Keep the Shift key pressed to obtain a shape where the height and width are equal.
-
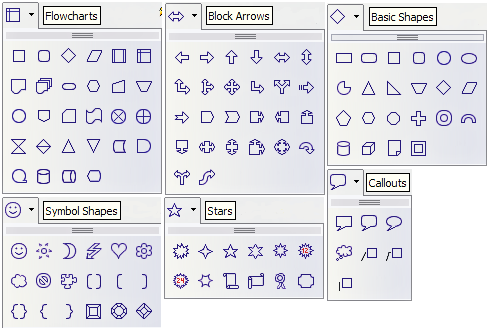
Available shapes for Impress.

The second part of the Drawing toolbar, shown below, contains more generic tools.
-
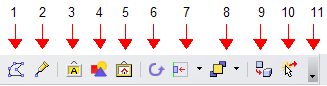
The second section of the Drawing toolbar with utility tools.

Those tools are:
- Edit points: select this tool, then select a shape or a line, to edit the individual points that form the shape or line.
- Glue points: select this tool to edit the glue points of a graphic object. Glue points are the positions where connector lines terminate or start. See Managing glue points for instructions.
- Fontwork: opens the Fontworks gallery. See Using Fontwork for further information.
- From file: equivalent to Insert > Picture > From file on the main menu. See Chapter 4 for details.
- Gallery: opens the gallery. Equivalent to Tools > Gallery on the main menu. See Chapter 4 for details.
- Rotate: select this tool to rotate an object. As rotation is considered a formatting attribute, this is discussed in Chapter 6.
- Align object: see Aligning shapes.
- Arrange object: see Arranging shapes.
- Extrusion On/Off: switches 3D effects on or off for the selected object. Clicking this button also opens the 3D settings toolbar. See Working with 3D shapes for details.
- Interaction: opens a dialog where you can specify the interaction between the user and the object. See Setting up interaction with a shape or image.
- Visible buttons: use the black triangle to open a menu that allows to add or subtract buttons to the toolbar. The step by step procedure is given in Chapter 4 of the Getting Started guide.
| Content on this page is licensed under the Creative Common Attribution 3.0 license (CC-BY). |