Difference between revisions of "Documentation/OOo3 User Guides/Writer Guide/Sending a fax"
From Apache OpenOffice Wiki
(New page: {{DISPLAYTITLE:Sending a fax}} {{Documentation/WG3PrintTOC |ShowPrevNext=block |PrevPage=Documentation/OOo3_User_Guides/Writer Guide/Printing labels |NextPage=Documentation/OOo3_User_Guide...) |
Clairedwood (Talk | contribs) ((checkpoint save)) |
||
| Line 12: | Line 12: | ||
== Adding a Fax icon to the toolbar (advanced) == | == Adding a Fax icon to the toolbar (advanced) == | ||
| − | You can configure OpenOffice.org so that a single click on an icon automatically sends the current document as a fax. | + | You can configure OpenOffice.org so that a single click on an icon automatically sends the current document as a fax. To add an icon for this purpose to a toolbar, see [[Documentation/OOo3_User_Guides/Writer_Guide/Customizing_toolbars|''Chapter 17'']] (Customizing Writer). |
<ol> | <ol> | ||
<li>Be sure the fax driver is installed. Consult the documentation for your fax modem for more information.</li> | <li>Be sure the fax driver is installed. Consult the documentation for your fax modem for more information.</li> | ||
Revision as of 14:41, 29 May 2010
To send a fax directly from OpenOffice.org, you need a fax modem and a fax driver that allows applications to communicate with the fax modem.
Sending a fax through the Print dialog box
- Open the Print dialog box by choosing File > Print and select the fax driver in the Name list.
- Click OK to open the dialog box for your fax driver, where you can select the fax recipient.
Adding a Fax icon to the toolbar (advanced)
You can configure OpenOffice.org so that a single click on an icon automatically sends the current document as a fax. To add an icon for this purpose to a toolbar, see Chapter 17 (Customizing Writer).
- Be sure the fax driver is installed. Consult the documentation for your fax modem for more information.
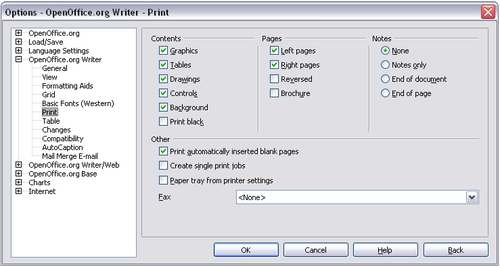
- Choose Tools > Options > OpenOffice.org Writer > Print. The dialog box shown below opens.
- Select the fax driver from the Fax list and click OK.
- Click the arrow icon at the end of the Standard toolbar. In the drop-down menu, choose Customize Toolbar. The Toolbars page of the Customize dialog box appears. Click Add.
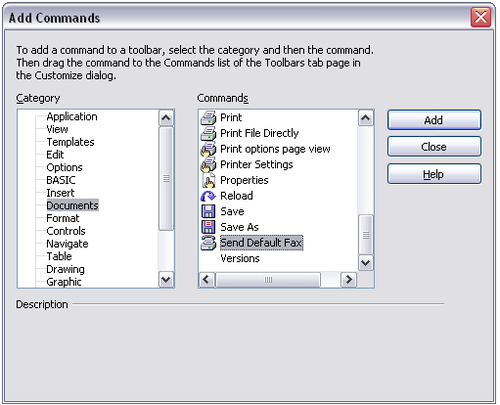
- On the Add Commands dialog box, select Documents in the Category list, then select Send Default Fax in the Commands list. Click Add. Now you can see the new icon in the Commands list.
- In the Commands list, click the up or down arrow button to position the new icon where you want it. Click OK and then click Close.
Your toolbar now has a new icon to send the current document as a fax.
| Content on this page is licensed under the Creative Common Attribution 3.0 license (CC-BY). |


