Difference between revisions of "Documentation/OOoAuthors User Manual/Draw Guide/Snap to snap objects"
| Line 8: | Line 8: | ||
''Snap lines'' run horizontal or vertical and appear are dashed lines. ''Snap points'' appear as small crosses, again with dashed lines. | ''Snap lines'' run horizontal or vertical and appear are dashed lines. ''Snap points'' appear as small crosses, again with dashed lines. | ||
| − | {{ | + | {{Note|In Version 2 of OOo the name of the buttons in the Options toolbar are “Display Guides” and “Snap to Guides” when what is actually meant is “Display Snap line” and “Snap to Snap line”. These will be corrected in subsequent versions.}} |
If you have activated this function, you can position objects exactly. Horizontal and vertical snap lines can be used together. Snap lines are not active immediately after inserting them but are turned on (or off) using the [[Image:]] icon or with the '''View''' menu. If the snap line is no longer needed you can hide it (or subsequently display it again) with the ''Display Guides'' icon [[Image:]] or using the '''View''' menu. | If you have activated this function, you can position objects exactly. Horizontal and vertical snap lines can be used together. Snap lines are not active immediately after inserting them but are turned on (or off) using the [[Image:]] icon or with the '''View''' menu. If the snap line is no longer needed you can hide it (or subsequently display it again) with the ''Display Guides'' icon [[Image:]] or using the '''View''' menu. | ||
Latest revision as of 15:32, 4 July 2018
- Positioning objects with Zoom
- Positioning objects with snap functions
- Snap to grid
- Snap to snap objects
- Other snap functions
- Positioning objects with helper lines
- Drawing to scale
- Splitting complex drawings on multiple layers
- Example: house plan and furniture
- Multi-page document
- Using page backgrounds
- Color palette
- Using the color picker dialog
- Cool effects
Snap lines and snap points)
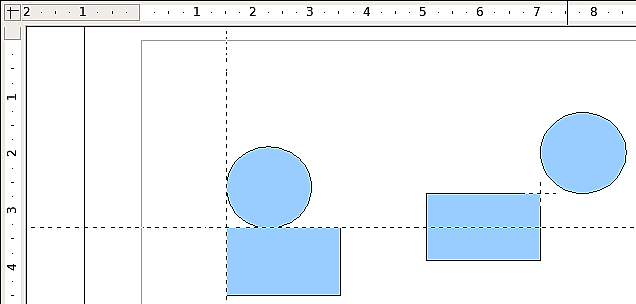
Snap lines run horizontal or vertical and appear are dashed lines. Snap points appear as small crosses, again with dashed lines.
If you have activated this function, you can position objects exactly. Horizontal and vertical snap lines can be used together. Snap lines are not active immediately after inserting them but are turned on (or off) using the [[Image:]] icon or with the View menu. If the snap line is no longer needed you can hide it (or subsequently display it again) with the Display Guides icon [[Image:]] or using the View menu.

Figure 11: Objects 'connected' to snap lines (left) or to a snap point (right). Note that the snap point functions in principle as if it was the intersection of two snap lines.
Inserting a snap line with the mouse
To insert a snap line in a drawing:
- Hover the mouse cursor over either ruler.
- Click and hold the right mouse button.
- Drag the mouse into the drawing area to produce a snap line.
The snap line can at any time be moved with the mouse. Moving a snap line will not, however, move any objects that have been snapped to that line.
Inserting snap points and snap lines using coordinates
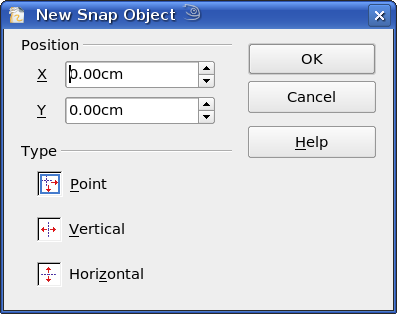
The command Insert > Snap point / line opens a window (Figure 12) where you can specify X and Y coordinates and choose the type of snap object: point, vertical line, or horizontal line.

Figure 12: Setting a) snap object type and b) snap object position using X,Y coordinates
Editing snap points and snap lines
All snap objects can be subsequently edited after setting them. If you right-click on a snap object, an appropriate menu is opened. This contains a number of possible commands, including Delete.
| Content on this page is licensed under the Creative Common Attribution 3.0 license (CC-BY). |