Difference between revisions of "Documentation/OOo3 User Guides/Calc Guide/Picture context menu"
(New page: {{DISPLAYTITLE:Using the Picture context menu}} {{Documentation/CG3Ch8TOC |ShowPrevNext=block |PrevPage=Documentation/OOo3_User_Guides/Calc Guide/Modifying images |NextPage=Documentation/O...) |
(→Assign Macro) |
||
| Line 32: | Line 32: | ||
== Assign Macro == | == Assign Macro == | ||
| − | Adds programmable functionality to the image. Calc provides rich macro functionality. Macros are introduced in | + | Adds programmable functionality to the image. Calc provides rich macro functionality. Macros are introduced in [[Documentation/OOo3_User_Guides/Calc Guide/Calc Macros|Calc Macros]]. |
== Group == | == Group == | ||
Revision as of 18:03, 12 December 2010
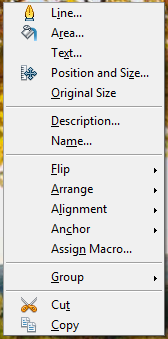
Many of the options accessible from the Picture toolbar can also be reached by right-clicking on an image to bring up the context menu. Some additional options are only available from the context menu; these are described in this section.
Text
Opens a dialog where you can set the options for text that goes over a picture. To write text over a graphic, click on the graphic to select it, and then press Enter. There should be a cursor inside the graphic. Any text entered is part of the graphic, so if the graphic is moved the text will move with it.
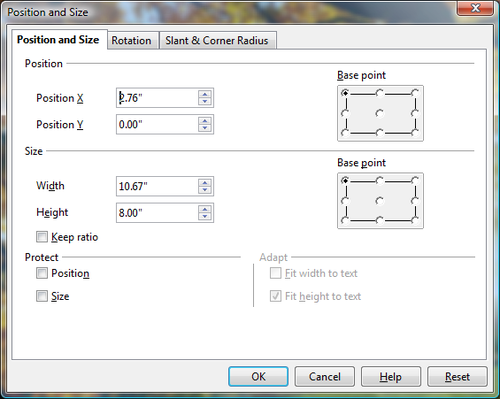
Position and Size
Opens the dialog shown below where you can change the size, location, rotation, slant and corner radius of the image.
Original Size
Resets the dimensions of the image to the values when it was originally inserted into the document.
Description
You can add metadata in the form of a title and a description to the image. This information is used by accessibility tools (such as screen reader software) and as ALT (alternative) attributes if you export the document to HTML.
Name
You can add a custom name to be assigned to the image, to make it easier to find in the Navigator.
Flip
Flips the image either horizontally or vertically.
Assign Macro
Adds programmable functionality to the image. Calc provides rich macro functionality. Macros are introduced in Calc Macros.
Group
To group images:
- Select one image, then hold down the Shift key and select the others you want to include in the group. The bounding box expands to include all the selected objects.
- With the objects selected, hover the mouse pointer over one of the objects and choose Format > Group > Group from the menu bar or right-click and choose Group > Group from the pop-up menu.
After images are grouped, the menus include other choices, including Ungroup and Edit Group. For more information about grouping, see the Draw Guide.
| Content on this page is licensed under the Creative Common Attribution 3.0 license (CC-BY). |

