Using frames for page layout
Introduction to frames
Frames can be very useful when producing a newsletter or other layout-intensive documents. Frames can contain text, tables, multiple columns, pictures, and other objects.
Use frames when you need to:
- Position something in a particular place on a page, for example, a logo or a “stop press" news box in one corner of a page.
- Allow text on one page to continue on another page somewhere else in the document (other than the next page), by linking the content of one frame to another so the contents flow between them as you edit the text.
- Wrap text around an object, such as a photograph.
Because OpenOffice.org does not allow you to define page styles with recurring frames, consider doing some quick sketches of the basic page layouts you need, indicating the approximate positions of different frames and their purposes. Try to keep the number of different page layouts as low as possible in order to avoid chaos in your design.
Pay special attention to the positioning of frames. Many of the predefined styles default to a center alignment. This is the lowest common denominator of design; centering all frames looks reasonably good in most cases but is rarely the best choice.
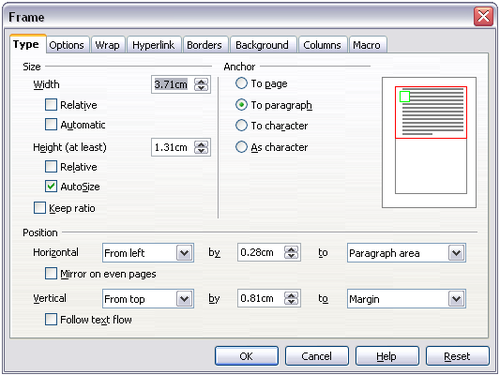
One of the most visually effective ways to position a frame is to align its left margin with that of the paragraph above it. To achieve this effect, insert the frame in a blank paragraph of the same style as the paragraph above. Then, select Insert > Frame > Type > Position > Horizontal > From Left to position the frame exactly where you want it.
You also should think about the type of wrap and the spacing between the frame and text. Instead of cramming a frame close to the text, use the Wrap tab to place some white space between them.
You can format frames individually or define and apply frame styles; see Chapter 7 (Working with Styles).
Creating frames
You can create a frame in several ways, depending on your needs.
- Choose Insert > Frame) to create an empty frame. The Frame dialog box appears. You can click OK and come back to customize it later, or you can set the frame's characteristics at this stage.
- Select text or a graphic, choose Insert > Frame, and click OK to create a frame containing the selection. The selected text is automatically deleted from the normal text flow and inserted into the frame, and the Frame dialog box appears.
- Insert a picture or other object by selecting Insert > Picture > From file or Insert > Object to start the process to insert a picture or object. The item inserted automatically appears in a frame, but the Frame dialog box does not appear.
- Use the Insert Frame Manually icon on the Insert toolbar (go to View > Toolbars > Insert to display it), select the number of frames in the drop-down menu, and drag the mouse to draw the frame.
When you release the mouse button, a box appears where the cursor is located in the document. This box represents the frame: an area isolated from the main document.
To add content to a frame, first deselect the frame by clicking somewhere else on the page. Then, click inside the frame so that the cursor shifts its focus there. Now add content just like you would on the main page. When you are done, deselect the frame.
Moving, resizing, and changing frame attributes
When an object is added to Writer, it is automatically enclosed in a frame of a predetermined type. The frame sets how the object is placed on the page, as well as how it interacts with other elements in the document. You can edit the frame by modifying the frame style it uses or by using a manual override when a frame is added to the document. Frame styles are discussed in Chapter 7 (Working with Styles).
To change the size or location of a frame, first select the frame, then use either the mouse or the Frame dialog box. Using the mouse is faster but less accurate. You might use the mouse for gross layout and the dialog box for fine-tuning.
You can resize the frame manually (by clicking on the green squares and dragging to the appropriate size) or start adding content to it (the frame will resize automatically if you, for example, add a large picture to it) or go back to the Frame dialog box and set the size and other characteristics.
To change the location of the frame using the mouse, drag and drop one of the edges or having the cursor anywhere within the frame. (The I-bar cursor changes to a four-headed arrow when properly positioned for a drag-and-drop move.) To change the size of the frame, drag one of the handles. Drag a handle on one of the sides to enlarge or reduce the text frame in one dimension only; drag a corner handle to enlarge or reduce it in both dimensions.
These resizing actions distort the proportions of the frame. Holding down the Shift key while dragging one of the handles makes the frame keep the same proportions.
You can open the Frame dialog box at any time by selecting the frame, right-clicking, and choosing Frame from the pop-up menu.
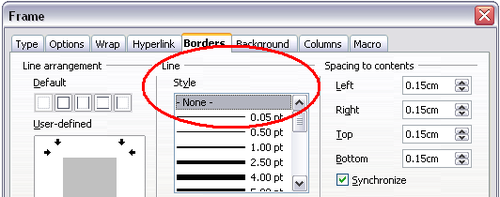
To remove the default border on a newly created frame, open the Frame dialog box, go to the Borders page, and under Line, select None. Alternatively, you can assign a borderless frame style to the frame; see Chapter 7 (Working with Styles), for information on frame styles.
| Do not confuse a frame's border with the text boundaries that are made visible using the View menu (by checking View > Text Boundaries). |
Anchoring a frame
Using the Frame dialog box (or by right-clicking and pointing to Anchor), you can anchor a frame to a page, paragraph, or character, or you can anchor it as a character.
To Page
The frame keeps the same position in relation to the page margins. It does not move as you add or delete text. This method is useful when the frame does not need to be visually associated with a particular piece of text. It is often used when producing newsletters or other documents that are very layout-intensive.
To Paragraph
The frame is associated with a paragraph and moves with the paragraph. It may be placed in the margin or another location. This method is useful as an alternative to a table for placing icons beside paragraphs.
To Character
The frame is associated with a character but is not in the text sequence. It moves with the paragraph but may be placed in the margin or another location. This method is similar to anchoring to a paragraph.
As Character
The frame is placed in the document like any other character and, therefore, affects the height of the text line and the line break. The frame moves with the paragraph as you add or delete text before the paragraph. This method is useful for adding a small icon in sequence in a sentence. It is also the best method for anchoring a graphic to an empty paragraph so it does not move around the page in unexpected ways.
Linking frames
You can link several frames to each other even when they are on different pages of a document. The contents will automatically flow from one to the next. This technique is very useful when designing newsletters, where articles may need to be continued on a different page.
To link one frame to another:
- Select the frame to be linked from.
- Click the Link Frames icon inline:Graphic151.png on the object bar.
- Click the next frame in the series (which must be empty).
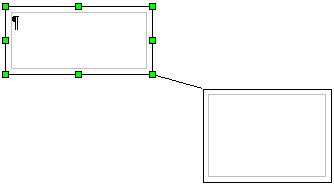
When a linked frame is selected, any existing links are indicated by a connecting line, as shown below.
The height of a frame that is being linked from is fixed; you can change this height manually or by using the Frame dialog box, but it does not automatically adjust to the size of the contents (that is, the AutoHeight attribute is disabled). Only the last frame of a chain can adapt its height to the content.
The Options page of the Frame dialog box shows the names of the selected frame and any frames it is linked to or from. You can change this information here. On this page, you can also select check boxes to protect the contents, position, and size of the frame.
On the Hyperlink page, you can specify the file for the hyperlink to open. This file can be on your machine, a network, or the Internet.
The Wrap, Borders, Background, Columns, and Macro pages of the Frame dialog box are the same as those for frame styles. Refer to Chapter 7 (Working with Styles) for details.
| Content on this page is licensed under the Creative Common Attribution 3.0 license (CC-BY). |


