Moving and dynamically adjusting an object’s size
There are several ways of moving or changing the size of an object. The method described here is called dynamic in the sense that it is carried out using the mouse.
When you dynamically change an object, remember to check the right-hand area of the status bar at the bottom of your screen. This shows detailed information about the ongoing manipulation. For example, during a resizing manipulation, the following information is displayed.
The Info-field (not shown in Figure 2 below) shows which object is selected; the (current) position – X/Y coordinates, and object dimensions – Width x Height, of the object being moved are shown. The information displayed changes as the mouse is moved. The units displayed are those selected under Tools > Options > OpenOffice.org.Draw > General.
Dynamic movement of objects
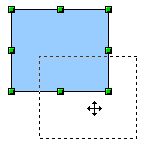
To move an object, select it and then click within the object’s border and hold down the left mouse button while moving the mouse. During movement, the shape of the object appears as dotted lines to help with repositioning.
To drop the object at its new location, let go of the mouse button. The new position will appear immediately in the status bar.
Dynamic size modification of objects
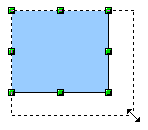
To change the size of a selected object (or a group of selected objects) with the mouse, you need to move one of the handles located around the selection. As shown in the following illustration, the outline of the resulting new object appears as a dotted line while the mouse button is pressed.
The results will differ depending on which handle you use. If you choose a corner handle (as shown in the figure above), you will resize the object along two axes at the same time. If you use a side handle, the objects will only be resized along one axis. The new size will appear immediately in the status bar.
Dynamic size modification with the help of the Status bar
If you select an object and modify it using the mouse, the changes are immediately reflected in the Info field of the status bar. With geometric shapes (such as Basic Shapes, Symbol Shapes, Block Arrows) only the information that the shape is being resized is shown in the status bar. With geometric elements (Rectangles, Circles, and so on) the changes to the attributes of the element (either relative or absolute) are shown. In the case of a rectangle the relative percentage of the x and y dimensions of the original shape are shown. For a line much more information is given: the absolute change in x,y coordinates of the end point being moved together with the current length and bearing of the modified line are all given in the status bar and updated as the end point is moved (see Figure 3).
This information is very useful. It is the only place in which one can see the exact start and end angle locations of an arc or where the length and bearing of a sloping line are shown. With this information you can dimension the object with some accuracy.
Modifying an arc
The beginning and end points of an arc can be modified. Select the arc and click on the Points icon [[Image:]] on the menu bar to enter the Edit points mode[1]. In this mode the handles on the selection frame change – at the beginning and end points of the arc two larger blue handles appear. When the mouse hovers over one of these points the cursor will change to a hand.
If you click and hold the mouse button when the hand cursor appears, moving the mouse will change the location of the start or end point of the arc. The actual coordinates are shown in the Status bar.
[1] This mode is described in more detail later in this chapter.
| Content on this page is licensed under the Creative Common Attribution 3.0 license (CC-BY). |


