Working with slide masters
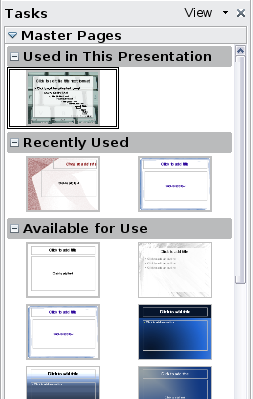
Impress comes with 28 pre-packaged slide masters. They are shown in the Master Pages section of the Tasks pane. This section has three subsections: Used in This Presentation, Recently Used, and Available for Use. Click the + sign next to the name of a subsection to expand it to show thumbnails of the slides, or click the – sign to collapse the subsection to hide the thumbnails.
Each of the slide masters shown in the Available for Use list is from a template of the same name. If you have created your own templates, or added templates from other sources, slide masters from those templates will also appear in this list. See Working with templates for more about templates.
Creating slide masters
You can create a new slide master in a similar way to modifying the default slide master.
To start, enable editing of slide masters by View > Master > Slide Master.
On the Master View toolbar, click the New Master icon (highlighted in the figure).
A second slide master appears in the Slides pane. Modify this slide master to suit your requirements. It is also recommended that you rename this new slide master. To do that, right-click on the slide in the Slides pane and select Rename master from the popup menu.
When you are done, close the Master View toolbar to return to normal slide editing mode.
Applying a slide master
In the Tasks Pane, be sure the Master Pages section is showing.
To apply one of the slide masters to all slides in your presentation, click on it in the list.
To apply a different slide master to one or more selected slides:
- In the Slide Pane, select the slides you want to change.
- In the Tasks Pane, right-click on the slide master you want to apply to the selected slides, and click Apply to Selected Slides on the pop-up menu.
Loading additional slide masters
Sometimes, in the same set of slides, you may need to mix multiple slide masters that may belong to different templates (the use of templates is explained later in Working with templates). For example, you may need a completely different layout for the first slide of the presentation, or you may want to add to your presentation a slide from a different presentation (based on a template available on the hard disk).
The Slide Design dialog box makes this possible. Access this dialog box either from the menu bar (Format > Slide design) or from the pop-up menu that appears when right-clicking on a slide in the Slides pane.
The main window in the dialog box shows the slide masters already available for use. To add more:
- Click the Load button.
- Select in the new dialog box the template from which to load the slide master. Click OK.
- Click OK again to close the slide design dialog box.
The slide masters in the template you selected are now shown also in the Master Pages section of the Tasks pane in the Available for use subsection.
| To limit the size of the presentation file, you may want to minimize the number of slide masters used. |
| Content on this page is licensed under the Creative Common Attribution 3.0 license (CC-BY). |

