Combining Multiple Objects
This is Chapter 5 of the OpenOffice.org 3 Draw Guide, produced by the OOoAuthors group. A PDF of this chapter is available from this wiki page.
Introduction: grouping and combining objects
Using Draw, you can combine drawing objects together in two distinct ways: grouping and combining. These two methods allow you to treat multiple objects as one unit, or to merge objects to form a new shape.
Grouping is like putting objects in a container. You can move them as a group and apply global changes to them. A group can always be undone and the objects that make up the group can always be manipulated separately.
A combination is a permanent fusion of objects leading to a new object. The original objects are no longer available as individual entities and the operation is not reversible.
| To select multiple objects, click on each object while holding down the Shift key or click the Select icon (on the Drawing toolbar) and draw a rectangle around the objects. |
Grouping objects
Grouping by common selection
When several objects are selected, any operations you carry out are applied to all of the objects. For example, you can rotate a group of objects in its entirety. Groups obtained through common selection of several objects are undone as soon as you click outside the group. However, you can group objects and keep those selected objects grouped together.
Maintaining groups and undoing groups
To group objects, first select the objects, then right-click and choose Group from the pop-up menu. You can also use the keyboard shortcut Control+Shift+G or choose Modify > Group from the menu bar.
When objects are grouped, any editing operations carried out on that group are applied to all members of the group. If you click on one member of the group, the whole group is selected.

The objects of a group retain their own individual properties. To undo a group, right-click and choose Ungroup from the pop-up menu, use the keyboard shortcut Control+Alt+Shift+G or choose Modify > Ungroup from the menu bar.
Editing individual objects in a group
You can edit a member of a group individually without breaking the group. To do this, right-click and choose Enter group or double-click on the group.

Once inside the group, click on any object to edit it.

To leave this mode, right-click and choose Exit group or double-click outside the group.
Nesting groups
You can create "nested" groups, or groups of groups. In this case, Draw keeps the initial group hierarchy. If you ungroup a group made of other groups, you are left with individual groups that you can then ungroup further, and so on until only single objects remain.
Combining objects
In contrast to grouping functions, combinations create a new object; subsequent "un-combining" in the same manner as ungrouping is not possible. Select a collection of objects, then right-click and choose Combine from the pop-up menu. The result of this operation is shown below.

|
||
| Combining objects | ||


At first glance, this can seem rather surprising. Once you understand the rules governing combination in Draw, however, it will become clearer.
- The attributes (for example, area fill) of the resulting object are those of the object furthest back. In this example, it is the circle.
- Where the objects overlap, the overlapping zone is either filled or empty depending on the number of overlaps. When the number of overlaps is even, you get an empty space; when the number is odd, you get a filled area.

| You can reorder objects so they are further back in the background or further forward in the foreground: right-click on the object and select Arrangement from the pop-up menu. See also Aids for positioning objects |
An object which is a combination can be broken up into its constituent parts by selecting Modify > Break. This is not the equivalent of ungrouping as the objects were converted to Bézier curves when they were combined. The resulting object is a set of base level objects (for example, a rectangle will be broken into 4 separate lines). The original formatting — line thickness, colors, and area properties — is not retained.
Merging, subtracting, or intersecting shapes
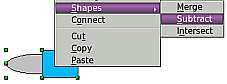
After you have selected more than one object, the Merge, Subtract, and Intersect functions can be reached in the Modify > Shapes menu or though the group's right-click menu under the heading Shapes.
| Merge
When you merge objects, the new object covers the entire surface of the original objects (it is the union of the objects). In the same way as combining, the fill of the merged object is determined by the fill of the object furthest in the background. Other properties are not taken over into the new object. |
|
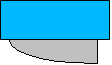
| Subtract
When you subtract, the upper object is subtracted from the lower object. |
|
| Intersect
When you intersect two objects, you get the area covered by both objects. |


| How do I move an object so it is further back or closer to the front? See Moving an object. |
Practical example
The following example shows how you can use the merge functions to create a complex shape, namely a knife with a wooden handle.
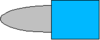
- Draw an ellipse and then a rectangle overlapping half of its width.
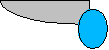
- Select both shapes, right-click, and choose Shapes > Subtract from the pop-up menu. The result should resemble the shape at the right:


- Draw another rectangle and put it over the top half of the ellipse. Then subtract again.

- Draw a small ellipse covering just the lower right corner and subtract again.

- The knife blade is now complete. To make the handle, draw a rectangle and an ellipse as shown.

- Merge the shapes together.
- Group this image with the previous one.


Aids for positioning objects
Draw has various tools to help you arrange the objects with respect to each other. Here we explore some of the more important ones.
Moving an object to the front or to the back
When you combine or merge objects, the end result varies drastically depending on which object is "in front" and which one is "in the back".


If you imagine several objects stacked one on top of the other, the one referred to as "Front" is the one on top of the stack. The one referred to as "Back" is the one on the very bottom of the stack.
First select an object, then on the Drawing toolbar, long-click on the Arrange icon ![]() to open the Position toolbar. This toolbar can be torn off and made to float.
to open the Position toolbar. This toolbar can be torn off and made to float.

| 1 Bring to Front | 5 In Front of Object |
| 2 Bring Forward | 6 Behind Object |
| 3 Send Backward | 7 Reverse |
| 4 Send to Back | |
| The floating Position toolbar | |


![]() moves the selected object behind another chosen object.
Click first on the object you want to change in position. Next click on the icon and then move the mouse over the other object. The mouse cursor changes into a hand and the outline of the second object becomes a dashed line (see below). Clicking on this object completes the rearrangement of position.
moves the selected object behind another chosen object.
Click first on the object you want to change in position. Next click on the icon and then move the mouse over the other object. The mouse cursor changes into a hand and the outline of the second object becomes a dashed line (see below). Clicking on this object completes the rearrangement of position.


Aligning objects
Select two objects and long-click on [[Image:]] on the Drawing toolbar to open the Align toolbar. This toolbar can be torn off and made to float. The tools help you position objects with respect to each other.

| 1' Align left | 4 Align top |
| 2 Center horizontally | 5 Center vertically |
| 3 Align right | 6 Align bottom |
| The floating Align toolbar | |


If you have selected only one object, clicking the various buttons on the Align toolbar positions the object in relation to the drawing page.
Distributing the distance and space between objects
Select at least three objects. Now you are able to select the option Distribution on the Modify menu or from the right-click menu. The Distribution dialog contains a number of options, described below.

Horizontal distribution
None. Does not distribute the objects horizontally.
Left. The left edges of the objects are evenly spaced from one another.
Center. The horizontal centers of the objects are evenly spaced from one another.
Spacing. The horizontal spacing between the objects is evenly distributed.
Right. The right edges of the objects are evenly spaced from one another.
Vertical distribution
None. Does not distribute the objects vertically.
Top. The top edges of the objects are evenly spaced from one another.
Center. The vertical centers of the objects are evenly spaced from one another.
Spacing. The vertical spacing between the objects is evenly distributed.
Bottom. The bottom edges of the objects are evenly spaced from one another.
The following two figures show four objects, first before distribution of horizontal spacing, and then after distribution resulting from the selections shown above.


| Content on this page is licensed under the Creative Common Attribution 3.0 license (CC-BY). |