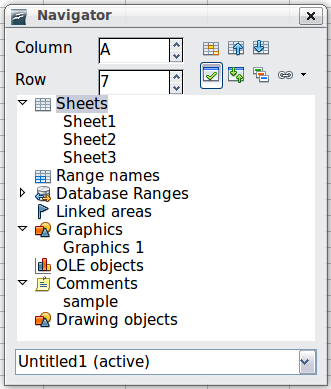
Using the Navigator
In addition to the cell reference boxes (labeled Column and Row), the Navigator provides several other ways to move quickly through a spreadsheet and find specific items.
To open the Navigator, click its icon ![]() on the Standard toolbar, or press F5, or choose View > Navigator on the Menu bar, or double-click on the Sheet Sequence Number
on the Standard toolbar, or press F5, or choose View > Navigator on the Menu bar, or double-click on the Sheet Sequence Number ![]() in the Status Bar. You can dock the Navigator to either side of the main Calc window or leave it floating. (To dock or float the Navigator, hold down the Control key and double-click in an empty area near the icons at the top.)
in the Status Bar. You can dock the Navigator to either side of the main Calc window or leave it floating. (To dock or float the Navigator, hold down the Control key and double-click in an empty area near the icons at the top.)
The Navigator displays lists of all the objects in a spreadsheet document, grouped into categories. If an indicator (plus sign or arrow) appears next to a category, at least one object of this kind exists. To open a category and see the list of items, click on the indicator.
To hide the list of categories and show only the icons at the top, click the Contents icon ![]() . Click this icon again to show the list.
. Click this icon again to show the list.
Table 1 summarizes the functions of the icons at the top of the Navigator.
Table 2: Function of icons in the Navigator
| Icon | Action |
|---|---|
| Data Range. Specifies the current data range denoted by the position of the cell cursor. | |
| Start/End. Moves to the cell at the beginning or end of the current data range, which you can highlight using the Data Range button. | |
| Contents. Shows or hides the list of categories. | |
| Toggle. Switches between showing all categories and showing only the selected category. | |
| Displays all available scenarios. Double-click a name to apply that scenario. See Data Analysis for more information. | |
| Drag Mode. Choose hyperlink, link, or copy. See Choosing a drag mode for details. |
Moving quickly through a document
The Navigator provides several convenient ways to move around a document and find items in it:
- To jump to a specific cell in the current sheet, type its cell reference in the Column and Row boxes at the top of the Navigator and press the Enter key; for example, in the figure above the cell reference is A7.
- When a category is showing the list of objects in it, double-click on an object to jump directly to that object’s location in the document.
- To see the content in only one category, highlight that category and click the Toggle icon. Click the icon again to display all the categories.
- Use the Start and End icons to jump to the first or last cell in the selected data range.
Choosing a drag mode
Sets the drag and drop options for inserting items into a document using the Navigator.
Insert as Hyperlink
Creates a hyperlink when you drag and drop an item into the current document.
Insert as Link
Inserts the selected item as a link where you drag and drop an object into the current document.
Insert as Copy
Inserts a copy of the selected item where you drag and drop in the current document. You cannot drag and drop copies of graphics, OLE objects, or indexes.
| Content on this page is licensed under the Creative Common Attribution 3.0 license (CC-BY). |
