Controlling Printing
Contents
- 1 Controlling Printing
- 1.1 Selecting General Printing Options
- 1.2 Printing Multiple Pages on a Single Sheet of Paper
- 1.3 Selecting Pages/Sheets/Slides to Print
- 1.4 Printing Handouts, Notes, or Outlines in Impress
- 1.5 Printing A Brochure
- 1.6 Printing Envelopes, Labels, Business Cards
- 1.7 Printing in Black and White (on a Color Printer)
- 1.8 Previewing Pages/Sheets Before Printing
Controlling Printing
For more control over printing, use the Print dialog (File → Print or Ctrl + P ). (See Figure 219)
The Print dialog has four tabs, from which you can choose a range of options, as described in the following sections.
| The options selected on the Print dialog apply to this printing of this document only.
To specify default printing settings for Apache OpenOffice, go to Tools → Options → OpenOffice → Print and Tools → Options → OpenOffice Writer → Print. See Chapter 11 (Setting Up and Customizing Apache OpenOffice) for more details. |
The different components of Apache OpenOffice have different available print settings, as summarized in Table 2.

Table 2: Print options in Apache OpenOffice components
| Feature | Writer | Calc | Impress | Draw |
| Select pages/sheets/slides to print | Yes | Yes | Yes | Yes |
| Print multiple pages/sheets/slides on one page | Yes | Yes | Yes | Yes |
| Print a brochure | Yes | No | Yes | Yes |
| Print envelopes | Yes | No | No | No |
| Print labels or business cards | Yes | No | No | No |
| Preview pages/sheets before printing | Yes | Yes | No | No |
Selecting General Printing Options
On the General tab of the Print dialog, you can choose:
- The printer (from the printers available)
- Which pages to print, the number of copies to print, and whether to collate multiple copies (Range and copies section)
- Whether to print a multiple-page document in reverse page order, to accommodate the output feed of the printer
- Whether to print any comments that are in the document, and where to print the comments.

Select the Properties button to display a dialog where you can choose portrait or landscape orientation, which paper tray to use, and the paper size to print on. Setting some of these properties requires clicking the Advanced button in the Properties dialog.
On the Options tab of the Print dialog (Figure 221), the last item, Use only paper tray from printer preference, is not available in Calc.

Printing Multiple Pages on a Single Sheet of Paper
You can print multiple pages of a document on one sheet of paper. To do this:
- In the Print dialog, select the Page Layout tab (Figure 222).

- In the Layout section, select from the drop-down list the number of pages to print per sheet. The preview panel on the left of the Print dialog shows how the printed document will look.
When printing more than 2 pages per sheet, you can choose the order in which they are printing across and down the paper. The two pictures below show the difference.


- In the Page sides section, select whether to print all pages or only some pages.
- Click the Print button.
| In Writer, to print two pages per sheet in “facing pages” (book layout) style, print from Print Preview instead. See page 250. |
Selecting Pages/Sheets/Slides to Print
In addition to printing a full document, you can choose to print individual pages/ sheets/slides, ranges of pages/sheets/slides, or a selection of a document. The details vary slightly in Writer, Calc, Draw and Impress, as described in this section.
Writer
Printing an individual page:
- Choose File → Print from the menu bar.
- On the Print dialog, select the page to print.
- In the Ranges and copies section of the General page, select the Pages option.
- Enter the sequence number of the page you want to print. The preview box changes to show the selected page.If you have restarted page numbering within the document, the sequence number is not the same as the page number.
- Click the Print button.
Printing a range of pages:
- Choose File → Print from the menu bar.
- On the Print dialog, select the range of pages to print.
- In the Ranges and copies section of the General page, select the Pages option.
- Enter the sequence numbers of the pages to print (for example, 1-4 or 1,3,7,11).
- Click the Print button.
Printing a selection of text:
- In the document, select the material (text and graphics) to print.
- Choose File → Print from the menu bar.
- The Ranges and copies section of the Print dialog now includes a Selection option and the preview box shows the selected material. See Figure 223.
- Click the Print button.

Calc
You can choose single sheets, multiple sheets, and selections of cells for printing.

Printing an individual sheet:
- In the spreadsheet, click on the sheet tab to select the sheet you want to print.
- Choose File → Print from the menu bar.
- In the Ranges and copies section of the Print dialog, choose the Selected sheets option.
- Click the Print button.
Printing a range of sheets:
- In the spreadsheet, select the sheets to print.
- Select the first sheet.
- Hold down the Ctrl key.
- Click on the additional sheet tabs.
- Release the ' Ctrl key when all required sheets are selected.
- Choose File → Print from the menu bar.
- In the Ranges and copies section of the Print dialog, choose the Selected sheets option.
- Click the Print button.
Printing a selection of cells:
- In the document, select the section of cells to print.
- Choose File → Print from the menu.
- In the Ranges and copies section of the Print dialog, select the Selected cells option.
- Click the Print button.
| After printing, be sure to deselect the extra sheets. If you keep them selected, the next time you enter data on one sheet, you enter data on all the selected sheets. This might not be what you want. |
Impress and Draw
You can choose individual slides, ranges of slides, or selections of slides for printing.

Printing an individual slide:
- Choose File → Print from the menu bar.
- Select the slide to print.
- In the Ranges and copies section of the Print dialog, select the Slides option.
- Enter the number of the slide to print.
- Click the Print button.
Printing a range of pages:
- Choose File → Print from the menu bar.
- Select the slides to print.
- In the Ranges and copies section of the Print dialog, select the Slides option.
- Enter the number of the slides to print (for example 1-4 or 1,3,7,11).
- Click the Print button.
Printing a selection of a slide, or a selection from multiple slides:
- In the document, select the section of the slide to print.
- Choose File → Print from the menu bar.
- Select the Selection option in the Ranges and copies section of the Print dialog.
- Click the Print button.
Printing Handouts, Notes, or Outlines in Impress
Handouts print the slides in reduced size on the page, from one to nine slides per page. The slides can be printed horizontally (landscape orientation) or vertically (portrait orientation) on the page.
Notes print a single slide per page with any notes entered for that slide in Notes View.
Outline prints the title and headings of each slide in outline format.
To print handouts, notes, or outlines:
- Choose File → Print from the menu bar.
- In the Print section of the Print dialog, select the required option.
- For Handouts, you can then choose how many slides to print per page, and the order in which they are printed.
- Click the Print button.

Printing A Brochure
In Writer, Impress, and Draw, you can print a document with two pages on each side of a sheet of paper, arranged so that when the printed pages are folded in half, the pages are in the correct order to form a booklet or brochure.
| Plan your document, so it will look good when printed half size; choose appropriate margins, font sizes, and so on. You may need to experiment. |
To print a brochure on a single-sided printer:
- Choose File → Print.
- In the Print dialog, click Properties.
- Check the printer is set to the same orientation (portrait or landscape) as specified in the page setup for your document. Usually the orientation does not matter, but it does for brochures. Click OK to return to the Print dialog.
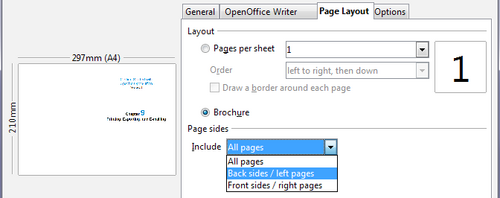
- Select the Page layout tab in the Print dialog.
- Select the Brochure option.
- In the Page sides section, select Back sides / left pages option from the Include drop-down list.
- Click the Print button.
- Take the printed pages out of the printer, turn the pages over, and put them back into the printer in the correct orientation to print on the blank side. You may need to experiment a bit to find out what the correct arrangement is for your printer.
- On the Print dialog, in the Page sides section, select Front sides / right pages option from the Include drop down box.
- Click the Print button.

| If your printer can print double-sided automatically, choose All pages. |
Printing Envelopes, Labels, Business Cards
Printing envelopes, labels, or business cards using Writer involves two steps: setup and printing.
For details of how to set these up, see Chapter 11 (Using Mail Merge) in the Writer Guide. To print:
- Choose File → Print from the menu bar.
- On the Print dialog, under Ranges and copies, choose Pages and type 1 in the box. Click the Print button.
Printing in Black and White (on a Color Printer)
You may wish to print documents in black and white on a color printer. Several choices are available. Please note that some color printers may print in color regardless of the settings you choose.
Change the printer settings to print in black and white or gray scale:
- Choose File → Print to open the Print dialog.
- Click Properties to open the Properties dialog for the printer. The available choices vary from one printer to another, but you should find options for the Color settings. See your printer's help or user manual for more information.
- The choices for color might include black and white or grayscale. Choose the required setting.
- Click OK to confirm your choice and return to the Print dialog,
Click the Print button to print the document.
| Gray scale is best if you have any graphics in the document. |
Change the Apache OpenOffice settings to print all color text and graphics as gray scale:
- Choose Tools → Options → OpenOffice → Print.
- Select the Convert colors to grayscale option. Click OK to save the change.
- Open the Print dialog (File → Print).
- Click the Print button to print the document.
Change the Writer (or Calc, Impress, Draw) settings to print all color text as black, and all graphics as gray scale:
- Choose Tools → Options → OpenOffice Writer → Print.
- Under Contents, select the Print text in black option. Click OK to save the change.
- Open the Print dialog ( Print ).
- Click the Print button to print the document.
Previewing Pages/Sheets Before Printing
You can use the previewing options in Writer and Calc to view the document as it will be printed. Different viewing options are available.
Writer
The normal page view in Writer shows you what each page will look like when printed, and you can edit the pages in that view. If you are designing a document to be printed double-sided, you may want to see what facing pages look like. Writer provides two ways to do this:
- View Layout (editable view): use the Facing Pages (Book Preview) button on the status bar.
- Page Preview (read-only view).
To use Page Preview:
- Choose File → Page Preview (or click the Page Preview button
 on the Standard toolbar). Writer now displays the Page Preview toolbar instead of the Formatting toolbar.
- Select the required preview icon: Two Pages (
 ), Multiple Pages (
 ) or Book Preview (
 ).
). - To print the document from this view, click the Print document icon (
 ) to open the Print dialog.
 - Choose the print options and click the Print button.
Calc
To preview the sheets in Calc before printing:
- Choose File → Page Preview.
The Calc window now displays the Page Preview toolbar instead of the Formatting toolbar.
- To print the document from this view, click the Print document icon () to open the Print dialog.
- Choose the print options and click the Print button.
| Content on this page is licensed under the Creative Common Attribution 3.0 license (CC-BY). |