Managing the Gallery
Managing the Gallery
Graphics in the Gallery are grouped by themes, such as Bullets, Rulers, and Backgrounds. You can create other groups or themes and add your own pictures or find extensions containing more graphics.
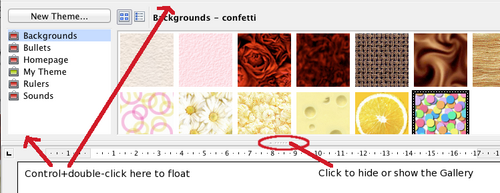
The box on the left, or above in the Sidebar, the gallery window lists the available themes. Click on a theme to see its contents displayed in the Gallery window.
You can display the Gallery in Icon View (Figure 241) or Detailed View, and you can hide or show the Gallery by clicking on the Hide button (similar to the Hide button for the Navigator and the Styles and Formatting window when they are docked).
When the Gallery is called with Tools → Gallery or with the icon on the Standard toolbar, it is docked above the workspace by default. To expand the Gallery, position the pointer over the line that divides it from the top of the workspace. When the pointer changes to parallel lines with arrows, click and drag downward. The workspace resizes in response.
As with other docked windows, you can “float” the Gallery from its position above the workspace or in the Sidebar by moving the mouse pointer over an edge of the Gallery window, holding down the Ctrl key, and double-clicking. Repeat this procedure to dock the Gallery again.
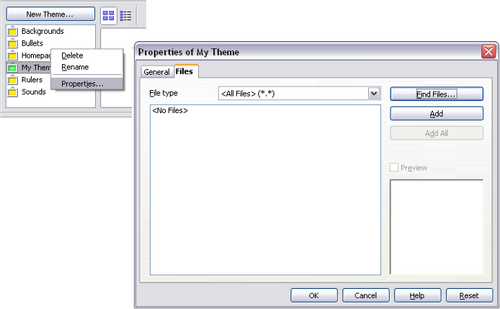
The default themes are locked; no items can be added to or deleted from these themes. The locked themes are easily recognizable by right-clicking on them; the only available option in the pop-up menu is Properties.
In a default installation, only My Theme is customizable, although new themes can be added as explained in “Adding a New Theme to the Gallery".
Adding Objects to the Gallery
You may wish to add to the Gallery any images that you use frequently, for example, a company logo. You can then very easily insert these graphics into a document later.
You can add images only to “My Theme” or to any other theme that you have created; these are indicated by a green icon in the list of themes. You cannot add images to the built-in themes, indicated by an icon of another color.
Method 1 (selecting a file):
- Right-click on the desired theme and select Properties from the context menu.
- In the theme's Properties dialog, go to the Files page and click the Find Files button.
- The Select path dialog (not shown) opens. You can enter the path for the file's directory in the Path text box, or you can navigate to locate the file's directory.
- Click the Select button to start the search. A list of graphic files is then displayed in the Properties dialog. You can use the File type drop-down list to limit the files displayed.
- To add all the files shown in the list, click Add All . Otherwise, select the files to add and then click Add . (Hold down either the ⇧ Shift key or the Ctrl key while you click on the files.)
Method 2 (drag and drop)
You can drag and drop an image into the Gallery from a document.
- Open the document containing an image you want to add to the Gallery, and display the Gallery theme to which you want to add it.
- Position the mouse pointer above the image, without clicking.
- If the mouse pointer changes to a hand symbol, the image refers to a hyperlink. In this case, press the Alt key while you click the image, to select it without activating the link. If the mouse pointer does not change to a hand symbol, you can simply click the image to select it.
- Once the image is selected, evident from the green selection handles around it, release the mouse button. Click again on the image, keeping the mouse button pressed for more than two seconds. Without releasing the mouse button, drag the image into the document.
- Release the mouse button.
Deleting Images from the Gallery
To delete an image from a theme that you created:
- Right-click on the name of the image file or its thumbnail in the Gallery.
- Click Delete on the pop-up menu. A message appears, asking if you want to delete this object. Click Yes .
| Deleting the name of a file from the list in the Gallery does not delete the file from the hard disk or other location. |
Adding a New Theme to the Gallery
To add a new theme to the Gallery:
- Click the New Theme button above the list of themes (Figure 241).
- In the Properties of New Theme dialog, click the General tab and type a name for the new theme.
- Click the Files tab and add images to the theme, as described earlier.
Deleting a Theme from the Gallery
You can delete only themes that you have added to the Gallery; you cannot delete any of the inbuilt themes. To delete a theme from the Gallery:
- Go to the list of themes and select the one you wish to delete.
- Right-click on the theme, then click Delete on the pop-up menu.
Location of the Gallery and the Objects in It
Graphics and other objects shown in the Gallery can be located anywhere on your computer's hard disk or on a network drive. Listings in the Gallery refer to the location of each object. When you add graphics to the Gallery, the files are not moved or copied; only the location of each new object is added as a reference.
In a work group, you may have access to a shared Gallery (where you cannot change the contents unless authorized to do so) and a user Gallery, where you can add, change, or delete objects.
The location of the user Gallery is specified in Tools → Options → OpenOffice → Paths. You can change this location, and you can copy your gallery files (*.sdv) to other computers.
Gallery contents provided with AOO are stored in a different location. You cannot change this location.
| Content on this page is licensed under the Creative Common Attribution 3.0 license (CC-BY). |

