Difference between revisions of "FR/Documentation/Writer Guide/Travail styles paragraphe"
m (→Settings on the Alignment page) |
m (→Text flow options for paragraph styles) |
||
| Line 65: | Line 65: | ||
[[Image:WG3Ch7F8.png|thumb|none|500px|''Mesures typographiques (de Wikipedia.org).'']] | [[Image:WG3Ch7F8.png|thumb|none|500px|''Mesures typographiques (de Wikipedia.org).'']] | ||
| − | == | + | == Options d'enchaînement des styles de paragraphe == |
| − | + | ||
| − | + | L'onglet de la boîte de dialogue contrôlant les options d'enchaînement du texte est montré ci dessous. Cet onglet est divisé en trois parties ''Coupure des mots'', ''Sauts'' et ''Options''. | |
| − | + | Dans la section ''Coupure des mots'' vous pouvez modifier trois paramètres : | |
| − | + | ||
| − | + | ||
| − | + | * ''Caractères en fin de ligne'' : contrôle le nombre de caractères minimum à laisser en fin de ligne avant d'insérer un tiret. | |
| + | * ''Caractères en début de ligne'' : contrôle le nombre minimum de caractères qui peuvent être placés au début d'une nouvelle ligne suivant un tiret. | ||
| + | * ''Nombre maximal de coupures consécutives'' : contrôle le nombre de lignes consécutives qui peuvent se terminer par un tiret. | ||
| − | + | Si vous préférez que Writer contrôle automatiquement la coupure des mots, sélectionnez l'option '''Automatiquement'''. | |
| − | + | [[Image:WG3Ch7F9.png|thumb|none|500px|''Les options sur l'onglet Enchaînement de la boîte de dialogue de style de paragraphe.'']] | |
| − | + | Dans la section ''Sauts'', vous pouvez demander à ce qu'un paragraphe commence sur une nouvelle page ou colonne, aussi bien que spécifier la position du saut, le style de la nouvelle page ainsi que le nouveau numéro de page. Un usage typique de cette option est d'assurer qu'une nouvelle page d'un nouveau chapitre (ou son titre) commence toujours sur une nouvelle page (en général recto ou de droite). | |
| − | + | Pour toujours commencer un style sur une nouvelle page, saisissez les paramètres suivants dans la page ''Enchaînement'' : | |
| − | + | ||
| − | + | ||
| − | + | ||
| − | + | # Dans la section ''Sauts'', sélectionnez '''Insérer'''. Assurez-vous que ''Type'' est défini sur '''Page''' et ''Position'' est définie sur '''Avant'''. | |
| + | # Sélectionnez '''Avec le style de page''' et choisissez le style de page à partir de la liste. | ||
| + | # Pour continuer la numérotation des page du chapitre précédent, laissez ''Numéro de page'' défini sur '''0'''. Pour redémarrer la numérotation à 1 sur chaque page de chapitre, définissez ''Numéro de page'' sur '''1'''. | ||
| + | # Cliquez sur '''OK'''. La page doit ressembler à la figure ci dessous. | ||
| − | + | [[Image:WG3Ch7F10.png|thumb|none|500px|''Définir un style de paragraphe pour démarrer toujours sur une nouvelle page.'']] | |
| − | + | {{Documentation/Note| Si vous souhaitez que la première page d'un nouveau chapitre commence toujours sur une page de droite (recto), assurez-vous que le stie pour la première page du chapitre soit défini seulement en faisant cette sélection dans le champ ''Paramètres de mise en page''' dans l'onglet '''Page''' dans la boite de dialogue Style de page. La procédure typique pour le reste d'un chapigre est de définir un style de page "miroir" unique pour les pages de droite et de gauche. Un style de page en miroir peut avoir un en-tête et un pied de page différents. Fait de cette façon, chaque chapitre utilisera deux styles de page. | |
| − | + | Vous pouvez choisir de définir des styles de page séparés pour les pages de droite et de gauche, si vous voulez que les pages aient une apparence très différente (par exemple, des marges différentes ou des en-têtes et des pieds de page différents seluement sur les pages de droite et pas sur les pages de gauche ; imaginons un livre avec une photographie pleine page sur les pages de gauche et du texte sur les pages de droite). Dans ce cas, assurez-vous que le champ ''Style de suite'' pour le style de première page est alors, défini sur page de gauche uniquement, qui, à son tour, est défini pour être suivi par un style page de droite uniquement. Fait de cette façon, chaque chapitre utilisera trois styles de page. Cette hypothèse pourrait avoir ces noms de styles : Première page, Gauche et Droite.}} | |
| + | |||
| + | La section ''Options'' de l'onglet ''Enchaînement'' fournit des paramètres pour contrôler ce qui se passe quand un paragraphe ne tient pas dans le bas d'une page : | ||
| − | * ''' | + | * '''Ne pas scinder le paragraphe''' signifie que le paragraphe ne sera jamais scinder sur deux pages. S'il ne tient pas en bas de la page, le paragraphe entier est déplacé en haut de la page suivante. |
| − | * ''' | + | * '''Conserver avec le paragraphe suivant''' est approprié au titres ou la phrase d'introduction d'une liste, pour s'assurer qu'il n'est pas le dernier paragraphe de la page. |
| − | * ''' | + | * '''Traitement des orphelines''' et '''Traitement des veuves'''. Veuves et orphelines sont des termes typographiques. Une ''orpheline'' est la première d'un paragraphe seul en bas d'une page ou d'une colonne. Une ''veuve'' est la dernière ligne d'un paragraphe qui apparaît seul en haut de la page ou de la colonne suivante. Utilisez ces options pour permettre aux paragraphes d'être scinder sur les pages ou colonne mais requiert qu'au moins deux lignes ou plus demeurent ensemble en haut ou en bas de la page ou de la colonne. Vous pouvez spécifier le nombre de lignes devant rester ensemble. |
== Font options for the paragraph style == | == Font options for the paragraph style == | ||
Revision as of 17:51, 25 April 2009
- Création de nouveaux styles personnalisés
- Travail avec les styles de paragraphe
- Travail avec les styles de paragraphe conditionnels
- Travail avec les styles de caractère
- Travail avec les styles de cadre
- Travail avec les styles de page
- Exemple d'une séquence de page de chapitre
- Travail avec les styles de liste
- Exemple : création d'un style de liste simple
Alors que cette section décrit la plupart des paramètres éparpillés dans les douze onglets montrés dans la figure ci dessous, vous n'avez pas besoin de tous les configurer. En fait, dans la vaste majorité des cas, il est suffisant de modifier seulement quelques attributs, particulièrement si vous faites l'usage de la propriété de lien des styles ou lorsque vous basez le nouveau sur un qui est similaire.
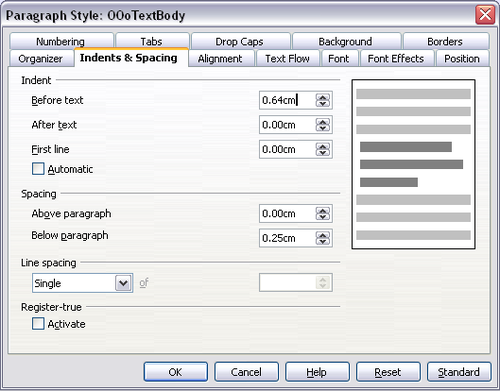
Paramètres de l'onglet Retraits et espacement
Sur l'onglet Retraits et espacement, vous pouvez définir les paramètres qui affectent la popsition du paragraphe dans la page et l'espacement entre les lignes entre ce paragraphe et les paragraphes autour. Sur la droite de l'onglet, vous pouvez avoir un apercu des paramètres appliqués.
Utilisez la section Retrait de l'onglet pour définir un retrait en utilisant ces paramètres :
- Avant le texte : contrôle l'espace dans votre unité de mesure sélectionnée entre la marge de gauche de la page et la partie la plus à gauche de la zone de paragraphe. Saisir une valeur négative fait commencer le texte dans la marge de gauche. Cela peut être utile dans le situations où la marge de gauche est plutôt large, mais vous préférerez centrer les titres dans la page.
- Après le texte : contrôle l'espace dans votre unité de mesure sélectionnée entre la marge de droite de la page et la partie la plus à droite de la zone de paragraphe. Saisir une valeur négative fait s'étendre le texte dans la marge de droite de la page.
- Première ligne : saisissez dans le champ le décalage (aussi bien positif que négatif) de la première ligne du paragraphe relative à la zone de paragraphe. Une valeur positive augment le retrait de la première ligne, alors qu'une valeur négative fait commencer la première ligne à la gauche de la zone de paragraphe.
- Automatique : cocher cette case permet à Writer de contrôler automatiquement le retrait de la première ligne. La valeur est calculée par Writer sur la base de la taille de la police et d'autres paramètres.
Utilisez la section Espacement de l'onglet pour déterminer l'espace vertical au-dessus et en-dessous du paragraphe. Il est habituel de laisser de l'espace au-dessus des styles de titre de façon à ce qu'ils soient séparés du corps de texte de la section précédente sans avoir besoin d'insérer des paragraphes vides. L'espacement entre les paragraphes est normal dans certains types de documents. Le style corps de texte de ce guide est configuré pour laissez de l'espace entre deux paragraphes consécutifs.
L'espacement entre les paragraphes n'affecte pas l'espacement entre les lignes, qui est en fait contrôlé par la liste déroulante dans la section Interligne. Vous pouvez sélectionner une des valeurs suivantes :
- Simple : le paramètre par défaut applique une interligne simple au paragraphe. Celui-ci est automatiquement calculé sur la base de la taille de la police.
- 1,5 ligne: définit l'interligne sur 1,5 ligne
- Double : définit l'interligne sur deux lignes.
- Proportionnel : cette valeur active le champ d'édition en regard de la liste déroulante dans lequel vous saisissez une valeur en pourcentage. 100% signifie un interligne d'une ligne.
- Minimum : ce choix active le champ d'édition en regard de la liste déroulante dans lequel vous pouvez saisir la valeur minimale (dans votre unité de mesure sélectionnée) qui doit être utilisée pour l'interligne.
- Typographique : si cette valeur est sélectionnée, vous pouvez contrôler la hauteur de l'espace vertical inséré entre deux lignes (à partir du bas de la police de la ligne du dessus, au haut de la police de la ligne du dessous).
- Fixe : ce choix active le champ d'édition en regard de la liste déroulante dans lequel vous pouvez saisir la valeur exacte de l'interligne.
Le dernier paramètre que vous pouvez définir sur cet onglet est le Contrôle de repérage. Référez-vous aux Paramètres généraux du style de page pour des informations sur la manière d'utiliser ce paramètre.
Paramètres de l'onglet Alignement
Utilisez l'onglet Alignement pour modifier l' alignement horizontal du texte, en choisissant entre Gauche, Droite, Centré et Justifié. Le résultat de la sélection est montré dans la fenêtre d'aperçu à la droite de l'onglet.
Lors de la sélection de l'alignement Justifié, vous pouvez aussi décider de comment Writer doit traiter la dernière ligne du paragraphe. Par défaut, Writer aligne la dernière ligne à gauche, mais vous pouvez choisir de l'aligner au centre ou de la justifier (cela signifie que les mots sur la dernière ligne seront espacés de façon à occuper toute la ligne). Si vous sélectionnez l'option Étirer un mot seul, alors lorsque la dernière ligne d'un paragraphe justifié consiste en un mot seul, ce mot est étiré par l'insertion d'espaces entre les caractères de façon à ce qu'il occupe toute la largeur de la ligne.
L'onglet Alignement est également utilisé pour contrôler l'alignement vertical Texte à texte - utile lorsque des tailles de polices mélangées dans la même ligne. Choisissez l'élément des polices sur la ligne qui sera aligné entre Automatique, Ligne de base, En haut, Milieu, En bas. Référez-vous à la figure ci dessous pour une représentation graphique de ces points de référence.
Options d'enchaînement des styles de paragraphe
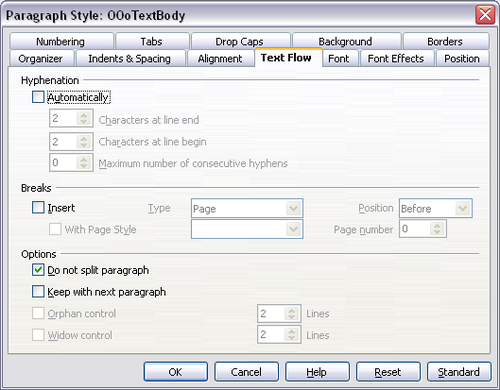
L'onglet de la boîte de dialogue contrôlant les options d'enchaînement du texte est montré ci dessous. Cet onglet est divisé en trois parties Coupure des mots, Sauts et Options.
Dans la section Coupure des mots vous pouvez modifier trois paramètres :
- Caractères en fin de ligne : contrôle le nombre de caractères minimum à laisser en fin de ligne avant d'insérer un tiret.
- Caractères en début de ligne : contrôle le nombre minimum de caractères qui peuvent être placés au début d'une nouvelle ligne suivant un tiret.
- Nombre maximal de coupures consécutives : contrôle le nombre de lignes consécutives qui peuvent se terminer par un tiret.
Si vous préférez que Writer contrôle automatiquement la coupure des mots, sélectionnez l'option Automatiquement.
Dans la section Sauts, vous pouvez demander à ce qu'un paragraphe commence sur une nouvelle page ou colonne, aussi bien que spécifier la position du saut, le style de la nouvelle page ainsi que le nouveau numéro de page. Un usage typique de cette option est d'assurer qu'une nouvelle page d'un nouveau chapitre (ou son titre) commence toujours sur une nouvelle page (en général recto ou de droite).
Pour toujours commencer un style sur une nouvelle page, saisissez les paramètres suivants dans la page Enchaînement :
- Dans la section Sauts, sélectionnez Insérer. Assurez-vous que Type est défini sur Page et Position est définie sur Avant.
- Sélectionnez Avec le style de page et choisissez le style de page à partir de la liste.
- Pour continuer la numérotation des page du chapitre précédent, laissez Numéro de page défini sur 0. Pour redémarrer la numérotation à 1 sur chaque page de chapitre, définissez Numéro de page sur 1.
- Cliquez sur OK. La page doit ressembler à la figure ci dessous.
La section Options de l'onglet Enchaînement fournit des paramètres pour contrôler ce qui se passe quand un paragraphe ne tient pas dans le bas d'une page :
- Ne pas scinder le paragraphe signifie que le paragraphe ne sera jamais scinder sur deux pages. S'il ne tient pas en bas de la page, le paragraphe entier est déplacé en haut de la page suivante.
- Conserver avec le paragraphe suivant est approprié au titres ou la phrase d'introduction d'une liste, pour s'assurer qu'il n'est pas le dernier paragraphe de la page.
- Traitement des orphelines et Traitement des veuves. Veuves et orphelines sont des termes typographiques. Une orpheline est la première d'un paragraphe seul en bas d'une page ou d'une colonne. Une veuve est la dernière ligne d'un paragraphe qui apparaît seul en haut de la page ou de la colonne suivante. Utilisez ces options pour permettre aux paragraphes d'être scinder sur les pages ou colonne mais requiert qu'au moins deux lignes ou plus demeurent ensemble en haut ou en bas de la page ou de la colonne. Vous pouvez spécifier le nombre de lignes devant rester ensemble.
Font options for the paragraph style
Three pages of the Paragraph Style dialog box are dedicated to settings controlling the appearance of the font, namely, the Font, Font Effects, and Position pages. The use of the first two pages should be straightforward. Many of the options used when creating a character style are discussed in Creating a new character style. Options that can be used when creating a paragraph style are described here.
Specifying a relative font size
If you are creating a style based on another style (linked style), you can specify a font size relative to that other style—either as a percentage or as a plus or minus point value (–2pt or +5pt). Relative font sizes are commonly used for Web pages.
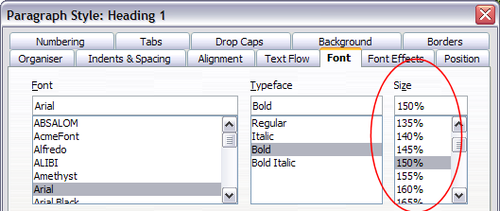
For example, the paragraph style Heading 1 is based on the paragraph style Heading. The font size of the paragraph style Heading is 14pt, and the font size of paragraph style Heading 1 is specified as 115%. Thus, the resultant font size of text in a paragraph formatted with the Heading 1 paragraph style is 14pt times 115% = 16.1pt.
To specify a percentage font size: in the Paragraph Style dialog box, select the Font tab. In the Size box, enter the percentage amount followed by the symbol % (see figure below). Similarly, you can enter a plus or minus sign followed by the number of points to be added or subtracted from the base font size.
To change from a relative font size back to an absolute font size, enter the desired font size in points followed by the letters “pt”.
It is also possible to use a Percentage Font size for character styles.
Selecting a language for a paragraph style
The language you select for a document (on Tools > Options > Language Settings > Languages) determines the dictionary used for spell checking, thesaurus, hyphenation, the decimal and thousands delimiter used, and the default currency format.
Within the document, you can apply a separate language to any paragraph style. This setting has priority over the language of the whole document. On the Font page of the Paragraph Style dialog box, languages with installed dictionaries are marked in the Language list by a small ABC icon. When you check spelling, Writer will use the correct dictionary for paragraphs with this style. If you write documents in multiple languages, you can use the linked styles to create two paragraph styles that differ only in the language option. If you then want to change some of the other properties of the paragraph style, all you need do is to change the parent style.
To insert occasional words in a different language and avoid their being picked by mistake with the check-spelling function, it is more convenient to use a character style.
Options for positioning text
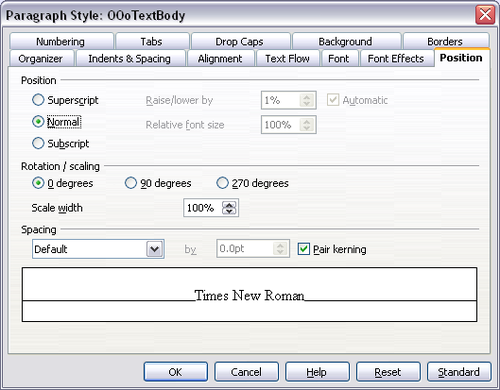
The Position page of the Paragraph Style dialog box collects all the options that affect the position of the text on the screen or printed page. This page is divided into three sections, plus a preview area. They are: Position, Rotation, and Scaling.
Use the Position section to control the appearance of superscripts and subscripts. However, you will normally apply superscript and subscripts to groups of characters rather than to entire paragraphs. Therefore, it is strongly recommended to change these parameters only when defining a character style and, instead, leave the default settings for the paragraph styles.
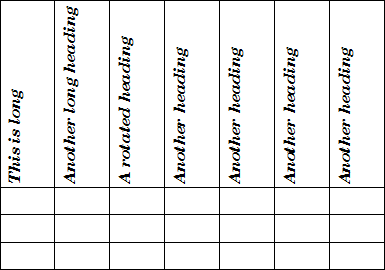
The second section of the Position page controls the rotation of the paragraph area. Two common uses for rotated paragraphs are (a) to put portrait headers and footers on a landscape page and (b) to fit headings above narrow table columns.
The Scale Width box controls the percentage of the font width by which to compress or stretch the rotated text horizontally.
Chapter 4 (Formatting Pages) describes how to create portrait headers and footers on landscape pages by rotating characters. You can achieve the same effect by defining a separate header or footer paragraph style specifically for landscape pages.
Example: Rotating the text in a paragraph style
As an example, we will apply rotated table headings to a pre-existing table.
- Create a new paragraph style. Name it Table Heading Rotated.
- On the Position page of the Paragraph Style dialog box, in the Rotation / scaling section, select 90 degrees. Click OK to save the new style.
- Select the heading row of the table and apply the new style. Any text in the cells of the heading row is now rotated.
- If the headings are aligned to the top of the cells, you may want to change the alignment to the bottom of the cells. To do this, click the Bottom button on the Table toolbar or select Format> Alignment > Bottom from the main menu.
Spacing options
The spacing section of the Position page allows you to control the spacing between individual characters in the paragraph. When selecting an option other than default in the drop-down menu, use the edit box to enter the value in points by which you want to expand or condense the text. Selecting the Pair Kerning option results in increasing or decreasing the amount of space between certain pairs of letters to improve the overall appearance of the text. Kerning automatically adjusts the character spacing for specific letter combinations (see an example of kerning pair below). Kerning is only available for certain font types and, for printed documents, only works if your printer supports it.
Controlling tab stops
Although borderless tables are generally considered a much better solution to space out material across a page, there are still many situations where tabulations are sufficient to do what you need with the added advantages of being simpler to manage and quicker to apply.
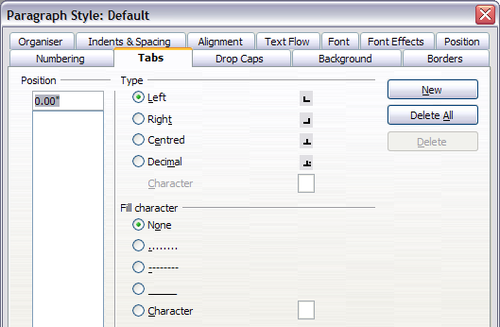
To define tab stops in your paragraph style, use the page shown below. Here you can choose the type of tab: left, right, centered, or decimal; the character to be used as a decimal point; and the fill character—the characters that appear between the end of the text before the tab and the beginning of the text after the tab. You can also create a custom fill character by entering it in the corresponding box. Common use of a fill character is adding dots between a heading and a page number in a table of contents or underscore character when creating a form to fill in.
Creating a new tab stop, therefore, is just a matter of deciding its position relative to the left margin, the type, the fill character and clicking the New button. The tab stop will be entered in the Position list on the left hand side. Unfortunately, the only way to modify the position of a tab stop is to create a new one in the desired position and delete the old one using the buttons on the right-hand side of the page.
Note that it is not possible to define tabulations that exceed the page margin. In the rare cases where it may be needed, use a borderless table instead.
Using the Numbering page
Use the numbering page if you want to be number the paragraph. This page should be used in combination with list styles when you need to associate a certain paragraph style with a list style. Refer to Combining list and paragraph styles for additional information on how to use this page, as well as an example.
Setting up a drop cap
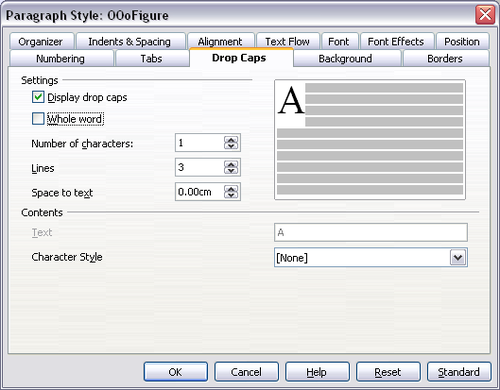
If you want your paragraph to use drop caps (usually this is suitable for a first paragraph style), then you can predefine the properties in the page shown below. Checking the box to display drop caps also enables the subsequent options where you can fine tune the appearance, such as the number of lines occupied, the number of characters to enlarge (if you want the whole first word, check the corresponding box), and the space between the drop caps and the text.
Drop caps use the same font and have the same properties of the rest of the paragraph; however, you can easily modify their appearance by creating a specific character style and using it. For example, you may want the drop caps to be of a different color or apply an outline effect. Select the character style you want to use in the corresponding drop-down menu.
Setting up paragraph background and borders
Adding a background color and a border to a paragraph is a good way to make it stand out without having to insert a frame. You can customize the background and border of the paragraph areas using the corresponding pages of the paragraph style dialog box. In addition to highlighting, borders are also often used to separate header and footer areas from the main text area as well as decorative elements in some heading styles.
The two pages are fairly intuitive. You may want to pay attention to the following points when working with the Background page:
- In case you do not find the desired color in the list of predefined ones, you can define your own by selecting Tools > Options > Colors.
- You can use a graphic instead of a solid color as background. Select Graphic in the drop-down menu, then select the graphic object you want to use and adjust the parameters, as required. Detailed instructions on working with graphic backgrounds can be found in the Impress Guide.
- The background is applied to the paragraph area, so that if you have defined some indentations, the space between the paragraph and the margin remains of the page color.
With regard to the Borders page, the following points are worth considering:
- Watch out for the effects that the spacing between borders and paragraph area produces on indentations and tabulations.
- If you want the border to be drawn around multiple paragraphs, leave the corresponding option at the bottom of the page marked.
| Content on this page is licensed under the Creative Common Attribution 3.0 license (CC-BY). |

