Modification d'une image
- Ajout d'images à un document
- Modification d'une image
- Rognage, redimensionnement, rotation et autres paramétrages
- Utilisation des outils de dessin Writer
- Positionnement des images dans le texte
- Disposition, ancrage et alignement
- Adaptation du texte autour des images
- Exemple d'adaptation du texte
- Ajout de légendes aux images
- Ajout d'une image à la Gallery
- Types de fichier d'image supportés
Lorsque vous insérez une nouvelle image, vous aurez sans doute besoin de la modifier pour l'adapter à votre document. Le positionnement de l'image en fonction du texte est discuté dans Positionnement des images dans le texte. Cette section décrit l'utilisation de la barre d'outils, le redimensionnement et le rognage ainsi qu'un contournement pour la rotation des images.
Utiliser la barre d'outils d'image
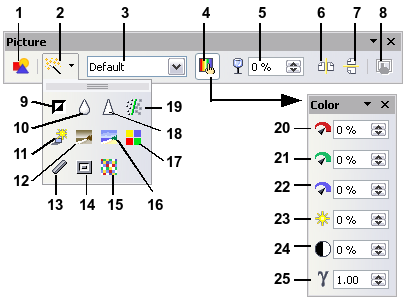
Lorsque vous insérez une image ou en sélectionnez une déjà présente dans le document, la barre d'outils Image apparaît. Cette barre d'outils peut être aussi bien flottante qu'ancrée. L'image ci dessous montre la barre d'outils lorsqu'elle est flottante. Deux autre barres d'outils peuvent être ouvertes à partir de celle-ci : la barre d'outils Filtre graphique, qui peut être désactivée ou placé n'importe dans la fenêtre et la barre d'outils Couleur, qui peut être ouverte comme une barre d'outils flottante séparée.
À partir de ces barres d'outils, vous pouvez appliquer de petites corrections à l'image et obtenir des effets spéciaux.

1 À partir d'un fichier
| 2 Filtre
| 3 Mode graphique
| 4 Couleur
| 5 Transparence
| 6 Refléter horizontalement
| 7 Refléter verticalement
| 8 Propriétés du cadre
| 9 Invertir
| 10 Adoucir
| 11 Solarisation
| 12 Vieillissement
| 13 Dessin au fusain
| 14 Relief
| 15 Mosaïque
| 16 Poster
| 17 Pop'Art
| 18 Augmenter la netteté
| 19 Supprimer les interférences
| 20 Proportion de rouge
| 21 Proportion de vert
| 22 Proportion de bleu
| 23 Luminosité
| 24 Contraste
| 25 Gamma
(ci-dessus) Barre d'outils Image plus les barres d'outils Filtre graphique et la barre d'outils couleur. Le mode graphique (3) peut être Par défaut, Niveau de gris, Noir et Blanc ou Filigrane.
Filters
Table 2 provides a short description of the available filters, however the best way to understand them is to see them in action. Feel free to experiment with the different filters and filters settings. remembering that you can undo all the changes by pressing Ctrl+Z or Alt+Backspace or by selecting Edit > Undo.
The figure below shows examples of some of the changes available on the Picture toolbar.
| Original Image | Flipped Vertically | Flipped Horizontally | Light 50% |
|---|---|---|---|

|

|

|

|
| Contrast 50% | Red 50% | Green 50% | Blue 50% |

|

|

|

|
Some graphic effects available from the Picture toolbar.
Table 1: Graphic filters and their effects
Color
Use this dialog box to modify the individual RGB color components of the image (red, green, blue) as well as the brightness, contrast, and gamma of the image. If the result is not satisfactory, you can press Control+Z to restore the default values.
Setting the object transparency
Modify the percentage value in the Transparency box ![]() on the Picture toolbar to make the image more transparent. This is particularly useful when creating a watermark or when wrapping the image in the background.
on the Picture toolbar to make the image more transparent. This is particularly useful when creating a watermark or when wrapping the image in the background.
Using the formatting toolbar and picture dialog
When an image is selected, you can customize some aspects of its appearance using the tools available on the Formatting toolbar as well as in the dialog that is shown by right-clicking on the image and selecting Picture. You can, for example, create a border around the image, selecting style and color; or you can (in the Borders page of the Picture dialog) add a shadow to the image.
| Content on this page is licensed under the Creative Common Attribution 3.0 license (CC-BY). |