Travail avec les styles de page
- Création de nouveaux styles personnalisés
- Travail avec les styles de paragraphe
- Travail avec les styles de paragraphe conditionnels
- Travail avec les styles de caractère
- Travail avec les styles de cadre
- Travail avec les styles de page
- Exemple d'une séquence de page de chapitre
- Travail avec les styles de liste
- Exemple : création d'un style de liste simple
| < Page précédente | Page suivante > |
Les chapitres de livre commencent sur une page de droite, la première page du chapitre ayant une mise en page différente des autres pages. Les autres pages du chapitre sont en "vis-à-vis" pour une impression recto/verso. Par exemple, les numéros de page dans l'en-tête ou le pied de page peuvent être positionnés sur le bord externe des pages et une marge plus large (permettant la reliure) peut être définie sur le bord interne.
Le tableau 2 montre les propriétés de deux styles de page (Page de droite et Standard) définis pour une séquence de pages d'un chapitre de livre.
Tableau 2. Propriétés d'un style de page personnalisé pour le chapitre d'un livre
| Style de page | Effet souhaité | Propriété : paramètre | ||||||
|---|---|---|---|---|---|---|---|---|
| Page de droite |
| |||||||
| Default |
| |||||||
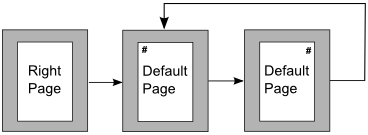
La figure ci dessous illustre les transitions du style de page Page de droite au style de page Standard, avec la modification de l'en-tête entre la page de gauche et de droite montré par le symble #.
Étape 1. Définir le style de page Page de droite.
- On the Styles and Formatting window, click the Page Styles icon
 (fourth from left) to display a list of page styles.
 - Right-click on Right Page and select Modify from the pop-up menu.
- On the Organizer page of the Page Style: Right Page dialog box, change Next Style to Default.
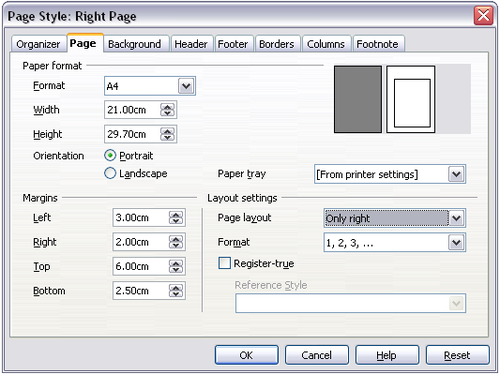
- On the Page page, specify a larger left margin for binding, and a larger top margin to move the chapter title down the page.
- On the Header and Footer pages, be sure the Header on and Footer on options are not selected. Click OK to save your changes.
- On the Styles and Formatting window, in the list of page styles, right-click on Default and select Modify from the pop-up menu.
- On the Organizer page of the Page Style: Default dialog box, be sure Next Style is set to Default.
Step 2. Set up the Default page style.
- On the Page page of the Page Style: Default dialog box, select Mirrored for Page layout and set the Inner and Outer margins to the same width as the Left and Right margins, respectively, on the Right Page style.
- On the Header page of the Page Style: Default dialog box, select the Header on option and deselect the Same content left/right option. Click OK to save your changes.
Step 3. Set up the Heading 1 paragraph style to start on a new right-hand page.
- In the Styles and Formatting window, right-click on Heading 1 and select Modify.
- On the Text Flow page of the Paragraph Style dialog box, in the Breaks section, select Insert, With Page Style, and Right Page. Click OK to save your changes.
Step 4. Start a new chapter.
Apply the Heading 1 paragraph style to the first paragraph, which will be the title of the chapter.
Step 5. Set up the page headers.
- On a left page, put the cursor in the header and insert a page number field on the left (Insert > Fields > Page Number).
- Press Tab to put the cursor in the middle and insert a Chapter reference: Press Control+F2 to display the Fields dialog box.
- On a right page, put the cursor in the header, press the Tab key, insert a Chapter reference, press Tab again, and insert a page number field.
- If you need to adjust the tab stops for the header, modify the Header paragraph style. Do not manually adjust the tab stops.
On the Document page, for Type, select Chapter and for Format, select Chapter name. Make sure that Layer is set to 1 and then click Insert.
| Content on this page is licensed under the Creative Common Attribution 3.0 license (CC-BY). |


