Exemple d'adaptation du texte
- Ajout d'images à un document
- Modification d'une image
- Rognage, redimensionnement, rotation et autres paramétrages
- Utilisation des outils de dessin Writer
- Positionnement des images dans le texte
- Disposition, ancrage et alignement
- Adaptation du texte autour des images
- Exemple d'adaptation du texte
- Ajout de légendes aux images
- Ajout d'une image à la Gallery
- Types de fichier d'image supportés
Exemple 1 : adaptation à la page
La figure ci dessous montre un exemple d'adaptation de page en action. Le procédé pour l'obtenir est le suivant :
- Insérez l'image dans le document, puis ancrez-la au premier paragraphe. Pour déplacer l'ancre, sélectionnez l'image et déplace-la jusqu'à ce que le symbole d'ancre soit au début du paragraphe. Ne vous inquiétez pas de la position, elle va être fixée à l'étape suivante.
- Alignez l'image de façon à ce que la marge de gauche de l'image soit alignée avec le retrait du paragraphe. Cela peut être fait avec la souris ou en utilisant les paramètres avancés. Dans cet exemple, l'image est placée à 1 cm à partir de la gauche de la zone de paragraphe.
- Modifiez l'adaptation à la page. Cela commence bien ; cependant il y a toujours trop peu d'espace entre l'image et le texte. Pour le corriger, accédez à l'onglet Adaptation du texte dans la boîte de dialogue Image et remplissez l'espace entre l'image et le texte de 0,2 cm dans les champs Droite et En bas.
- Pour apporter la dernière touche, il faut modifier la position de façon à ce que l'image soit en dessous de la première ligne de paragraphe. De nouveau, vous pouvez utiliser la souris pour glisser l'image ou utiliser des paramètres avancés, ce qui nécessite un peu d'essai et d'erreur. Il apparaît que la hauteur de ligne particulière utilisée dans ce guide - 0,75 cm de la marge haute au paragraphe - est une bonne valeur.
Example 2: simple contour wrapping in action
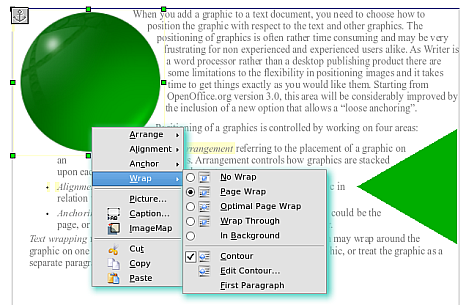
In this example we again apply page wrapping as in example 1, enabling this time the contour option. We will work on an image and on a drawing object as the contour option works slightly differently in the two cases.
The example below has been built following these steps, which you can use to practice:
- Create some text (a very quick way to do that is to use the dummy text AutoText. That is, type DT and then press the F3 key).
- Insert an image of your choice and anchor it to the first paragraph. Adjust the alignment as desired then change the wrap type to Page Wrap.
- Right-click on the picture to select the option Wrap > Contour, then right-click again and select Wrap > Edit Contour from the pop-up menu.
- Use the technique discussed in Editing the contour to create a custom contour and click Apply. If needed, adjust the spacing between the edge of the image and the text.
- Insert an AutoShape of your choice (a rotated triangle in the example) and proceed as in step 2 above.
- Enable the contour wrap by selecting Format > Wrap > Contour from the main menu. As discussed previously, OOo automatically generates the contour. You may need to adjust the distance between the drawing object and the text.
Example 3: Wrap Through and In Background
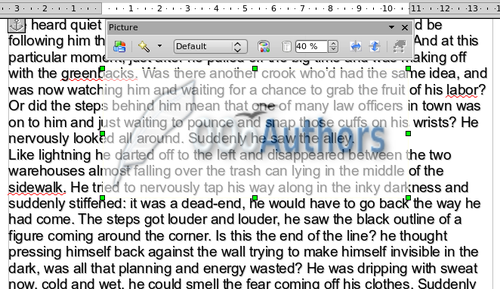
This example shows how to use an image as a watermark by wrapping it through the text and adjusting the transparency. This is not the best way to create watermarks and it is presented here only for its illustration purposes. If you need to create a watermark, it is best to use a Fontworks object wrapped in the background.
The Wrap Through option inserts an image overlapping the text which as a result will be hidden. To make the text appear, change the transparency of the picture; although the words under the image become visible, they may be difficult to read and will appear lighter than the rest of the text.
To reproduce the example above, create some dummy text, then insert the image of your choice. Anchor the image (to the page in the example) and select the wrap through option from the Format > Wrap menu or right-clicking on the image and selecting Wrap > Wrap Through from the pop-up menu. Move the image into the desired position. The Picture toolbar should be displayed when the image is selected. Change the transparency to a suitable value (in the example this is 40%) so that the text can be read. In the example, a shadow effect is applied to the text (Format > Character then select Shadow in the Font Effects page).
You can obtain a better result if you set a graphic’s wrap to In Background. In this case all the text will be clearly readable, with characters that have the same intensity as long as the background is not too dark. Also in this case you may want to adjust the transparency of the image.
| Content on this page is licensed under the Creative Common Attribution 3.0 license (CC-BY). |


