Difference between revisions of "Documentation/OOoAuthors User Manual/Getting Started/Defining relationships"
| (4 intermediate revisions by 2 users not shown) | |||
| Line 1: | Line 1: | ||
| − | {{GSBaseTOC| | + | {{DISPLAYTITLE:Defining relationships}} |
| − | | | + | {{Documentation/GSBaseTOC |
| − | | | + | |ShowPrevNext=block |
| − | + | |PrevPage=Documentation/OOoAuthors User Manual/Getting Started/Creating a View | |
| − | + | |NextPage=Documentation/OOoAuthors User Manual/Getting Started/Creating a database form | |
| − | + | }} | |
Now that the tables have been created, what are the relationships between our tables? This is the time to define them based upon the questions we asked and answered in the beginning. | Now that the tables have been created, what are the relationships between our tables? This is the time to define them based upon the questions we asked and answered in the beginning. | ||
| Line 15: | Line 15: | ||
The Fuel and Maintenance tables do not really have a relationship even though they share similar fields: Date, and Odometer. Unless a person is in a habit of regularly getting fuel and having their vehicle serviced, the entries in these tables do not share anything in common. | The Fuel and Maintenance tables do not really have a relationship even though they share similar fields: Date, and Odometer. Unless a person is in a habit of regularly getting fuel and having their vehicle serviced, the entries in these tables do not share anything in common. | ||
| − | + | {{Tip|As you create your own databases, you need to also determine where tables are related and how.}} | |
We begin defining relationships by '''Tools > Relationships'''. The Automobile - OpenOffice.org Base: Relation design window opens (Figure 13). The icons we will use are '''Add Tables''' and '''New Relation'''. | We begin defining relationships by '''Tools > Relationships'''. The Automobile - OpenOffice.org Base: Relation design window opens (Figure 13). The icons we will use are '''Add Tables''' and '''New Relation'''. | ||
| − | [[Image:RelationDesign.png| | + | [[Image:RelationDesign.png|thumb|none|500px|Figure 13: Relation design window.]] |
Click the '''Add Tables''' icon. The Add Tables window opens. | Click the '''Add Tables''' icon. The Add Tables window opens. | ||
| Line 30: | Line 30: | ||
<li>Click '''Close''' when you have added the tables you want (Figure 14).</li> | <li>Click '''Close''' when you have added the tables you want (Figure 14).</li> | ||
</ol> | </ol> | ||
| − | ::[[Image:AddedTable.png| | + | ::[[Image:AddedTable.png|thumb|none|500px|Figure 14: Added table lists.]] |
'''Defining the relationship between the Vacations and Fuel tables''' | '''Defining the relationship between the Vacations and Fuel tables''' | ||
| Line 38: | Line 38: | ||
<li>Click and drag the ''Date'' field in the Fuel table to the ''Date'' field in the Vacations table. When you release the left mouse button, a connecting line forms between the two date fields (Figure 15).</li> | <li>Click and drag the ''Date'' field in the Fuel table to the ''Date'' field in the Vacations table. When you release the left mouse button, a connecting line forms between the two date fields (Figure 15).</li> | ||
| − | : [[Image:1-nRelation.png| | + | : [[Image:1-nRelation.png|thumb|none|500px|Figure 15: Designation for a 1:n relationship.]] |
<li>Or, click the '''New Relation''' icon. This opens the Relations window (Figure 16). Our two tables are listed in the ''Tables involved'' section.</li> | <li>Or, click the '''New Relation''' icon. This opens the Relations window (Figure 16). Our two tables are listed in the ''Tables involved'' section.</li> | ||
| Line 44: | Line 44: | ||
<li>In the ''Fields involved'' section, click the dropdown list under the Fuel label.</li> | <li>In the ''Fields involved'' section, click the dropdown list under the Fuel label.</li> | ||
| − | : [[Image:SetRelation.png| | + | : [[Image:SetRelation.png|thumb|none|500px|Figure 16: Setting the relationship between tables.]] |
<li>Select ''Date'' from the Fuel table list.</li> | <li>Select ''Date'' from the Fuel table list.</li> | ||
| Line 50: | Line 50: | ||
<li>Select ''Date'' from the Vacations table list. It should now look like Figure 17.</li> | <li>Select ''Date'' from the Vacations table list. It should now look like Figure 17.</li> | ||
<li>Click '''OK'''.</li> | <li>Click '''OK'''.</li> | ||
| − | : [[Image:TablesInvolved.png| | + | : [[Image:TablesInvolved.png|thumb|none|500px|Figure 17: Selected fields in a relationship.]] |
</ol> | </ol> | ||
</ul> | </ul> | ||
| Line 60: | Line 60: | ||
# Select '''Update cascade'''. | # Select '''Update cascade'''. | ||
# Select '''Delete cascade'''. | # Select '''Delete cascade'''. | ||
| − | :: [[Image:BaseUpdateOptions.png| | + | :: [[Image:BaseUpdateOptions.png|thumb|none|500px|Figure 18: Update options and Delete options section.]] |
While these options are not absolutely necessary, they do help. Having these options selected permits you to update a table that has a relationship defined with another table. It also permits you to delete a field from the table. | While these options are not absolutely necessary, they do help. Having these options selected permits you to update a table that has a relationship defined with another table. It also permits you to delete a field from the table. | ||
| Line 66: | Line 66: | ||
[[#top|Top of page]] | [[#top|Top of page]] | ||
| − | |||
| − | |||
| − | |||
| − | |||
{{CCBY}} | {{CCBY}} | ||
| − | [[Category: Documentation]] | + | [[Category:Getting Started (Documentation)]] |
Latest revision as of 16:58, 14 July 2018
Now that the tables have been created, what are the relationships between our tables? This is the time to define them based upon the questions we asked and answered in the beginning.
When on vacation, we want to enter all of our expenses all at one time each day. Most of these expenses are in the Vacations table, but the fuel we buy is not. So, we will relate these two tables using the Date fields. Since the Fuel table may have more than one entry per date, this relationship between the Vacations and Fuel tables is one to many. (It is designated 1:n.)
The Vacations tables also contains several fields for the type of payment used. For each field listing the payment type, there is only one entry from the Payment Type table. This is a one to one relationship: one field in one table to one entry from the other table. (It is designated 1:1.) Other tables also contain fields for the type of payment. The relationship between these fields of those tables and the Payment Type table are also 1:1.
Since the Payment Type table only provides a static list, we will not be defining a relationship between the Payment Type table and the fields of the other tables which use the entries of the Payment Type table. That will be done when the forms are created.
The Fuel and Maintenance tables do not really have a relationship even though they share similar fields: Date, and Odometer. Unless a person is in a habit of regularly getting fuel and having their vehicle serviced, the entries in these tables do not share anything in common.
| As you create your own databases, you need to also determine where tables are related and how. |
We begin defining relationships by Tools > Relationships. The Automobile - OpenOffice.org Base: Relation design window opens (Figure 13). The icons we will use are Add Tables and New Relation.

Click the Add Tables icon. The Add Tables window opens.
- There are two ways to add a table to the Relation design window.
- Double-click the name of the table. In our case, do this for both Vacations and Fuel.
- Or, click the name of the table and then click Add.
- Click Close when you have added the tables you want (Figure 14).
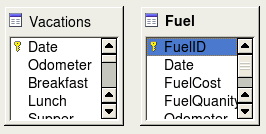 Figure 14: Added table lists.

Defining the relationship between the Vacations and Fuel tables
Two ways exist to do this:
- Click and drag the Date field in the Fuel table to the Date field in the Vacations table. When you release the left mouse button, a connecting line forms between the two date fields (Figure 15).
-
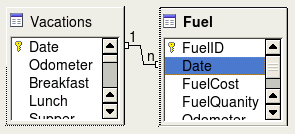 Figure 15: Designation for a 1:n relationship.
 - Or, click the New Relation icon. This opens the Relations window (Figure 16). Our two tables are listed in the Tables involved section.
- In the Fields involved section, click the dropdown list under the Fuel label.
-
 Figure 16: Setting the relationship between tables.
 - Select Date from the Fuel table list.
- Click in the cell to the right of this dropdown list. This opens a dropdown list for the Vacations table.
- Select Date from the Vacations table list. It should now look like Figure 17.
- Click OK.
-
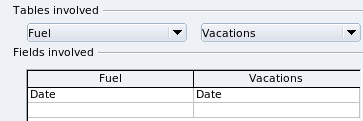 Figure 17: Selected fields in a relationship.


Modifying the Update options and Delete options section of the Relation window
- Right-click the line connecting the Date fields in the two table lists to open a context menu.
- Select Edit to open the Relation window (Figure 18).
- Select Update cascade.
- Select Delete cascade.
-
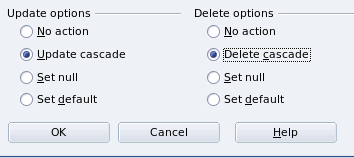 Figure 18: Update options and Delete options section.
-

While these options are not absolutely necessary, they do help. Having these options selected permits you to update a table that has a relationship defined with another table. It also permits you to delete a field from the table.
| Content on this page is licensed under the Creative Common Attribution 3.0 license (CC-BY). |