Color picker
- Positioning objects with Zoom
- Positioning objects with snap functions
- Snap to grid
- Snap to snap objects
- Other snap functions
- Positioning objects with helper lines
- Drawing to scale
- Splitting complex drawings on multiple layers
- Example: house plan and furniture
- Multi-page document
- Using page backgrounds
- Color palette
- Using the color picker dialog
- Cool effects
Using the color picker dialog
Method 1:
You can change the current color by modifying the individual color values. It is possible to jump from one color model to another during this process. The settings will always be calculated and stored according to the RGB model, possibly with some slight adjustment to your input values in the other models.
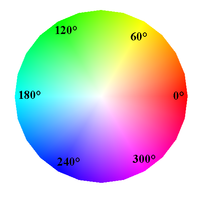
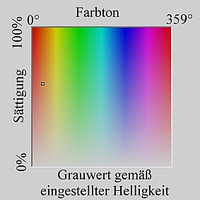
With the HSB model the color tone of the three parameters Hue (possible values from 0 to 359), Saturation (possible values from 0 to 100) and Brightness (possible values from 0 to 100) is defined. The number for the color represents the angle in a color wheel, the other two are both percentage values.
Method 2
It is also possible to select a new color by clicking on a color in the color window at the upper right of the dialog. The chosen color is shown in a black frame. The frame can be dragged with the mouse. If this color is not quite right you can fine tune it as described above in Method 1 by changing the color values.
As you drag the small square you will see the value change in the number fields. The CMYK and RGB are more or less self explanatory. To make the HSB model a little clearer some additional comments are necessary.
To better understand the working of the HSB model, move the frame from left to right and top to bottom. You will see that the Hue and Saturation values change from their maximum to their minimum (hue by horizontal movement and saturation by vertical movement), the brightness remains the same (see figure at left). This latter can only be adjusted by inputing a value into the number field.
Method 3
The left color window is divided like a chess board into 8 x 8 individual fields, each with a different color. Most important are the colors in each of the corner fields. The color red changes stepwise to green in the first row, and stepwise to yellow in the first column. The color green in the last column changes stepwise to blue.
This window thus contains a stepwise change between each of the four main colors in the corner points. If you hover the mouse over a square the RGB value will be shown as a tooltip. The yellow corner field (lower left) has for example RGB values of 255, 255 and 0 (full red, full green and no blue).
Click on this yellow field. A frame appears. If you click the -> arrow under the color windows the selected color is assigned (see picture below).
It is also possible to change the color fields, by changing (one or more) of the corner fields. Click on the field you want to change, then set the color with the mouse in the right color window and/or with the number fields. When you click now on the <- arrow, the new color will be assigned to the corner square you selected (see Figure 27).
| Content on this page is licensed under the Creative Common Attribution 3.0 license (CC-BY). |


