Difference between revisions of "Documentation/OOo3 User Guides/Writer Guide/Index Table page"
m |
m (→Protecting against manual changes) |
||
| Line 37: | Line 37: | ||
=== Protecting against manual changes === | === Protecting against manual changes === | ||
| − | To stop the table of contents being changed accidentally, select the '''Protected against manual changes''' option. If this option is | + | To stop the table of contents being changed accidentally, select the '''Protected against manual changes''' option. If this option is selected, the table of contents can only be changed using the context menu or the Insert Table/Index dialog box. If the option is not selected, the table of contents can be changed directly on the document page, just like other text. |
{{Documentation/Tip| Any manual changes to a table of contents are lost when you update it.}} | {{Documentation/Tip| Any manual changes to a table of contents are lost when you update it.}} | ||
Revision as of 14:38, 21 May 2009
- Tables of contents
- Customizing a table of contents
- Using the Index/Table page
- Using the Entries page
- Using the Styles, Columns, and Background pages
- Maintaining a table of contents
- Alphabetic indexes
- Customizing index entries
- Customizing the appearance of an index
- Maintaining an index
- Other types of indexes
- Bibliographies
- Creating a bibliographic database
- Adding a reference (citation) into a document
- Formatting the bibliography
- Defining the paragraph style for the bibliography
- Updating and editing an existing bibliography
Use the Index/Table page to set the attributes of the table of contents.
Adding a title
To give the table of contents a title, type it in the Title field. (You can change an existing title by typing over it.) To delete the title, clear the Title field.
Setting the type of index
You can create several types of indexes. They include:
- Table of Contents
- Alphabetical Index
- Illustration Index
- Table of Objects
- Bibliography
You can also create user-defined indexes.
Choosing the scope of the table of contents
From the for drop-down list in the Create index/table area, select Entire document. There is an additional option to create a table of contents for just the current chapter. For more information, refer to Help > OpenOffice.org Writer > Contents.
Creating a table of contents from an outline
This selection creates the table of contents using outline levels; that is, paragraphs formatted with one of the predefined heading styles (Heading 1-10) are added to the table of contents in order.
Click on the (...) button next to the checkbox to change the numbering properties of the table of contents. This can be useful if you want to put numbers in front of each level of the contents, as shown below.
Creating from index marks
This selection adds any index entries that you have inserted into the document by using Insert > Indexes and Tables > Entry. Normally you would not use this selection for a table of contents.
Protecting against manual changes
To stop the table of contents being changed accidentally, select the Protected against manual changes option. If this option is selected, the table of contents can only be changed using the context menu or the Insert Table/Index dialog box. If the option is not selected, the table of contents can be changed directly on the document page, just like other text.
Changing the number of levels included
Writer displays a default setting of 10 levels of headings when it builds the table of contents (or the number of levels used in the document, whichever is smaller). To change the number of levels, enter the required number in the Evaluate up to level box.
Creating from additional styles
Writer automatically assigns to the table of contents all paragraphs formatted with the default heading styles (Heading 1, Heading 2, and so on). To assign paragraphs formatted with other styles, including custom styles:
- In the Create from area, select the Additional Styles checkbox.
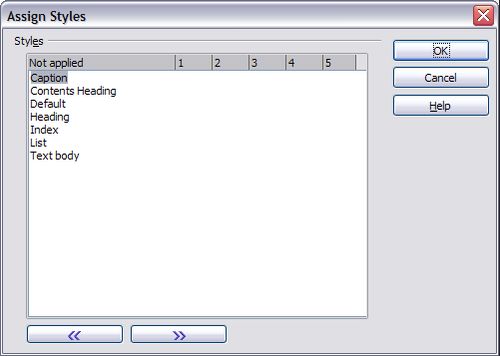
- Click the (...) button to the right of the checkbox. The Assign Styles dialog box opens.
- In the Not applied column, click the style that you want to assign to the table of contents.
- Use the >> button to move the selected style to the desired outline level. For example, to have paragraphs formatted with the selected style to appear as top-level entries in the table of contents, click the >> button once to move the style into the 1 column. To move the style in the opposite direction, use the << button.
- Click OK to save your changes and return to the Index/Table tab or click Cancel to return without saving your changes.
| Content on this page is licensed under the Creative Common Attribution 3.0 license (CC-BY). |

