Difference between revisions of "Documentation/OOo3 User Guides/Writer Guide/Entries page"
Clairedwood (Talk | contribs) ((checkpoint save)) |
Clairedwood (Talk | contribs) |
||
| Line 9: | Line 9: | ||
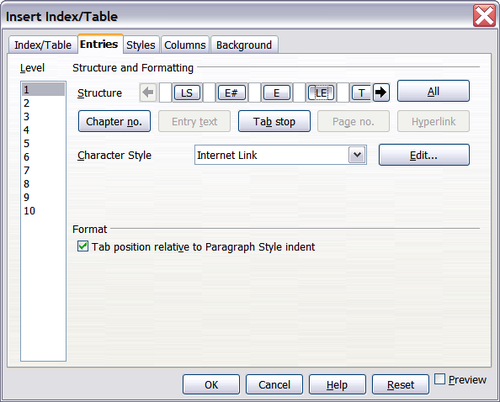
[[Image:WG3-12-6.png|thumb|none|500px|''Entries page of Insert Index/Table dialog box.'']] | [[Image:WG3-12-6.png|thumb|none|500px|''Entries page of Insert Index/Table dialog box.'']] | ||
| − | + | Click on a number in the Level column to select the outline level whose elements you want to format. This will display the Structure line which contains the elements included in the entries for that level. The available elements are displayed just below the structure line and are grayed out if already included: | |
| − | + | ||
* The '''E#''' button represents the “chapter number”, which means the heading number, not just for chapters but also for other levels of headings. | * The '''E#''' button represents the “chapter number”, which means the heading number, not just for chapters but also for other levels of headings. | ||
| − | * The '''E''' button represents the | + | * The '''E''' button represents the chapter (or sub-chapter) text. |
* The '''T''' button represents a tab stop. | * The '''T''' button represents a tab stop. | ||
| − | * The ''' | + | * The '''#''' button represents the page number. |
| − | * The '''LS''' button represents the start of a hyperlink. (This button does not appear on the default | + | * The '''LS''' button represents the start of a hyperlink. (This button does not appear on the default Structure line.) |
| − | * The '''LE''' button represents the end of a hyperlink. (This button does not appear on the default | + | * The '''LE''' button represents the end of a hyperlink. (This button does not appear on the default Structure line.) |
Each white field on the ''Structure'' line represents a blank space. You can add custom text if you desire. | Each white field on the ''Structure'' line represents a blank space. You can add custom text if you desire. | ||
| Line 22: | Line 21: | ||
{{Documentation/Note| If the chapter number defined for your document includes the word “Chapter” before the number itself, then the '''E#''' field in the table of contents will also include the word “Chapter”. If you want to include the chapter number with the page number (for example, in the style “'''1-1''', '''1-2''', ...”) , you will find that the page number appears in the table of contents as “'''Chapter 1-1'''”, which is probably not what you want.}} | {{Documentation/Note| If the chapter number defined for your document includes the word “Chapter” before the number itself, then the '''E#''' field in the table of contents will also include the word “Chapter”. If you want to include the chapter number with the page number (for example, in the style “'''1-1''', '''1-2''', ...”) , you will find that the page number appears in the table of contents as “'''Chapter 1-1'''”, which is probably not what you want.}} | ||
| − | === Changing elements | + | ==Adding elements== |
| + | |||
| + | To add an element to the ''Structure'' line: | ||
| + | |||
| + | <ol><li> Click in the white field where you want to insert the element. | ||
| + | <li> Click one of the five buttons just below the ''Structure'' line. (For example, to add a tab, click the '''Tab stop''' button.) A button representing the new element appears on the ''Structure'' line. | ||
| + | * To add custom text, such as the word ''Chapter'', type the text in the white field. | ||
| + | |||
| + | == Changing elements == | ||
To change an element in the ''Structure'' line, click the button representing that element and then click the element that you want to substitute in the row of buttons just below the ''Structure'' line. For example, to change a chapter number to a tab stop, click the '''E#''' button on the ''Structure'' line (it shows then as being pressed) and then click the '''Tab stop''' button in the row of available elements. | To change an element in the ''Structure'' line, click the button representing that element and then click the element that you want to substitute in the row of buttons just below the ''Structure'' line. For example, to change a chapter number to a tab stop, click the '''E#''' button on the ''Structure'' line (it shows then as being pressed) and then click the '''Tab stop''' button in the row of available elements. | ||
| − | + | == Deleting elements == | |
To delete an element from the ''Structure'' line, click the button representing that element and then press the ''Delete'' key on your keyboard. For example, to delete a tab stop, click the '''T''' button and then press the ''Delete'' key. | To delete an element from the ''Structure'' line, click the button representing that element and then press the ''Delete'' key on your keyboard. For example, to delete a tab stop, click the '''T''' button and then press the ''Delete'' key. | ||
| − | |||
| − | |||
| − | + | == Hyperlinking an entry == | |
| − | + | ||
| − | + | ||
| − | + | ||
To change the default ''Structure'' line so that the chapter number and the entry text form a hyperlink, follow these steps: | To change the default ''Structure'' line so that the chapter number and the entry text form a hyperlink, follow these steps: | ||
| Line 46: | Line 48: | ||
[[Image:WG3-12-7.png|thumb|none|500px|''Hyperlink in table of contents.'']] | [[Image:WG3-12-7.png|thumb|none|500px|''Hyperlink in table of contents.'']] | ||
| − | + | == Applying character styles == | |
| − | + | ||
| − | + | You might want an element to be a bit different from the rest of the line. For example, you might want the page number to be bold. To apply a character style to an element: | |
| − | + | ||
| + | <ol><li> Be sure you have defined a suitable character style. | ||
| + | <li> On the ''Structure'' line, click the button representing the element to which you want to apply a style. | ||
| + | <li> From the ''Character Style'' drop-down list, select the desired style.</li></ol> | ||
To view or edit the attributes of a character style, select the style from the ''Character Style'' drop-down list and then click the '''Edit''' button. | To view or edit the attributes of a character style, select the style from the ''Character Style'' drop-down list and then click the '''Edit''' button. | ||
| + | |||
{{Documentation/Tip| The default character style for hyperlinks is ''Internet Link'', which by default is underlined and shown in blue. If you want the table of contents entries to work as hyperlinks, but not have them underlined and blue, you can change the attributes of the Internet Link character style. However, this changes the attributes of ''all'' hyperlinks in the document. | {{Documentation/Tip| The default character style for hyperlinks is ''Internet Link'', which by default is underlined and shown in blue. If you want the table of contents entries to work as hyperlinks, but not have them underlined and blue, you can change the attributes of the Internet Link character style. However, this changes the attributes of ''all'' hyperlinks in the document. | ||
| Line 58: | Line 63: | ||
If you want other hyperlinks (for example, website addresses) to remain in the default style, change the character style selection for table of contents entries to ''Index Link''. If necessary, change the attributes for Index Link to what you want.}} | If you want other hyperlinks (for example, website addresses) to remain in the default style, change the character style selection for table of contents entries to ''Index Link''. If necessary, change the attributes for Index Link to what you want.}} | ||
| − | + | == Applying changes to all outline levels == | |
To apply the displayed structure and formatting to all outline levels, click the '''All''' button. | To apply the displayed structure and formatting to all outline levels, click the '''All''' button. | ||
| − | + | == Tab position relative to Paragraph Style indent == | |
| − | When this | + | When this option is selected, entries are indented according to the settings of their individual formats. Where a paragraph style specifies an indent on the left, tab stops are relative to this indent. If this option is not selected, tab stops are relative to the left margin position. |
| − | + | ||
{{CCBY}} | {{CCBY}} | ||
[[Category: Writer Guide (Documentation)]] | [[Category: Writer Guide (Documentation)]] | ||
Revision as of 14:11, 4 June 2010
- Tables of contents
- Customizing a table of contents
- Using the Index/Table page
- Using the Entries page
- Using the Styles, Columns, and Background pages
- Maintaining a table of contents
- Alphabetic indexes
- Customizing index entries
- Customizing the appearance of an index
- Maintaining an index
- Other types of indexes
- Bibliographies
- Creating a bibliographic database
- Adding a reference (citation) into a document
- Formatting the bibliography
- Defining the paragraph style for the bibliography
- Updating and editing an existing bibliography
Use the Entries page to define and format the entries in the TOC. Each outline level can be styled independently from the other levels by adding and deleting elements.

Click on a number in the Level column to select the outline level whose elements you want to format. This will display the Structure line which contains the elements included in the entries for that level. The available elements are displayed just below the structure line and are grayed out if already included:
- The E# button represents the “chapter number”, which means the heading number, not just for chapters but also for other levels of headings.
- The E button represents the chapter (or sub-chapter) text.
- The T button represents a tab stop.
- The # button represents the page number.
- The LS button represents the start of a hyperlink. (This button does not appear on the default Structure line.)
- The LE button represents the end of a hyperlink. (This button does not appear on the default Structure line.)
Each white field on the Structure line represents a blank space. You can add custom text if you desire.
Adding elements
To add an element to the Structure line:
- Click in the white field where you want to insert the element.
- Click one of the five buttons just below the Structure line. (For example, to add a tab, click the Tab stop button.) A button representing the new element appears on the Structure line.
- To add custom text, such as the word Chapter, type the text in the white field.
Changing elements
To change an element in the Structure line, click the button representing that element and then click the element that you want to substitute in the row of buttons just below the Structure line. For example, to change a chapter number to a tab stop, click the E# button on the Structure line (it shows then as being pressed) and then click the Tab stop button in the row of available elements.
Deleting elements
To delete an element from the Structure line, click the button representing that element and then press the Delete key on your keyboard. For example, to delete a tab stop, click the T button and then press the Delete key.
Hyperlinking an entry
To change the default Structure line so that the chapter number and the entry text form a hyperlink, follow these steps:
- On the Structure line, place the cursor in the white field to the left of the E# button.
- Click the Hyperlink button. An LS button, representing the start of the hyperlink, appears on the Structure line.
- On the Structure line, place the cursor in the white field to the right of the E button.
- Click the Hyperlink button again. An LE button, representing the end of the hyperlink, appears on the Structure line.
The figure below represents the completion of the above steps. The number and the text of the entries on that level will now be hyperlinks.
 Hyperlink in table of contents.
Applying character styles
You might want an element to be a bit different from the rest of the line. For example, you might want the page number to be bold. To apply a character style to an element:
- Be sure you have defined a suitable character style.
- On the Structure line, click the button representing the element to which you want to apply a style.
- From the Character Style drop-down list, select the desired style.
To view or edit the attributes of a character style, select the style from the Character Style drop-down list and then click the Edit button.
Applying changes to all outline levels
To apply the displayed structure and formatting to all outline levels, click the All button.
Tab position relative to Paragraph Style indent
When this option is selected, entries are indented according to the settings of their individual formats. Where a paragraph style specifies an indent on the left, tab stops are relative to this indent. If this option is not selected, tab stops are relative to the left margin position.
Content on this page is licensed under the Creative Common Attribution 3.0 license (CC-BY).
