Arranging, anchoring, and aligning
- Adding images to a document
- Modifying an image
- Cropping, resizing, rotating, and other settings
- Using Writer's drawing tools
- Positioning graphics within the text
- Arranging, anchoring, and aligning
- Wrapping text around graphics
- Examples of wrapping
- Adding captions to graphics
- Adding an image to the Gallery
- Graphic file types supported
Arranging graphics
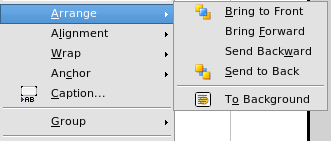
Arranging a graphic object means to determine its vertical position relative to other graphic objects or text. Arranging is only relevant when objects are overlapping. You can choose between four settings, plus a special setting for drawing objects.
- Bring to Front: places the graphic on top of any other graphics or text.
- Bring Forward: brings the object one level up in the stack (z-axis). Depending on the number of overlapping objects, you may need to apply this option several times to obtain the desired result.
- Send Backward: the opposite of Bring Forward; sends the selected object one level down in the object stack.
- Send to Back: sends the selected graphic to the bottom of the stack, so that other graphics and text cover it.
- To Background / To Foreground: only available for drawing objects; moves the drawing object behind or in front of the text respectively.
Anchoring graphics
You can anchor graphics as a character or to a page, paragraph, or character. You can also place graphics in a frame and anchor the frame to a page, paragraph, or character. Which method you choose depends on what you are trying to achieve.
Here are the ways you can anchor graphics or drawing objects:
To Page
The graphic keeps the same position in relation to the page margins. It does not move as you add or delete text or other graphics. This method is useful when the graphic does not need to be visually associated with a particular piece of text. It is often used when producing newsletters or other documents that are very layout intensive, or for placing logos in letterheads.
| If you plan to use a document within a master document, do not anchor graphics To Page because the graphics will disappear from the master document. See Chapter 13 (Working with Master Documents) for more information. |
To Paragraph
The graphic is associated with a paragraph and moves with the paragraph. It may be placed in the margin or another location. This method is useful as an alternative to a table for placing icons beside paragraphs.
To Character
The graphic is associated with a character but is not in the text sequence. It moves with the paragraph but may be placed in the margin or another location. This method is similar to anchoring to a paragraph but cannot be used with drawing objects.
As Character
The graphic is placed in the document like any other character and, therefore, affects the height of the text line and the line break. The graphic moves with the paragraph as you add or delete text before the paragraph. This method is useful for keeping screenshots in sequence in a procedure (by anchoring them as a character in a blank paragraph) or for adding a small (inline) icon in sequence in a sentence.
To Frame
If the graphic has been placed in a frame, you can anchor the graphic in a fixed position inside the frame. The frame can then be anchored to the page, a paragraph, or a character, as required.
Aligning graphics
Once you have established the anchor point of the graphic, you can decide the position of the graphic relative to this anchor: this is called aligning the graphics. Choose from six options: three for aligning the graphic horizontally (left, center, right) and three for aligning the graphic vertically (top, center, bottom). Horizontal alignment is not available for images anchored as character.
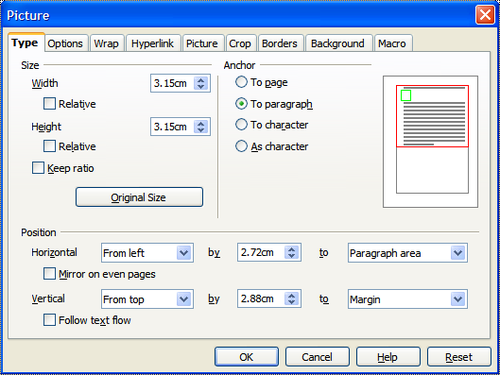
For finer control of the alignment, use the Position options on the Type page of the Picture dialog box, shown below.
For both the horizontal and vertical position, start by picking the reference point in the right hand side drop down menu, then select in the first drop down menu among Left, Right or Center. If you select the value From left (or From top for the vertical positioning) you can specify the amount in your selected unit of measurement. In the example above, the upper-left corner of the image will be placed at 2.72 cm from the left margin of the page horizontally and on the top margin vertically.
| Content on this page is licensed under the Creative Common Attribution 3.0 license (CC-BY). |

